Key Takeaways
- To create a high-quality video podcast, prioritize core equipment including audio, camera, and lighting, with audio being the most important aspect.
- A simple and reliable setup that achieves crystal-clear audio and sharp, well-lit video is more important than a complex rig with multiple gadgets and features.
- When investing in gear, consider your goals and budget, and break down options into starter, pro, and studio tiers to choose the right equipment for your specific needs and level of production.
Ready to jump into video podcasting? The sheer amount of gear can feel overwhelming. Let's cut through the noise. To create a show that looks and sounds fantastic, you only need to nail a few core pieces of equipment.
Think of your podcast's quality as resting on three pillars: your audio (the engine), your camera (the body), and your lighting (the headlights). If one fails, the whole thing sputters. You can have the slickest 4K video, but if your audio sounds like you're broadcasting from a tin can, your audience is gone. Prioritize audio first; it will always be king.
Your Essential Video Podcasting Gear Checklist
To start, get a solid USB mic and a good webcam. When you’re ready to level up, upgrade to a mirrorless camera and an XLR microphone with an audio interface. This will make a night-and-day difference in your production value. Your goal is always the same: achieve crystal-clear audio and sharp, well-lit video. Get those right, and you've won half the battle.
The Three Pillars Of Production Quality
Forget the endless list of gadgets and focus on these three elements. A simple, reliable setup that nails these will always beat a complex rig that's poorly executed.
- Camera: This is how your audience sees you. Use it to capture your expressions and create a real connection that audio-only formats can't match.
- Audio: This is the bedrock of your show. Make it non-negotiable. People will forgive a grainy video, but they will click away in seconds if the sound is bad.
- Lighting: This is your magic ingredient. Use good lighting to separate your home video from a professional production. It makes you pop from the background, gets rid of harsh shadows, and makes everything look better.
For a more detailed breakdown of specific gear recommendations for every budget, check out our guide here.
Start small and prioritize gear that is dead simple and reliable. Every new cable or gadget is another thing that can break mid-recording. Master the basics before you add complexity.
Planning Your Gear Investment
The right setup depends entirely on your goals and budget. To make it easier, break down the options into three common tiers.
- Starter: Choose this tier if you're just dipping your toes in. Focus on ease of use and affordability without sacrificing too much quality.
- Pro: Select this tier when you are ready to invest in better production value and want more creative control over your look and sound.
- Studio: Opt for top-shelf gear if you are a business or professional who needs broadcast-quality results without compromise.
Thinking about the whole ecosystem, from gear to software? This guide on the best streaming setup is a fantastic resource. Understand these tiers from the start to build a studio you can grow with, not one you'll outgrow in six months.
Choosing the Right Camera for Your Podcast
Your camera is the window your audience looks through to connect with you. It sets the visual tone for your show and plays a huge part in how professionally your brand comes across.
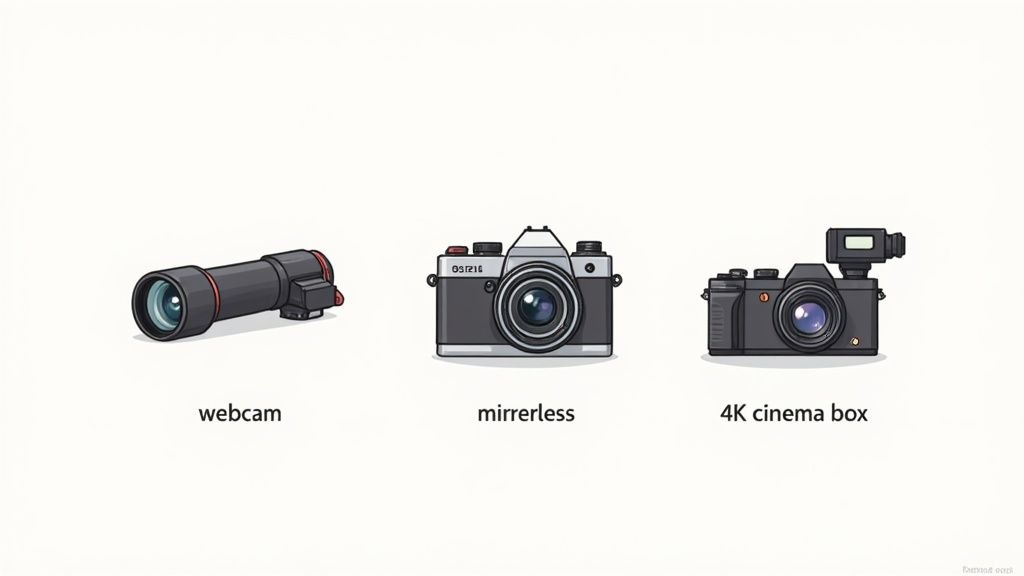
Let's make choosing one simple. Think of your camera options like vehicles. A webcam is your reliable daily driver, a mirrorless camera is a do-it-all SUV, and a cinema camera is a high-performance machine. To pick the right one, decide where you want to go with your podcast.
The Reliable Daily Driver: Webcams
If you're just starting, get a quality webcam. It's the fastest and most straightforward way to get rolling. They’re built for simplicity: plug it in, and you’re good to go. Modern webcams offer crisp 1080p or even 4K resolution that looks great on platforms like YouTube.
The biggest win here is the sheer ease of use. You can sidestep the learning curve of lenses and manual settings. This lets you put all your energy into your content without getting tripped up by the tech.
- Choose This For: Solo creators, beginners, or anyone who values a streamlined, no-fuss workflow.
- Key Actionable Advantage: Forget extra cables or accessories that can fail mid-recording. Just plug and play.
- Top Picks: Look at models like the Logitech Brio 4K or Razer Kiyo Pro.
The trade-off? Webcams have small sensors. This means they struggle in low light and won't give you that creamy, blurred background (known as bokeh) that makes professional video pop.
The Versatile SUV: Mirrorless and DSLR Cameras
Upgrade to a mirrorless or DSLR camera when you're ready to level up your production value. These cameras are a massive leap forward in visual quality, thanks to their larger sensors and interchangeable lenses. This is how you unlock real creative control.
A bigger sensor pulls in more light, which gives you a cleaner, richer picture. But the ability to swap lenses is the real game-changer. To create that beautiful background blur, choose a lens with a wide aperture (like f/1.8). This will make you stand out from your environment.
Don't get fixated on 4K while ignoring the sensor and lens. A 1080p mirrorless camera with a good lens and proper lighting will always look more professional than a 4K webcam in a dim room.
To use a mirrorless or DSLR for live recording, you’ll need a capture card. This device converts your camera's HDMI output into a signal your computer recognizes as a webcam. It’s an extra step, but the dramatic jump in quality is worth it. To see exactly how this fits into a full setup, our complete guide to video podcast production maps it all out.
The High-Performance Machine: Cinema Cameras
When you need broadcast-level quality, choose a cinema camera. These are purpose-built tools designed to capture the best possible video. They offer incredible dynamic range, meaning they capture far more detail in the bright highlights and dark shadows of your shot.
Cinema cameras also come packed with pro features like high-quality audio inputs (XLR), built-in ND filters to control bright light, and recording formats that give you maximum flexibility for color grading in post-production.
This tier of equipment is a serious investment. Choose it if you're an established brand, production studio, or B2B company where every piece of content needs to scream premium.
Use this table to make your decision:

Ultimately, your camera choice should line up with your budget and technical comfort level. Start where you're comfortable, master the gear you have, and never forget that great lighting and audio will always be your most powerful allies.
Mastering Audio for Your Video Podcast

Let's get one thing straight: while your camera gets all the glory, your audio quality is what makes people stay. You could shoot in glorious 4K, but if your sound is a muffled, crackly mess, you've lost your audience. Make audio the absolute foundation of your podcast.
Poor audio screams "amateur" and distracts from your message. This is why your investment in equipment for video podcasting must start with the microphone. The great news? Getting that crisp, professional sound is easier and more affordable than you think.
The demand for better gear has exploded. The global podcast equipment market, valued at around $3.7 billion in 2025, is on track to nearly double to $7.2 billion by 2033. This isn't just hype; it's creators like you demanding broadcast-quality tools to make their voices heard.
The Great Debate: USB vs. XLR Microphones
Your first big audio decision is choosing between two main microphone types: USB and XLR.
A USB microphone is your plug-and-play, all-in-one solution. It has a built-in converter that lets you connect it directly to your computer. Simple, fast, and effective.
An XLR microphone is the pro-level choice. It requires a separate piece of hardware called an audio interface to connect to your computer. This extra step is worth it, delivering better sound quality, durability, and the freedom to expand your setup with multiple mics down the road.
For most people starting, a top-tier USB mic is more than enough. But if you're serious and can see a future with co-hosts, plan for an XLR setup from the get-go. It's the smarter long-term play.
The audio interface becomes the central command for your sound. It takes the analog signal from your XLR mic, converts it to digital, and gives you physical knobs to control volume (gain). You can also plug in headphones to monitor your sound in real-time. This hands-on control is a lifesaver, letting you adjust levels on the fly without fumbling through software menus.
For a deeper dive into specific models, check out our guide on choosing the best microphones for podcast recording.
Dynamic vs. Condenser Mics: What's the Difference?
Beyond how they connect, mics also differ in how they capture sound. The two you'll hear about most are dynamic and condenser.
- Dynamic Microphones: These are the workhorses of broadcasting. They’re fantastic at rejecting background noise, making them perfect for recording in imperfect spaces (like your home office). They zero in on the sound right in front of them, minimizing room echo and keyboard clicks.
- Condenser Microphones: These mics are far more sensitive. They capture a richer, more detailed "studio" sound. But there's a catch: they pick up everything, the hum of your air conditioner, a distant dog bark. If it makes a noise, a condenser mic will hear it.
For most at-home video podcasters, choose a dynamic microphone. It's the safer, more practical choice that delivers a clean, focused vocal track without forcing you to build a sound booth.
Audio Gear Recommendations by Tier
Match your gear to your ambition and your budget. Use this breakdown to get started on the right foot.

One non-negotiable rule, no matter your budget: always use wired headphones to monitor your audio while recording. Bluetooth headphones introduce a slight delay (latency) that will throw you off. Wearing headphones lets you hear exactly what your audience hears, so you can catch issues before they ruin a take.
Building a Professional Lighting Setup
If great audio is the soul of your video podcast, lighting gives it a body. It’s the magic that lifts your show from looking like a flat, grainy webcam call to a dynamic, professional production.
Good lighting isn’t just about making sure people can see you; it’s about shaping how they see you. It carves out your features, separates you from the background, and kills harsh shadows. Getting your lighting right is one of the highest-impact upgrades you can make.
Understanding Three-Point Lighting
The gold standard in video work is a technique called three-point lighting. The idea is simple: use three different lights to shape your subject perfectly.
- Key Light: This is your main and brightest light. Place it about 45 degrees off to one side to cast the strongest light on you.
- Fill Light: Set this up on the opposite side of the key light. Make it a bit softer. Its only job is to fill in the shadows created by the key light for a cleaner, more flattering look.
- Back Light: Place this light behind you. It creates a subtle glow around your head and shoulders, making you "pop" off the background. This touch adds a ton of depth and professionalism.
This trio ensures you’re evenly lit. It’s a core concept to master for your equipment for video podcasting.
Don't get overwhelmed trying to get all three perfect from day one. Just start with a good key light. A single, soft light source will make a world of difference compared to the overhead light in your office.
Choosing the Right Lights for Your Space
When you start looking at lights, you'll see LED panels everywhere. There's a good reason for that. They don't get hot, they sip energy, and they give you incredible control over brightness and color temperature.
If you're just starting, a ring light is a great, budget-friendly option. It wraps you in a soft, even light that works well for solo shots.
Once you're ready to level up, get a kit with two or three LED panels and softboxes. A softbox is a fabric hood that goes over your light, diffusing it to create a much softer, more forgiving glow. It's the secret to that high-end studio look.
For a deeper dive into all the gear you'll need, check out our complete guide to podcast studio equipment. We break down everything you need, piece by piece.
Connecting Your Gear for a Seamless Workflow
You’ve picked out your camera, mic, and lights. Now, make it all play nice together. This is where capture cards, switchers, and accessories turn a pile of electronics into a production powerhouse.
Think of this part of your setup as the central nervous system. Your camera and microphone are the eyes and ears, but without a way to route those signals to your computer, you can't record anything. Nailing this step prevents frustrating, glitchy recording sessions.
The demand for these tools is exploding. The video podcast software market alone is on track to blow past $500 million in 2025, with an expected annual growth rate of nearly 15% through 2033. This growth is all about creating robust tools that make recording and distributing high-quality video easier. You can read more about the video podcast software market trends here.
The Brain of Your Operation: Video Capture Cards
If you’re using a mirrorless or DSLR camera, a video capture card is non-negotiable. It's a vital device that translates your camera’s high-quality HDMI signal into a format your computer can understand, basically, it makes your fancy camera look like a simple webcam.
Without one, your computer has no idea what to do with the feed from your camera. A good capture card delivers a stable, high-fidelity connection and prevents lag or glitches that can ruin a take.
- External Capture Cards: These are the most common and easiest to use. Get a device like the Elgato Cam Link 4K. It's a plug-and-play USB dongle that gets you running in minutes.
- Internal Capture Cards: For permanent studio setups, an internal PCIe card plugs right into your computer's motherboard for the most stable connection possible.
For most podcasters, a solid external card is the perfect balance of performance and flexibility.
Managing Multiple Feeds with Video Switchers
When your show involves more than one camera, or you want to mix in screen shares and graphics on the fly, a video switcher becomes your command center. This hardware lets you jump between different video sources with the push of a button, creating a dynamic, live-edited production.
Imagine you have a wide shot, a close-up on the host, and another on your guest. A switcher, like the ATEM Mini Pro from Blackmagic Design, lets you cut between these angles just like a professional TV broadcast. This simplifies post-production and adds a layer of polish to your show.
A switcher is a game-changer for multi-camera workflows. Instead of syncing a bunch of video files in your editor, you can produce a finished product in real-time. The hours you save are immense.
A key part of making any camera setup look its best is lighting. This diagram breaks down the classic three-point lighting technique we talked about earlier.
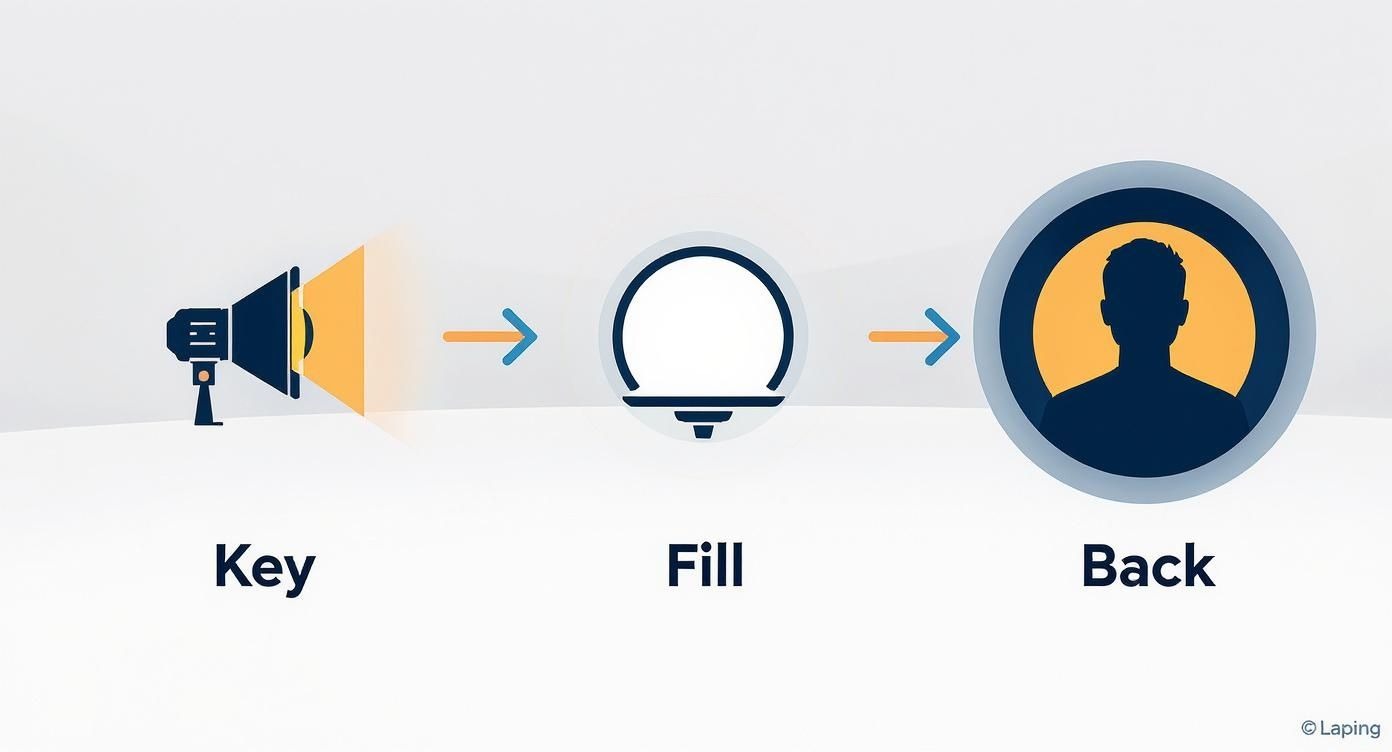
Use it as a simple visual guide for how the key, fill, and back lights work together to create a professional, three-dimensional look that makes you pop from the background.
Don't Forget the Supporting Cast: Cables and Mounts
Now for the less glamorous, but equally critical, gear. High-quality cables and sturdy mounts are your best defense against technical failures.
- Cables: Don't cheap out here. Invest in reliable HDMI and XLR cables. A flimsy cable is usually the first thing to fail, causing signal dropouts, flickers, and crackles.
- Tripods and Mounts: A wobbly camera is incredibly distracting. Get a solid tripod for your camera and a boom arm for your microphone. A boom arm lets you get the mic close to your mouth for that rich, broadcast sound while keeping it out of the camera's frame.
Making a Smart Investment in Your Podcast Gear
For any serious business, a video podcast is a strategic asset. When you think about your equipment for video podcasting this way, it stops being an expense and becomes an investment in your brand's future. The quality of your show directly shapes how potential customers see your company.
High-quality video and audio feel more professional and authoritative. A polished show leads to more people sticking around, better leads, and faster brand growth. Your gear is the foundation on which you're building your credibility on.
The audio and video equipment market is on track to jump from $297.94 billion in 2024 to over $348.68 billion by 2029. This is driven by the explosion of podcasting and digital media, signaling a clear shift toward higher production standards.
Calculating Your Potential Return on Investment
To get budget approval for podcast gear, show the return on that investment (ROI). The right equipment has a real, measurable impact on key business metrics.
- Improve Brand Perception: A slick, professionally produced show instantly positions you as an industry leader.
- Increase Lead Quality: When viewers are impressed by your content quality, they're far more likely to become qualified leads.
- Boost Audience Growth: Superior audio and video make people watch longer and share more often, which is the secret to organic growth.
As you think about the financial side, understand how podcasters make money to ensure your equipment choices support your long-term goals. When you connect production quality to these business outcomes, building the case for the investment becomes much easier.
Smart Procurement Strategy: Start Small or Go All-In?
Do you bootstrap with a minimal setup, or build out a full studio from day one? The answer depends on your immediate goals and resources.
The smartest path is often a phased approach. Start with high-quality, reliable "prosumer" gear. It delivers excellent results without the price tag of a full studio. This gives you a chance to master your workflow and prove the concept's value before you ask for a bigger budget.
For a detailed breakdown of what gear you'll need at each stage, our guide on the essential podcasting equipment needed lays out a clear roadmap. It helps you scale your investment intelligently as your podcast takes off.
Pre-Publish Checklist for Branded Podcasts
Before you publish, run this quick final check to ensure every episode is high-quality and aligned with your business goals.
- Check Visual Branding Consistency: Are your brand colors, logos, and on-screen graphics showing up correctly?
- Verify Audio Clarity: Listen one last time. Is there any background noise, echo, or volume jumps?
- Confirm Call-to-Action (CTA) Clarity: Is your CTA punchy, clear, and easy for the audience to act on?
- Review Lower Thirds and Titles: Are all guest names, titles, and topics spelled correctly and easy to read?
- Test All Distribution Links: Click every link in your show notes and descriptions. Do they work and go to the right place?
Your Top Video Podcast Equipment Questions, Answered
Jumping into video podcasting can feel overwhelming. Whether you're just starting or looking to level up, a few questions always pop up. Let's get you some straight answers on the gear you actually need.
Do I Really Need a 4K Camera to Start?
No. Especially not right out of the gate.
A crisp 1080p camera, paired with great lighting and even better audio, will blow a poorly lit 4K video out of the water every time. Big platforms like YouTube and Spotify are built to make 1080p content look fantastic.
Sink your initial budget into your sound and lighting first. Those two elements have a much bigger impact on how professional your show feels. You can always jump to 4K later as your channel and your budget. What's the One Piece of Gear I Absolutely Can't Skimp On?
Your microphone. No question.
Audiences have almost zero patience for bad audio. Crackling, echo, or muffled sound is the fastest way to get someone to click away. They'll forgive slightly grainy video, but they won't sit through audio that’s painful to listen to.
If you nail one thing, make it your sound. A clear, rich microphone does more to signal quality and professionalism than any other single piece of equipment you can buy.
Your audio is the foundation of your entire show. If you get one thing right, make it your sound. Viewers might tolerate grainy video, but they will not tolerate bad audio. It immediately signals an amateur production and undermines your credibility.
How Should I Handle Recording with Remote Guests?
Use a dedicated remote recording platform. Trying to record a Zoom call is a recipe for disaster. Services like Riverside.fm, Zencastr, or SquadCast are the industry standard for a reason.
Here's how they work:
- Local Recordings: Instead of capturing the choppy video from your internet call, these platforms record each person's audio and video directly on their own computer.
- High-Quality Files: After the recording, those pristine, high-resolution files are uploaded. This sidesteps any internet glitches, lag, or compression that plague normal video calls.
For the best possible result, give your guests a heads-up. Ask them to use an external microphone if they have one and to find a quiet room without much echo. A little prep goes a long way in making the final cut sound incredible.
Ready to turn your B2B expertise into a powerful lead-generation engine? At Fame, we specialize in producing professional, results-driven podcasts for businesses. We handle the production, so you can focus on the content. Learn more and book a call at Fame.