Key Takeaways
- Investing in the right microphone is crucial for professional audio quality and keeping listeners engaged, as it shapes the podcast's entire sonic identity.
- The choice between USB and XLR microphones depends on the desired level of flexibility and professional quality, with USB being perfect for beginners and XLR offering more advanced features.
- Dynamic and condenser microphones serve different purposes, with dynamic mics being less sensitive and suitable for untreated rooms, and condenser mics capturing rich, detailed sound in quiet, controlled spaces.
Picking the right microphone for podcast recording is the single most important decision you'll make for your show's sound quality. It's the foundation of professional audio and the one thing that will keep listeners engaged. While other gear matters, your mic is what shapes your podcast's entire sonic identity.
Your Foundation for Great Podcast Audio
Think of your microphone as more than just a piece of tech; it's the direct line connecting you to your audience. Your content is the message, but your microphone is the messenger. If that messenger mumbles or is hard to understand, the message gets lost, no matter how brilliant it is. This is why investing in the right microphone from day one isn't just a good idea; it's a non-negotiable for any serious podcaster.
A lot of new creators get sidetracked by video, but for podcasts, audio is king. As our founder, Tom Hunt, often says, "Great audio is more important than great video." Listeners will forgive a grainy webcam, but they will hit "stop" in a heartbeat if they're met with tinny, distorted, or echoey sound. You can fix a poorly lit shot in post-production, but there’s no magic button to truly save a bad recording. Our complete guide to podcasting equipment dives deeper into why audio is the one thing you have to get right.
Key Microphone Concepts to Understand
Before you start browsing specific models, you need to get a handle on the two fundamental choices you’ll face right out of the gate:
- USB vs. XLR: This is all about how the microphone connects to your computer. USB mics are the definition of plug-and-play, making them perfect for beginners. XLR mics are the industry standard, offering more flexibility and professional quality, but they do require a separate piece of gear called an audio interface.
- Dynamic vs. Condenser: This describes the technology inside the microphone. Dynamic mics are workhorses, built to be less sensitive and fantastic at rejecting background noise. They're a godsend for anyone recording in an untreated room (like a spare bedroom or office). Condenser mics are much more sensitive, capturing rich, detailed sound with incredible clarity, but they're best used in quiet, controlled spaces that resemble a studio.
This decision tree gives you a quick visual on how to pick a microphone based on your specific podcasting situation.
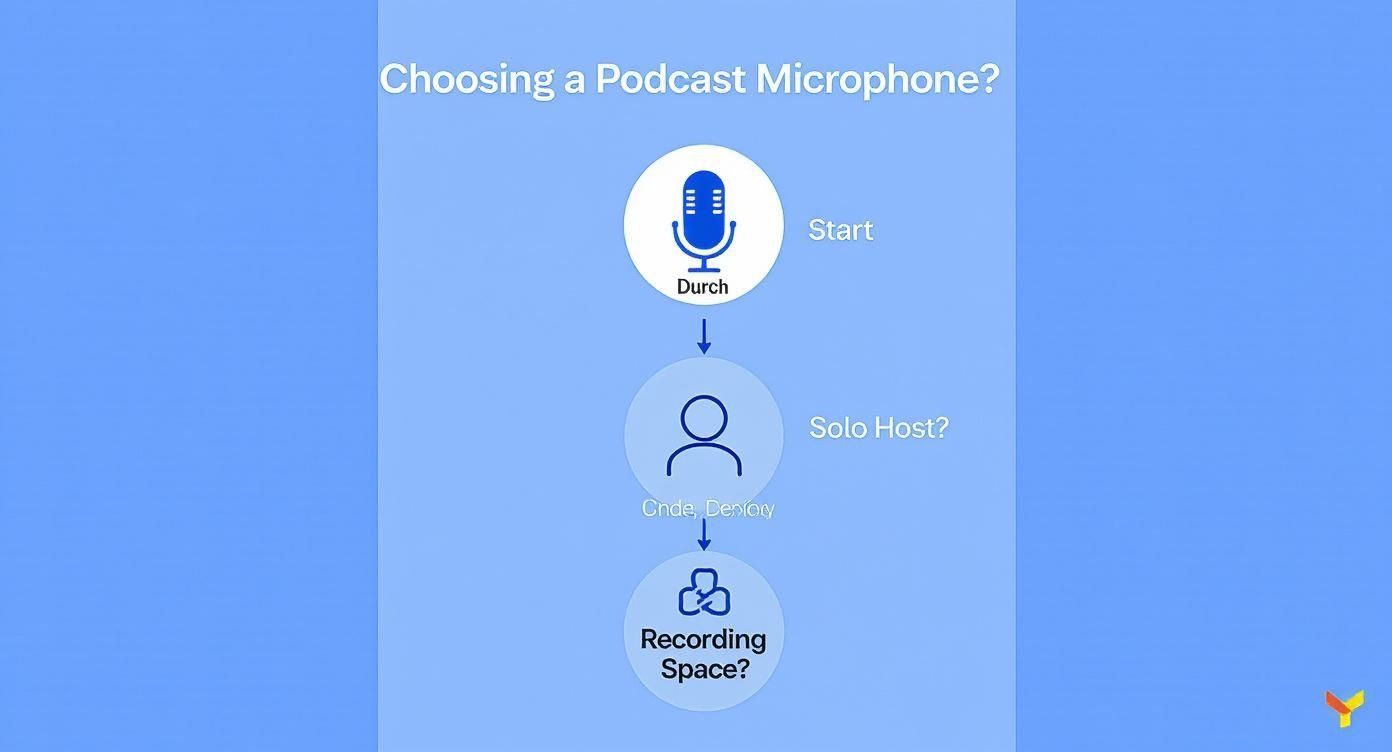
As the infographic makes clear, your recording environment and the format of your show are the biggest factors that should guide your microphone choice.
Making the right call here sets the stage for everything that follows. It impacts your workflow, your editing time, and, most importantly, what your listener actually hears. Getting these core concepts down is the first real step toward building the best podcasting setup for your needs and creating a show that sounds polished and professional from the jump.
Quick Guide to Choosing Your Podcast Microphone
Use this table to quickly match your podcasting needs with the right type of microphone technology and setup.
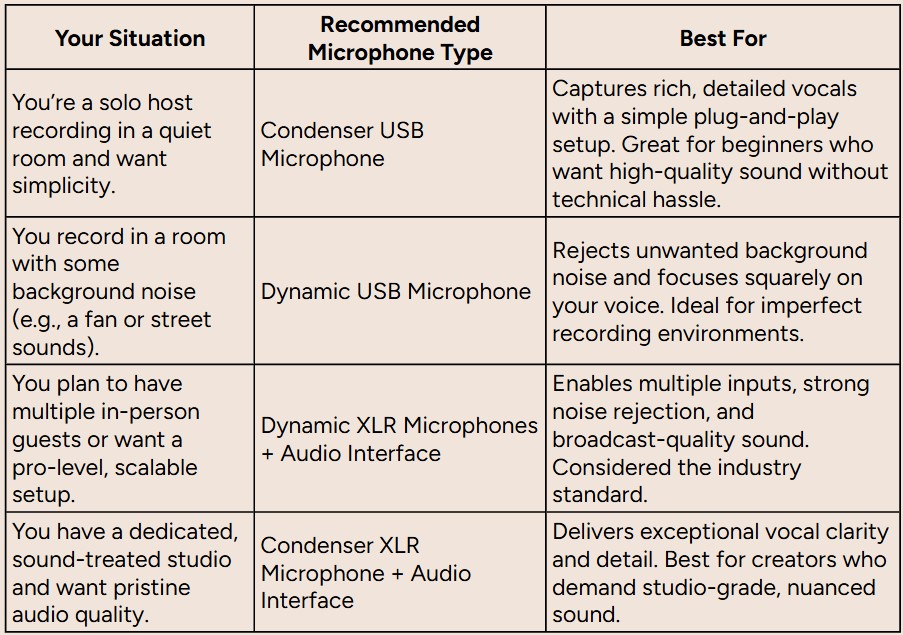
This table should give you a solid starting point. Remember, the goal isn't just to buy a "good" microphone; it's to buy the right microphone for your specific show, space, and workflow.
Choosing Between Dynamic and Condenser Mics
When you start looking at microphones for podcast recording, you'll quickly run into two main types: dynamic and condenser. Getting the difference between them is probably the single most important choice you'll make for your sound quality, right after sorting out your recording space.
This isn't about which one is "better" overall. It's about which one is better for you and your show.
Think of it like this: a dynamic microphone is like a spotlight operator at a concert. Its whole job is to focus tightly on the lead singer (your voice) and ignore everything else: the drummer, the crowd, the buzzing amp. This makes it a real workhorse for most podcasters.
A condenser microphone, on the other hand, is like the house lights in a grand theater. It’s built to illuminate everything, capturing every last whisper and subtle detail with stunning clarity. In the right room, that sensitivity is its greatest strength. In the wrong one, it's a huge liability.
The Sturdy Workhorse: Dynamic Microphones
Dynamic mics are known for two things: being tough as nails and rejecting background noise like a champ. They're just not as sensitive to high-frequency sounds and the ambient noise floating around your room. This makes them the obvious choice for anyone recording in a less-than-perfect space, like a home office or a spare bedroom without any acoustic treatment.
Because they’re designed to capture what’s directly in front of them and not much else, they’re perfect for:
- Untreated Rooms: If you’ve got an air conditioner humming, kids playing down the hall, or traffic outside, a dynamic mic is your best friend for keeping those sounds out of your recording.
- Multi-Host Shows: When you have more than one person in the same room, dynamic mics are crucial for preventing "mic bleed," which is when your mic picks up your co-host's voice.
- Lively and Energetic Hosts: They can handle loud sounds really well without distorting, so if you're a passionate speaker who tends to get loud, this mic can take it.
The Shure SM7B is the classic broadcast standard, but you absolutely don't need to spend that much. A mic like the Samson Q2U is a fantastic, budget-friendly dynamic option that punches way above its weight in typical home setups.
The Sensitive Artist: Condenser Microphones
Condenser mics are all about detail. They capture a much wider range of frequencies and all the subtle nuances in a voice, giving you that crisp, clear, and "airy" sound that you hear on many professionally produced solo podcasts. But that incredible sensitivity is a double-edged sword.
A basic setup in a good recording environment will beat expensive gear in an untreated space every time. A condenser mic will expose every flaw in your room, from a computer fan to the echo off a bare wall.
This means condenser mics only really deliver the goods under the right conditions:
- Acoustically Treated Spaces: They need a quiet, controlled room to shine. Think dedicated studios or a well-treated closet packed with soft furnishings.
- Solo Narration: For a single host who wants to capture maximum vocal richness and detail, a condenser can deliver truly stunning results.
- Controlled Vocal Performance: If you can maintain a consistent volume and distance from the mic, a condenser will reward you with pristine, professional-grade audio.
The Rode NT1 is a super popular condenser known for its clarity and incredibly low self-noise. For beginners, the Blue Yeti offers that condenser sound in a simple USB package, but it still needs a very quiet room to perform well. Our guide on the equipment needed for a podcast dives deeper into how your mic fits into the bigger picture.
Making the Right Choice for Your Podcast
To cut through the noise and make a decision, just answer these three questions about your real-world podcasting situation:
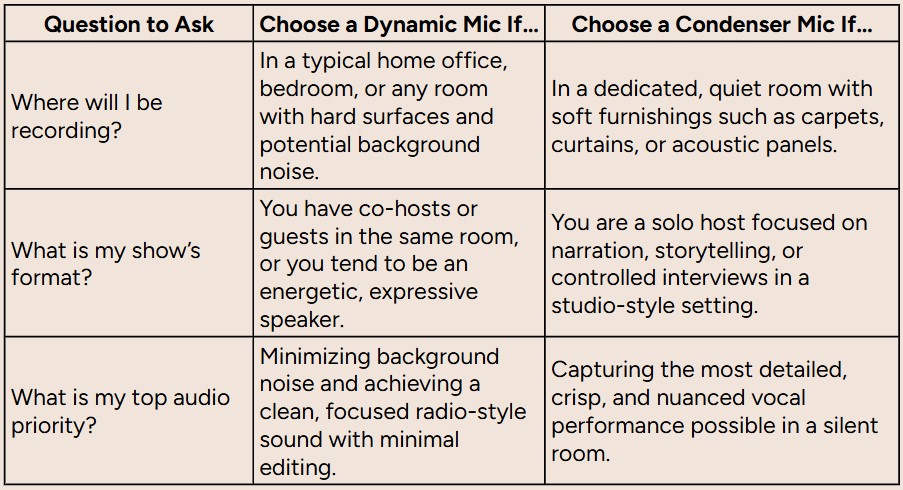
Honestly, for the vast majority of new and growing B2B podcasters, a dynamic microphone is the safer and more practical choice. It gives you a clean, professional sound without demanding a perfect recording environment. That lets you focus on what really matters, creating great content, instead of fighting with technical audio headaches.
Connecting Your Mic: USB vs. XLR Setups
Alright, you've picked your side in the dynamic vs. condenser debate. Now for the next big decision: how does the mic actually talk to your computer? This boils down to two paths: USB or XLR.
This choice will shape your entire recording workflow. It’s a classic trade-off between dead-simple convenience and the kind of professional flexibility that lets your studio grow with your ambitions.
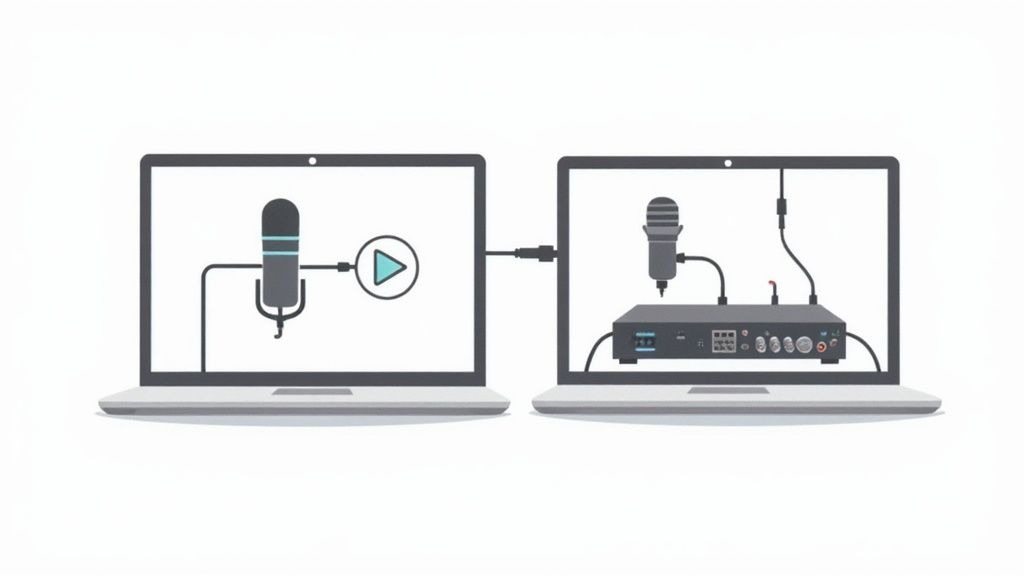
Think of a USB microphone as the "all-in-one" solution. It's the undisputed champion of convenience. With an audio interface built right in, you just plug it into your computer and hit record. For solo podcasters, beginners, or anyone who wants great audio without the headache, a USB mic is the perfect starting point.
An XLR microphone, on the other hand, is a component in a bigger, professional system. It uses a chunky three-pin connector and needs an external piece of gear, an audio interface or a mixer, to translate its analog signal into a digital one your computer can use. That extra step is precisely what unlocks its massive potential for superior sound and scalability.
The Simplicity of USB Microphones
USB mics have completely changed the game, making high-quality audio accessible to pretty much everyone. Their plug-and-play nature tears down a huge technical wall, letting creators focus on what really matters: their content.
This ease of use is exactly why they've exploded in popularity, especially with new podcasters and hobbyists. USB microphones are affordable, they're straightforward, and they let you produce professional-sounding audio without needing a degree in sound engineering. It's a trend that's helping the global podcasting community get bigger every day.
The main benefits of a USB setup are pretty clear:
- Ease of Use: Plug it into your computer's USB port, select it as the input in your recording software, and you're off. It’s that simple.
- Cost-Effective: Because the audio interface is baked in, you don't need to buy extra hardware to get started.
- Portability: Fewer moving parts mean it's easy to pack up and take it with you. Perfect for recording on the road.
The Power and Flexibility of XLR Setups
While USB mics win on simplicity, XLR is the undisputed industry standard for a reason. An XLR setup gives you precise, granular control over your sound and the ability to expand your studio over time. That external audio interface isn't just an extra box; it's the command center for your entire audio operation.
For podcasters with long-term ambitions, an XLR setup is an investment in quality and scalability. It provides the foundation to grow from a solo show into a multi-person production without compromising on audio fidelity.
Switching to an XLR system opens up a world of advantages:
- Superior Sound Quality: High-quality audio interfaces are packed with better preamps (which boost the mic's signal) and analog-to-digital converters. The result is cleaner, richer, more detailed audio.
- Multi-Microphone Recording: Most audio interfaces have multiple XLR inputs. This is crucial for recording two or more hosts in the same room, each on their own separate audio track for easier editing.
- Greater Mic Selection: The overwhelming majority of professional-grade broadcast microphones are XLR-only. This gives you a much, much wider ocean of high-end options to swim in as you decide to upgrade your gear.
Once you have your mic setup sorted, don't forget the small things that make a big difference, like effective cable management. A tidy, well-organized space free of cable clutter helps prevent interference and just makes recording less stressful. To see how all these pieces fit together, check out your guide to podcast studio equipment.
Ultimately, choosing between USB and XLR comes down to where you are now and where you want to go. If you're a solo host who wants fantastic sound without the fuss, a quality USB mic is an excellent, no-regrets choice. But if you envision a show with co-hosts, in-person guests, and the absolute best audio quality possible, starting with an XLR setup will pay off massively in the long run.
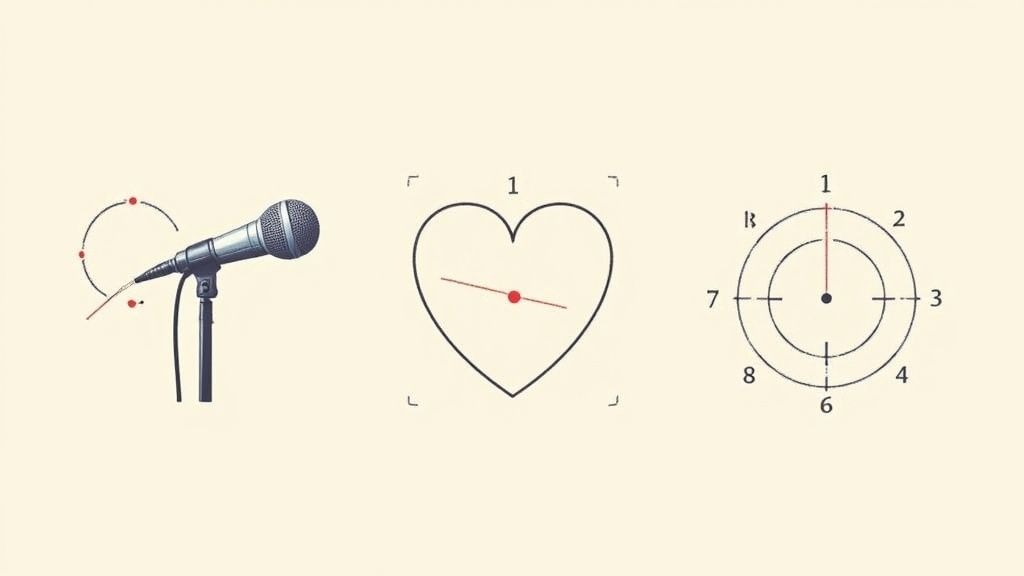
Using Polar Patterns to Get Clearer Audio
Think of a microphone's polar pattern as its field of vision. It’s what determines where the mic "listens" and, just as importantly, what sounds it chooses to ignore.
Getting this right is the difference between capturing a crisp, clean voice and recording a muddled mess of room echo and background noise. It’s one of the simplest changes you can make to instantly upgrade your podcast's sound quality.
Cardioid Pattern: The Solo Host's Best Friend
The cardioid pattern is probably the one you'll use most. It gets its name from its heart-shaped pickup area, focusing directly on what's in front of the mic while actively rejecting sound from the back and sides.
This makes it the go-to choice for solo podcasters, especially if you're recording in a space that isn't acoustically treated, like a spare bedroom or home office.
- It zeroes in on your voice, dramatically cutting down on distracting room echo.
- It ignores sounds from the sides and back, like a computer fan or street noise.
- It's forgiving. You can get a great sound without needing to invest in acoustic panels right away.
Bidirectional Pattern: Perfect for Face-to-Face Interviews
The bidirectional (or figure-8) pattern is a specialist. It captures sound equally from the front and the back of the microphone, while rejecting everything from the sides.
As you might guess, this is absolutely perfect for recording a two-person, face-to-face interview with a single microphone. Just place the mic between the two speakers, and you're good to go.
- The figure-8 shape ensures both you and your guest sound clear and balanced.
- It’s fantastic at cutting down side-wall reflections in rooms prone to echo.
- Position the mic on a stand in the middle, with each person speaking into one side.
A well-placed bidirectional microphone can feel like magic, making it sound like two separate mics by almost eliminating sound from the sides.
Omnidirectional Pattern: Capturing the Whole Room
Finally, there’s the omnidirectional pattern, which picks up sound equally from all directions, a full 360-degree circle. It doesn't reject any sound, instead capturing the entire ambiance of a room.
This is your tool for roundtable discussions or group interviews where you want to place one mic in the center of the table and capture everyone's voice.
- Place the mic right in the middle of all the speakers.
- Ideal for capturing the natural back-and-forth of a group conversation.
- The big catch? You need a very quiet, controlled room, because you will hear everything.
Choosing the right pattern from the start will save you countless hours in editing. A cardioid mic in a slightly echoey room is a problem solved before it even begins.
A Quick Polar Pattern Cheat Sheet
Cardioid Pattern
- Shape: Heart
- Best for: Solo hosts, remote guests, and untreated rooms
Bidirectional Pattern
- Shape: Figure 8
- Best for: Two person, face to face interviews
Omnidirectional Pattern
- Shape: Circle
- Best for: Group discussions and roundtable panels in quiet rooms
Remote Recording is No Exception
These rules still apply even when your guest is hundreds of miles away, connecting via a USB or XLR mic. The number one tip you can give a remote guest is to set their microphone to a cardioid pattern.
This simple instruction helps isolate their voice and drastically reduces the amount of room hiss, keyboard clicks, and other distracting noises on their end.
- Include a simple "polar pattern cheat sheet" in your pre-interview checklist.
- Use a recording platform like Riverside to capture separate audio tracks for each guest, giving you more control in post-production.
- Suggest basic mic setup tips, like using a pop filter to prevent harsh "p" sounds.
When you partner with a production team like Fame, this level of detail is built right into the workflow. We guide your guests on optimal setup to ensure every recording, remote or in-person, meets a consistent standard of quality. This consistency is what keeps listeners coming back.
Mastering Your Mic Placement and Technique
Picking out one of the best microphones for podcast recording is a great first step, but it’s only half the game. The real magic behind that warm, professional broadcast sound isn't the gear itself, but how you use it. Honestly, mastering your mic placement will do more for your audio quality than almost any expensive upgrade.
That means a budget-friendly mic, used the right way, can sound miles better than a top-shelf one used poorly. This is what separates amateur hour from a polished production, and it all starts with a few essential bits of kit.
Your Non-Negotiable Mic Accessories
If you want clean, consistent audio, these three accessories aren’t just nice-to-haves; they are essential. Think of them less as upgrades and more as foundational tools that kill common recording problems before they can ruin a perfect take.
- A Pop Filter or Windscreen: This is the screen that sits between you and the mic. Its entire job is to stop those harsh bursts of air from "p" and "b" sounds, what we call plosives, from hitting the microphone and creating a jarring "pop" in the recording.
- A Shock Mount: This is a cradle that suspends your mic in mid-air, isolating it from whatever it's attached to. It stops vibrations traveling up the mic stand from a bump on the desk, a tap of the foot, or even heavy footsteps from being recorded as a low, muddy rumble.
- A Sturdy Mic Stand or Boom Arm: Holding your microphone is not an option. A solid stand or, even better, a flexible boom arm, keeps the mic locked in the perfect spot. This prevents handling noise and helps you maintain a consistent distance as you speak, which is key for a level recording.
Finding the Sweet Spot for Your Voice
Okay, so your mic is all geared up. Now it's time to find the right placement. A brilliant place to start is what’s known as the "fist-to-chin" rule.
Make a fist, press it against your chin, and then stick your thumb out towards your mouth. The tip of your thumb is roughly where the microphone should be, about 4-6 inches away. This distance is the sweet spot for capturing a warm, present vocal tone without it sounding too boomy or picking up every tiny mouth noise.
Try speaking across the top of the microphone, not directly into it. By aiming your voice at a slight angle, somewhere between 10 and 45 degrees, you’ll often get a richer, more natural sound and cut down on plosives even more.
Play around with it. Speaking straight into the mic might sound brighter and more direct, while speaking at an angle can introduce more warmth and bass. There's no single "right" way; it's all about finding what works best for your voice and your specific mic. For a deeper dive into the whole process, check out our guide on how to produce a podcast from start to finish.
Your Pre-Flight Recording Checklist
Consistency is the name of the game in professional audio. Before you hit that big red button, run through a quick pre-flight check. It ensures you’re capturing the best possible sound every single time and will save you from a world of pain in the editing room.
- Check Mic Position: Is it 4-6 inches away? Is it angled correctly for your voice?
- Confirm Input Levels: Do a quick soundcheck. Talk at your normal volume. Are you peaking somewhere in the 12dB to -6dB range on your meter?
- Silence Your Environment: Turn off that whirring fan or AC unit. Put your phone on silent. Close the door.
- Put on Wired Headphones: Always monitor your own audio. It’s the only way to catch issues like static or clipping in real-time.
- Press Record: Do one last audio check to make sure everything sounds clean and clear before you get into the conversation.
Equipping Guests for High-Quality Remote Interviews
Going remote with your interviews opens up a world of possibilities. It makes it easier for guests to show up, lets you land higher-quality guests, and saves you money on travel and studio time. But there’s a catch: inconsistent guest equipment can throw a wrench in the works, leading to audio glitches that pull listeners out of the conversation.
This is where a little prep goes a long way. Think of the following as your pre-show playbook, a simple, actionable checklist to share with every guest to make sure they sound just as crisp and professional as you do.
The Guest Prep Checklist
One common worry is that guests won't have the right equipment. You can solve this with clear instructions and, if you have the budget, a small investment.
- Wired headphones are a must. Bluetooth can be flaky, introducing lag or dropouts. A simple wired pair solves this.
- Consider sending an affordable mic. If your budget allows, sending a guest a Blue Yeti is a great way to unify your show's sound, and it makes for a nice gift.
- Ask guests to record locally. Using a simple app like QuickTime or Audacity as a backup gives your editor clean source audio to work with, just in case of an internet dropout.
- Fully charge everything, laptops, headsets, you name it. Nothing kills the flow like a frantic search for a power cord mid-interview.
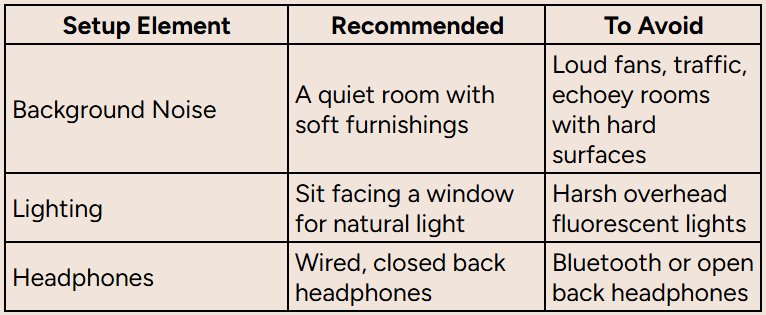
Optimizing Their Recording Space
It's not just about the gear; the room itself plays a huge role. You don't need a professional studio, just a little common sense.
A quiet room with soft surfaces, think carpets, curtains, or even a bookshelf full of books, can work wonders for absorbing echo. Ask guests to close the door, shut the windows, and turn off any fans or noisy appliances. For video, having them sit facing a window provides fantastic, natural light that beats harsh overhead fluorescents every time.
Choosing Your Remote Platform
When you're juggling multiple guests, the right platform is critical. The non-negotiable feature? It has to record separate audio tracks for each person.
This is why we often point our partners to tools like Riverside. It records high-quality audio and video locally on each person's computer, so a spotty internet connection on one end won't ruin the final product. Having separate tracks gives your production team the power to edit each voice independently, cutting out a cough or background noise on one track without touching the others.
For a deeper dive, check out our full guide on how to record a podcast remotely.
“Capturing separate tracks ensures maximum control over each voice, making post-production a breeze.” – Audio Engineer at Fame.
The Final Pre-Show Checklist
To tie it all together, send your guests a simple, numbered checklist the day before you record. Keep it short and sweet.
- Plug in your wired headphones and microphone. Double-check that they're selected as your input/output in your system settings.
- Find a quiet room. Close the door and silence all your notifications (phone, computer, everything!).
- Set yourself up facing a window for soft, natural lighting.
- Open your backup recording app and record a 10-second test. Listen back to make sure you sound clear.
- Please join the call five minutes early so we can iron out any last-minute tech wrinkles.
By guiding your guests through this simple setup, you're not just improving one episode; you're building a standard of quality for your entire show. This little bit of prep work makes a huge difference, reflecting your professionalism and making life much easier for your production partner at Fame. The result? Remote episodes that sound consistently professional and keep listeners hooked.
Frequently Asked Questions
Got questions? We've got answers. Stepping into the world of microphones for podcast recording can feel a little overwhelming, so let's clear up a few of the most common things we hear from podcasters just starting.
What Is the Best All-Around Microphone for a Beginner?
For most new podcasters, you can't go wrong with a high-quality USB condenser mic. Something like the Blue Yeti or the Rode NT-USB+ is a fantastic starting point. They deliver great sound quality, are ridiculously easy to set up (literally plug-and-play), and you don't need any extra gear like an audio interface.
Plus, their versatility with multiple polar patterns lets you play around with different recording styles as your show evolves. If you're in a less-than-perfect recording space, a dynamic USB mic like the Samson Q2U is a workhorse that gives you excellent noise rejection and reliability for under $100.
Do I Really Need an Audio Interface for My Podcast?
You only need an audio interface if you’re using an XLR microphone. If you've got a USB mic, you can skip this, as the interface is already built right in.
For XLR mics, an external interface is non-negotiable. It's the little box that converts the microphone's analog signal into a digital one your computer can understand. It also provides the right amount of power and, crucially, lets you plug in multiple mics for shows with co-hosts or guests. Think of it as your command center for professional-level control.
How Much Should I Spend on My First Podcast Mic?
You can get a seriously good podcasting microphone for somewhere between $100 and $250. In this sweet spot, you'll find mics like the Audio-Technica AT2020 or the Samson Q2U, which offer a massive leap in audio quality without the scary price tag of professional broadcast gear.
Honestly, there's no need to spend more than this to get clean, professional-sounding audio when you're just starting. Your time is better spent learning good mic technique.
The smartest investment isn't always the most expensive one. A well-placed budget microphone in a treated room will always, always sound better than a high-end mic in a noisy, echoey space.
Can I Use a Gaming Headset for My Podcast?
Technically, you can. But if you're serious about creating a professional sound, we'd strongly recommend against it. Gaming headset mics are built for quick, clear communication, not for rich, nuanced audio. They often sound thin, compressed, and just... cheap.
Today's podcast listeners have high expectations for audio quality. A dedicated microphone is what delivers that warm, clear sound that keeps people hooked and hitting "subscribe."
And once you've captured that great audio, you'll want to make it accessible to everyone. Learning how to create a transcript from any audio file with a tool like Recap.io is a fantastic way to repurpose your content and grow your audience.
At Fame, we handle every technical detail, from recommending the perfect microphones for podcast recording to making sure every remote guest sounds like they're in the studio with you. We can even help market your show through our B2B social media and newsletter services. If you want to focus on creating killer content while we build your brand's authority, get in touch with us today.