


Key Takeaways
- Investing in high-quality podcast studio equipment is crucial as it reflects the credibility and professionalism of a brand and can make or break the first impression on listeners.
- Great audio quality is more important than great video, as people are more likely to tune out due to poor audio, and it can also help attract higher-quality guests to a podcast.
- Having professional podcasting gear can pay off by helping to land better guests, making remote recordings possible, and ultimately turning a podcast into a powerful marketing engine that drives business growth.
Choosing the right podcast studio equipment isn't just about plugging in a mic and hitting record. It's a strategic call that says a lot about your brand before you even say a word. In the B2B world, your audio quality is your first handshake; it's a massive signal of how seriously you take your business and your audience.
Why Your Podcast Gear Is a Strategic Advantage
Let's be blunt: in a world overflowing with content, nobody has time for bad audio. If your listeners are met with distracting hiss, echo, or muffled voices, they're gone. And they're not coming back. That first impression doesn't just lose you a listener; it chips away at your brand's credibility.
Think of your equipment as a core business asset, not just a line item on an expense report. It's the foundation for building trust.
High-quality audio does more than just sound pleasant. It carries weight. When your voice comes through clean, crisp, and professional, people subconsciously give more authority to what you're saying. For any B2B podcast aiming to be a voice of authority and build real customer relationships, this is everything.
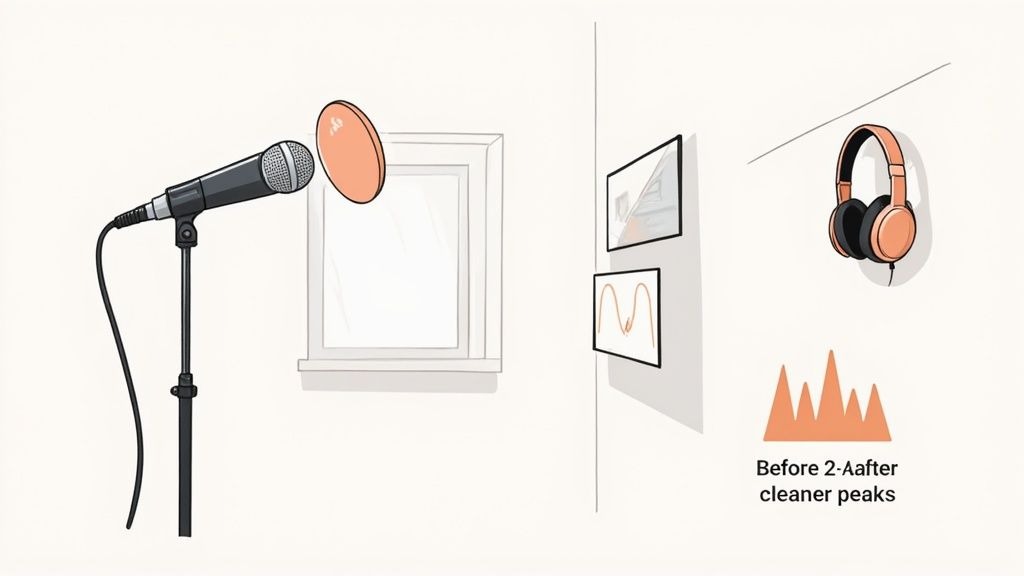
“Great audio is more important than great video. People can put up with lower quality video, but low quality audio is jarring, and they will tune out.” - Tom Hunt, Founder of Fame.
The ROI of Sounding Good
Putting some budget into the right gear pays you back, and fast. For starters, it helps you land better guests. An industry expert or a C-suite executive is far more likely to say yes to an interview if they're confident the final product will make them sound good. A professional setup shows you're not messing around, and that attracts guests who aren't messing around either.
On top of that, remote recording has blown the doors open for securing A-list guests. Travel and scheduling conflicts are yesterday's problems. Remote recordings make it easier for guests to show up, which means you can get a higher quality of guest without reimbursing for travel, hotels, or studio time. This only works if you can guarantee both you and your guest sound pristine, no matter where you are in the world.
The demand for solid podcasting gear is exploding for a reason. The market was valued at USD 3.6 billion in 2024 and is expected to rocket to USD 28.07 billion by 2034. You can learn more about the market dynamics of podcasting hardware here. This isn't just a trend; it's a fundamental shift in how businesses communicate. This guide will give you a practical, ROI-first roadmap to making smart investments that turn your podcast from a simple recording into a powerful marketing engine.
Building Your Foundation with Essential Podcast Gear
Diving into the world of podcast studio equipment can feel like you’re trying to learn a new language. But here’s the good news: you don't need a room full of blinking lights and complicated gear to sound professional. You just need to nail the "Core Four."
These four pieces of equipment are the absolute foundation of any serious B2B podcast. They are your microphone, audio interface, headphones, and recording software. Get these right, and you’re 90% of the way to incredible audio quality. Let's break down what each one does and why it matters.
Your Microphone: The Voice of Your Brand
First things first: your microphone. This is arguably the most critical piece of your entire setup. It’s what captures your voice, your brand’s voice, and turns it into something your audience can connect with. It’s tempting to just grab the first one you see, but the real choice comes down to USB vs. XLR.
- USB Microphones: Think of these as the "plug-and-play" option. They connect right into your computer's USB port, they're incredibly easy to use, and they are a fantastic starting point. A high-quality USB mic like a Blue Yeti can deliver great audio, especially for solo shows.
- XLR Microphones: This is the professional standard, hands down. XLR mics plug into an audio interface (we'll get to that next) and offer much better sound quality, durability, and room to grow. If you plan on having multiple hosts or in-person guests, you'll want to go the XLR route.
For a B2B podcaster who's serious about building authority, a good USB mic is a perfectly fine place to start. But have your sights set on an XLR setup, like the legendary Shure SM7B. It's a smart long-term investment.
The Audio Interface: Your Sound's Central Hub
If you opt for an XLR microphone, an audio interface is non-negotiable. The simplest way to think of it is as a translator. It’s the bridge between your pro-level mic and your computer.
A USB mic has a tiny, basic interface built right in, but a dedicated external box like a Focusrite Scarlett 2i2 gives you way more power and control. It takes the analog signal from your mic, cleanly converts it into a high-quality digital signal, and gives you physical knobs to dial in your recording levels (or "gain"). This ensures your audio is never too quiet or painfully loud and distorted.
Headphones: Your Secret Weapon for Clean Audio
Don't skip this one. Headphones aren't just for listening back to your edits; they are a mission-critical tool for real-time monitoring while you record. They let you hear exactly what the microphone is picking up, which means you can catch distracting background noise or audio issues before they ruin an entire episode.
The key is to use closed-back headphones. These create a seal around your ears. Why does that matter? It prevents the audio from your headphones (like your guest’s voice) from "bleeding" into your microphone, which creates a nasty echo. Even a basic pair of wired earbuds is a better choice than open-back headphones or, worse, speakers. Always go wired over Bluetooth to avoid any audio lag or connection drops mid-interview.
Recording Software: Where It All Comes Together
Finally, you need software to actually record, edit, and produce your show. In the audio world, this is usually called a Digital Audio Workstation, or DAW.
- Free Options: You can get started for zero dollars with incredibly powerful tools. Audacity and GarageBand (for Mac users) are perfect for learning the ropes.
- Paid DAWs: For those ready to level up their post-production, software like Adobe Audition or Hindenburg offers more advanced features and a smoother workflow.
- Remote Recording Platforms: This is a must-have for B2B podcasts. You're going to have guests, and you need a reliable way to capture their audio. We're proud partners with Riverside, which records each person's audio and video locally on their own computer. This simple trick sidesteps all the glitches and compression you get from standard video call software, giving you separate, studio-quality tracks for everyone.
This infographic shows how it all connects. Investing in quality gear builds credibility, which helps you engage your audience and, in turn, attract those high-profile guests you're after.
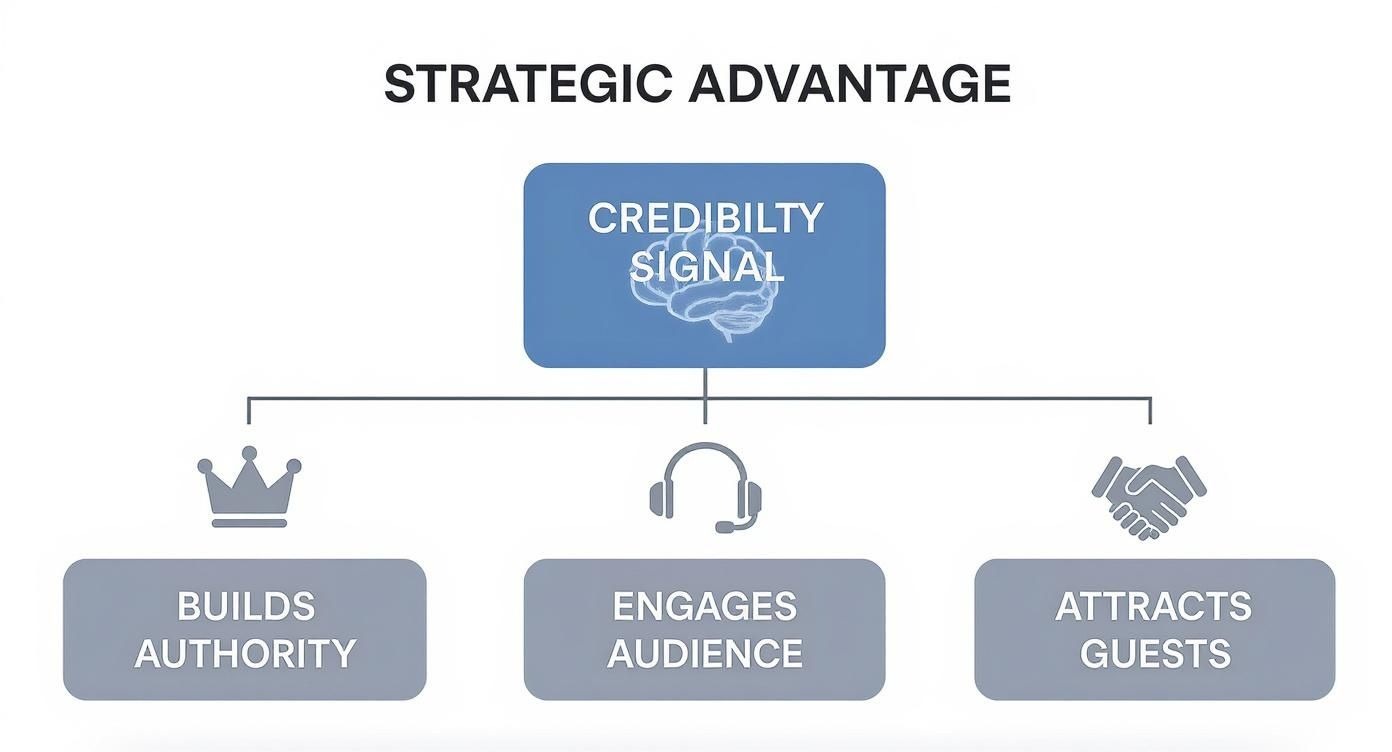
Ultimately, each of these four pieces is a building block. Together, they create a professional brand signal that strengthens your entire content strategy.
And this isn't a small niche. The podcasting equipment market in the U.S. alone pulls in an estimated $300 million in annual revenue, according to a recent podcast industry report. That figure is driven by podcasters who know that quality gear matters. For a more detailed look at how to put these pieces together, check out our complete guide on building the best podcasting setup.
Essential Podcast Gear Comparison
To make choosing a bit easier, we've broken down our top recommendations for the Core Four across different budget levels. Whether you're just starting or ready to build a professional-grade studio, there's a great option here for you.
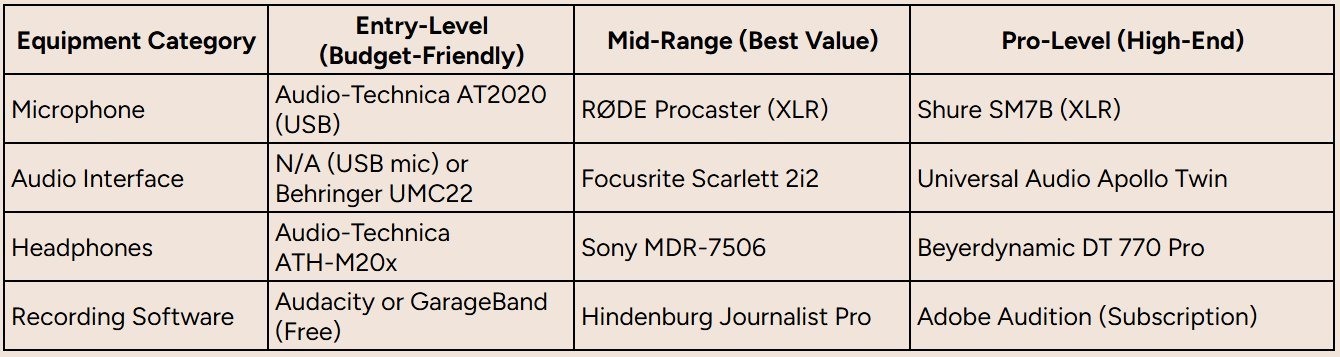
Remember, the goal isn't to buy the most expensive gear; it's to buy the right gear for your goals and budget. Even the entry-level options in this table can produce fantastic, professional-sounding audio when used correctly.
Designing Your Setup for Remote or In-Person Recording
The gear you choose for your podcast all boils down to one simple question: where are you, and where are your guests?
The answer completely changes the shopping list. A solo show from your office needs a totally different setup than a two-person interview in a dedicated studio. Your format dictates the gear.
Let's walk through the three main scenarios: fully remote, in-person studio, and the hybrid model that’s becoming more and more common. Get a feel for what each one demands, and you can invest in the right tools without blowing your budget on stuff you’ll never touch.
The Strategic Advantage of Remote Recording
For B2B podcasts, remote recording has become the default, and for good reason. It immediately removes the single biggest obstacle to landing high-profile guests: travel. You can book a CEO from across the globe without thinking about flights, hotels, or timezone Tetris.
This massively expands your pool of potential guests, letting you bring true A-list expertise to your audience.
The financial upside is huge, too. No travel reimbursements, no expensive studio rentals. That frees up cash to put toward what really moves the needle: making great content and getting it in front of the right people.
The secret to making remote sound professional is using a platform that records everyone's audio and video locally. This is exactly why we use tools like Riverside. It records pristine, uncompressed files right on each person's computer, completely bypassing spotty internet connections. You get studio-quality tracks, every single time. For a deeper look, check out our guide on how to record a podcast remotely.
Ensuring Guest Quality From a Distance
The big worry with remote interviews is always the guest's audio quality. You can't control their environment, but you can absolutely nudge them toward a much better recording.
A simple piece of advice from our founder, Tom Hunt: “One thing people worry about is guests not having good equipment for remote recordings. We recommend wired headphones (not Bluetooth if possible), sitting in front of a window to get natural light, and you can even send cheaper equipment to guests as a gift if you have the budget.”
Here are a few practical tips to make sure your guests sound fantastic:
- Insist on Wired Headphones: This is a non-negotiable for us. Bluetooth headphones introduce a tiny delay (latency) that makes conversations feel unnatural and can lead to connection drops. Even the basic wired earbuds that come with a phone are a better option.
- Coach on Mic Placement: Give them simple instructions. Record in a quiet, smaller room with soft things, carpets, curtains, and even a bookshelf, to soak up echoes.
- Send a "Guest Kit": If you’re interviewing a high-value guest, sending them an affordable but solid USB mic like a Blue Yeti or a Samson Q2U is a game-changer. It’s a great touch that shows you’re serious about quality and guarantees you get the audio you need.
Building an In-Person Studio Setup
If your show has multiple hosts in the same room or you’re bringing in local guests, your equipment needs a serious upgrade. A single USB mic isn’t going to cut it anymore. This is where you step into the world of XLR microphones.
For a proper in-person studio, you'll need:
- Multiple XLR Microphones: One for each person. This is crucial for capturing clean, isolated audio. Dynamic mics like the Rode Procaster are brilliant for rejecting background noise.
- An Audio Interface or Mixer: You'll need a central hub with multiple inputs, like a Focusrite Scarlett 18i8 or the RODECaster Pro II, to plug in and manage all the mics at once.
- Headphones for Everyone: Every participant needs their own pair of closed-back headphones. This lets them hear themselves clearly and, more importantly, prevents audio from their headphones from bleeding into their mic and causing feedback.
- Sturdy Mic Stands or Boom Arms: Don't underestimate this. Proper mic placement is the key to consistent audio levels and keeps everyone comfortable during longer recording sessions.
Creating a Flexible Hybrid Setup
The hybrid model gives you the best of both worlds: you can have your hosts together in the studio while bringing in guests from anywhere on the planet. This requires a slightly more advanced setup built around a simple but powerful technique called a "mix-minus."
A mix-minus is just a clever way to route audio. It sends your remote guest all the audio from the studio except for their own voice. This simple trick stops them from hearing that distracting, confusing echo of themselves speaking.
Thankfully, you don't need to be an audio engineer to pull this off. Modern mixers like the RODECaster series have this feature built right in, making it incredibly simple to manage.
Your gear list for a hybrid setup is really a combination of the in-person and remote kits. You'll need the multi-mic XLR setup for your studio, plus your go-to remote recording platform to connect with your guest. This flexibility means you’re ready for any interview scenario, ensuring you can land the best guests, no matter where they are.
Elevating Your Audio from Good to Unforgettable
You've got your core podcast studio equipment sorted. Honestly? You’ve won half the battle. Capturing clean, clear audio already puts you miles ahead of most shows out there. But the real magic, the stuff that turns a good podcast into an unforgettable one, lives in the details.
This next layer of gear isn't about flashy, expensive gadgets. It's about solving the small, nagging audio problems that everyone runs into. These are the tools that smooth out the rough edges and make your show sound polished, authoritative, and just plain easy to listen to.
Controlling Your Sound at the Source
Before your voice even hits the microphone, a couple of small accessories can make a world of difference. They're cheap, easy to set up, and have a massive impact on your raw recording quality. Less cleanup later is always a good thing, as our guide on how to edit a podcast makes crystal clear.
- Pop Filters and Windscreens: These fix "plosives", those harsh bursts of air that hit the mic when you say words with 'p' and 'b' sounds. A pop filter is a mesh screen that sits between you and the mic, while a windscreen is a foam cover that slips right over it. Both diffuse that puff of air, saving your audio from those distracting pops.
- Shock Mounts: Ever hear a low, thumpy rumble when someone bumps the desk or types on their keyboard? That's what a shock mount prevents. It's a little cradle that suspends your mic with elastic bands, completely isolating it from vibrations traveling up the stand. It’s a simple fix for a very common problem.
Nailing Your Mic Placement
How you position your microphone is just as important as the mic itself. You need to keep it at a consistent distance and angle to get that rich, steady vocal tone. Holding a mic by hand or using a flimsy little desk stand? That’s a recipe for jumpy audio levels and bad posture.
The goal of great equipment is for it to fade into the background. Every extra cable or piece of gear introduces another point of failure. Start small, focus on reliability, and learn how to use your existing gear before chasing the next big thing.
This is where a boom arm comes in. It’s an adjustable, articulating arm that clamps to your desk and holds your microphone exactly where you need it, usually about 4-6 inches from your mouth. It lets you maintain perfect mic placement without even thinking about it, frees up a ton of desk space, and even absorbs minor vibrations.
Taming Your Recording Space
The biggest enemy of professional audio isn't your mic; it's a bad room. Echo, reverb, and background noise can make even a high-end microphone sound cheap and amateurish. The good news? You don't need to build a soundproof booth to get great results.
The goal here is acoustic treatment, which is just a fancy way of saying you need to control how sound waves bounce around. You can do this with stuff you probably already have:
- Go small and soft. A walk-in closet filled with clothes is a classic home studio for a reason; all that fabric is amazing at absorbing sound.
- Use what you have. Carpets, heavy curtains, bookshelves packed with books, and even a comfy couch will help break up and absorb sound reflections.
- Hang heavy blankets on the walls if you’re in a really echoey room. It might not look pretty, but it's incredibly effective and costs next to nothing.
The podcasting gear market is booming for a reason: creators know that audio quality is a key differentiator. The global podcast equipment market was valued at around USD 3.7 billion in 2025 and is projected to hit USD 7.2 billion by 2033. By investing in a few of these simple upgrades, you ensure your content has the professional polish it needs to stand out.
Adding Video to Your Podcast the Right Way
Adding a video component to your show is a massive lever for growth, especially on platforms like YouTube, where discoverability is so much better than audio-only apps. But before you rush out to buy a camera, there's a golden rule every B2B podcaster needs to tattoo on their brain: great audio is always more important than great video.
It’s true. Listeners will put up with grainy, low-res visuals if the conversation is compelling and the audio is crystal clear. But the second you hit them with harsh, crackly, or distracting audio, they’re gone. Your video setup is there to support your pristine sound, not compensate for bad audio.
The great news is you don't need a Hollywood budget to produce a professional-looking show. You just need to focus your resources where they matter most. And the real secret isn't the camera, it's the lighting.
Lighting Makes All the Difference
Lighting is, without a doubt, the single biggest upgrade you can make to your video quality. I’m not exaggerating. A basic webcam can look shockingly professional with good lighting, while a pricey DSLR will look amateurish in a poorly lit room.
The goal is to create soft, even light across your face, getting rid of any harsh shadows that make you look like you're broadcasting from a dungeon.
The classic professional setup is called three-point lighting:
- Key Light: This is your main light source, the brightest of the three. You'll want to position it slightly off to one side of the camera to light up the primary side of your face.
- Fill Light: Placed on the opposite side, this is a softer, less intense light. Its only job is to "fill in" and soften the shadows created by the key light.
- Back Light: This one goes behind you, often pointing at your head and shoulders. It helps separate you from the background, adding a sense of depth and that polished, professional look.
You can get fantastic results with a couple of affordable LED panel lights. But if you're on a shoestring budget, don't sweat it. Just sit facing a large window. Natural light is the best (and cheapest) lighting source you’ll ever find.
Choosing the Right Camera
Once your lighting is dialed in, you can start thinking about cameras. You've got a few solid options, each with its own pros and cons.
- High-Quality Webcams: Don't sleep on modern webcams. Models like the Logitech C920 or the 4K Brio are workhorses for a reason. For most B2B podcasters, a high-end webcam delivers a sharp, clear image that's more than good enough.
- DSLR or Mirrorless Cameras: Want that cinematic look with the buttery, blurred background (a.k.a. bokeh)? A DSLR or mirrorless camera is your next step up. The Sony a6400 is a popular choice for this. Just remember, you’ll also need a capture card (like an Elgato Cam Link) to get the video feed into your computer.
An important piece of advice from our founder, Tom Hunt, for managing guests remotely: "We recommend wired headphones (not Bluetooth if possible), sitting in front of a window to get natural light improves video quality, and you can even send cheaper equipment to guests as a gift if you have the budget."
This simple guidance ensures your guests look and sound their best, which is critical for maintaining the overall quality of your production.
For a complete look at how to manage all the moving parts, check out our in-depth guide to video podcast production. And if you're looking to get creative and streamline your workflow, some of the best AI video creation tools can really help.
Bringing Your Production Workflow to Life
Investing in the right podcast studio equipment is a huge step, but the gear itself is only half the story. The best microphone in the world won't save you from a chaotic or inconsistent recording process.
What really turns your high-quality gear from a collection of expensive tools into a powerful content engine is a smooth, repeatable production workflow.
This process kicks off long before you hit record. Pre-production tech checks are non-negotiable, especially when you're interviewing guests remotely. I'm talking about testing connections, confirming your guest is using wired headphones (this is a big one), and doing a quick soundcheck to set proper gain levels. You want to make sure no one is recording too quietly or way too loudly.
This simple step alone prevents the most common audio headaches that can derail an otherwise fantastic conversation.
From Recording to Promotion
Once you press that big red button, the focus shifts to execution. This is where your equipment and your process need to dance together in perfect harmony. Your boom arm keeps the mic in the sweet spot, your pop filter kills those harsh "p" sounds, and your headphones let you monitor exactly what's being captured in real time.
After the interview wraps, post-production is where the real magic happens. This is where you'll edit out mistakes, mix the audio levels so everything sounds balanced and professional, and add in any music or sound effects. A well-organized workflow at this stage can slash your editing time.
We've actually put together a deep dive on how to structure this part of the process, which you can check out here: podcast production workflow.
A structured workflow doesn't just improve your audio quality. It creates a professional, seamless experience for your guests and, crucially, frees up your mental energy to focus on what truly matters, conducting a brilliant interview.
For a lot of B2B brands, managing this whole technical process in-house becomes a serious drain on resources. This is often where a dedicated partner like Fame can step in, handling everything from guest coordination and recording to professional editing and mixing.
Finally, you've got a polished episode ready for the world. But the workflow doesn't stop there. Promotion is absolutely key to getting a return on your investment. At Fame, we build promotion right into the production process through our dedicated B2B social media agency and newsletter services.
To really squeeze every drop of value from your new studio setup, think about implementing smart content repurposing strategies. This is how you turn one great episode into dozens of marketing assets, ensuring your high-quality recording reaches the right people and drives real business results.
Common Questions About Podcast Studio Gear
Diving into the world of podcast equipment can feel like learning a new language. To help you get up and running with confidence, we've tackled some of the most common questions we hear from B2B creators. Think of this as your cheat sheet for making smart, practical decisions.
What's the Absolute Bare Minimum I Need to Start?
For a professional-sounding B2B show, you really only need three things. First, a quality USB microphone like the Rode NT-USB+ or Samson Q2U. Next, a pair of closed-back headphones to stop your mic from picking up audio from your speakers.
Finally, and this is non-negotiable for interviews, you need a solid remote recording platform. While a free DAW is fine for editing, a service like Riverside (a Fame partner) is essential. It records a separate, high-quality audio track for each person, making sure your guest sounds just as crisp and clear as you do.
Should I Get a USB or an XLR Microphone?
Think of it this way: a USB mic is the perfect starting point. It's the ultimate plug-and-play solution, giving you fantastic audio quality for solo shows with zero fuss.
But an XLR microphone, paired with an audio interface, is the professional standard for a reason. This setup gives you noticeably better sound, way more control over your audio, and the power to easily expand to a multi-host or multi-guest show. If you're serious about your podcast as a long-term marketing engine, investing in an XLR setup is a strategic move that will pay dividends as your show grows.
How Can I Make Sure My Remote Guests Sound Good?
This is a huge one, and you have more control here than you might think. First things first: always insist on wired headphones. Bluetooth can introduce frustrating latency and connection issues.
Second, coach them on their recording space. A small, quiet room with soft furnishings, think carpets, curtains, or even a bookshelf, is your best friend. It’ll do wonders to kill echo and reverb.
Third, if you have the budget, shipping a quality USB mic to high-value guests is an absolute game-changer. Not only does it guarantee great audio on their end, but it makes an incredible impression and signals that you're committed to producing a top-tier show.
Do I Really Need to Buy Expensive Acoustic Treatment?
Honestly? Not when you're just starting. You can get incredible results for free just by being smart about where you record. A walk-in closet or a small office packed with books and furniture is acoustically miles better than a big, empty boardroom with bare walls.
If you need a little extra help, hanging a few thick blankets on the walls can absorb sound just as effectively as pricey foam panels. Remember, the environment you record in often has a bigger impact on your sound quality than the gear itself.
Ready to create a podcast that builds authority and drives real business results, without getting bogged down by the technical details? At Fame, we handle the entire production workflow, from recording and editing to promotion. You just focus on creating great content.