January 12, 2026
The Best Podcast Equipment For Beginners A B2B Marketer's Guide
By Fame Team
Key Takeaways
- For B2B teams, a basic setup with a high-quality USB mic and wired headphones is a budget-friendly foundation for clean, professional audio.
- Poor audio quality can be detrimental to a brand, making it look unprofessional and causing listeners to tune out.
- Investing in quality audio equipment is a critical investment in a brand's credibility, allowing for clear communication and building trust with potential customers and partners.
When you’re just starting, the best podcast equipment is whatever gets you clean, professional audio without breaking the bank. For most B2B teams, a simple setup built around a high-quality USB mic (like the Samson Q2U or Audio-Technica AT2020) and a decent pair of wired headphones is a fantastic, budget-friendly launchpad. This foundation is all you really need to make your brand sound polished from the start.
Why Audio Quality Is Non-Negotiable in B2B Podcasting
Before we get into specific gear, let’s get one thing straight: in B2B podcasting, poor audio is a brand killer.
It’s a hard truth, but an important one. People can tolerate lower-quality video, but low-quality audio is jarring and will make them tune out. They’ll look past imperfect lighting. But they absolutely will not tolerate muffled, echoey, or distorted sound. It’s an instant sign that you don’t respect their time, and it screams unprofessionalism.
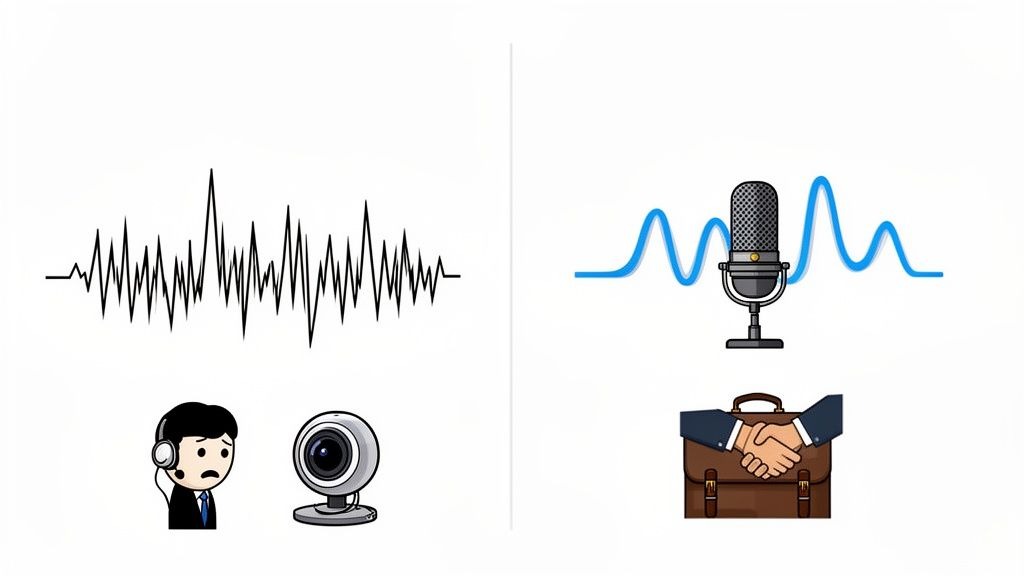
Think of your podcast as a direct extension of your brand. Each episode is a crucial touchpoint with potential customers, partners, and influential peers. You wouldn’t show up to a major sales meeting in a wrinkled shirt, right? So why would you present your best ideas with distracting, cheap-sounding audio?
Your Sound Is Your Credibility
It’s really that simple. Great audio builds trust and authority. When your voice comes through clearly, your message lands with the impact it deserves. Bad audio, on the other hand, puts a subconscious barrier between you and the listener. It forces them to work just to understand you, and most of the time, they’ll just tune out completely.
This is why we frame equipment choices not as an expense, but as a critical investment in your brand’s credibility. As you start to see how podcasters are redefining global influence, you realize your show is a direct line to decision-makers. Your audio quality is the very first impression you make.
The smartest mindset for a beginner isn't asking, 'What’s the cheapest option?' It's asking, 'What's the most effective starting point for professional sound that respects my listener?'
This shift in thinking is more important than ever. The podcasting world is growing fast. The global market is set to explode, growing from USD 30.72 billion in 2024 to USD 131.13 billion by 2030, with a large share of that growth coming from branded B2B content. What was "good enough" for a hobbyist five years ago no longer cuts it when your audience consists of enterprise buyers and investors.
Setting The Stage For Success
This guide is here to demystify the gear you actually need. We'll walk through the essential components, explain what they do in simple terms, and help you make smart, budget-conscious choices that lay the groundwork for a successful show.
Our goal is to pair the right equipment with the right techniques. You can learn more about those in our guide on essential podcast best practices. Combining good gear with good habits is how you create content that sounds as professional as the insights you're sharing.
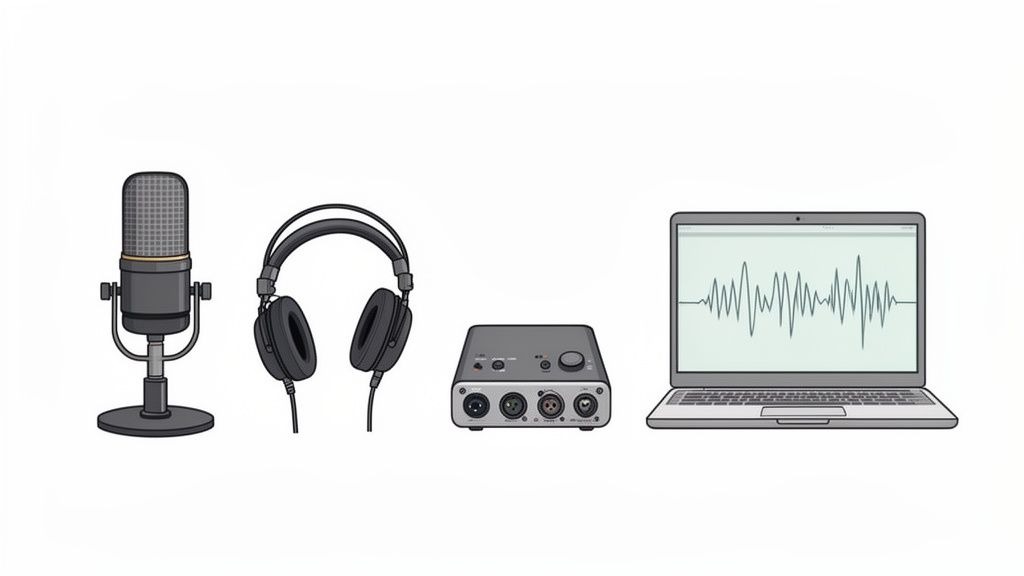
Your Core Four Equipment Essentials
Getting started with podcasting gear can feel like you're staring at a mountain of options, but here's the truth: you don't need a six-figure studio to sound incredible. You can get broadcast-quality audio with just four key pieces of equipment.
Think of it as your starter kit: a great microphone, a solid pair of headphones, a way to get the audio into your computer, and recording software. Let's break down exactly what you need.
1. The Microphone: The Heart Of Your Sound
Your microphone is hands-down the most important piece of gear you'll buy. It's the first link in the chain, turning your voice into a signal that can be recorded.
The podcasting hardware market is exploding, projected to jump from USD 3.6 billion to roughly USD 28.07 billion by 2034. Microphones are the largest share of that pie, accounting for over 24% of the spend. That alone shows you how critical a good mic is.
For beginners, the first big decision is whether to choose USB or XLR microphones.
- USB Microphones: These are the definition of plug-and-play. They connect right to your computer's USB port, no extra boxes needed. This makes them perfect for solo hosts or teams who want to get up and running fast without a fuss.
- XLR Microphones: This is the professional standard you see in recording studios. They connect to your computer via an external audio interface, giving you greater control and better sound quality. It's a bigger investment, but it's the right move if you plan on having multiple hosts or in-person guests.
This USB vs. XLR choice is a common sticking point for new B2B podcasters. We dig into specific models in our guide on the best microphones for podcast recording.
To help you decide, let's break down the key differences.
USB vs. XLR Microphones: Which Path Is Right For Your Show?
This quick comparison helps you choose between the plug-and-play simplicity of USB and the professional flexibility of XLR, based on your team's goals and budget.
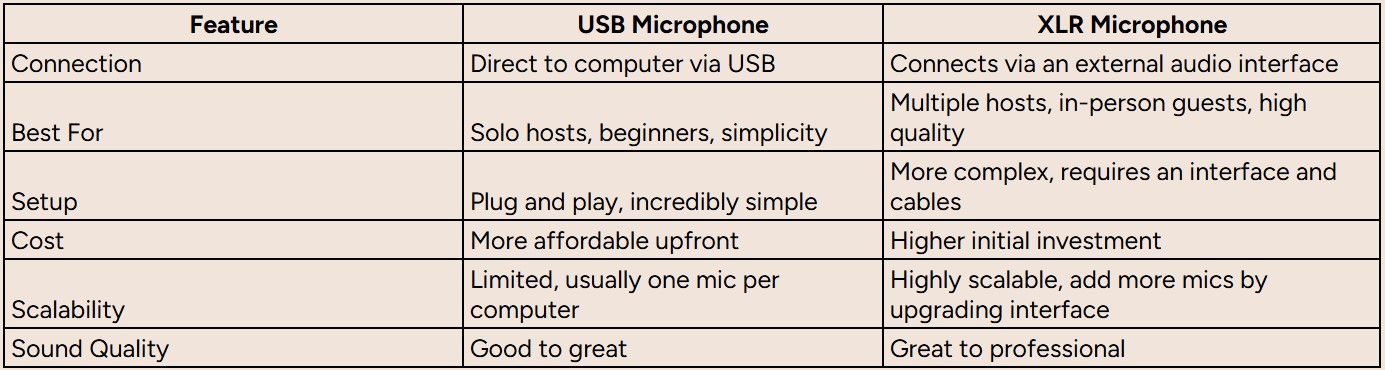
Ultimately, if you're flying solo and need to get started today, a USB mic is a fantastic choice. But if you see your show growing to include co-hosts or you're aiming for top-tier audio from day one, investing in an XLR setup will pay off in the long run.
2. Headphones: Monitoring Your Audio In Real-Time
Headphones are completely non-negotiable. You need to be able to hear exactly what your microphone picks up while you're recording. This is how you catch problems like a noisy air conditioner, distracting mouth clicks, or harsh "p" sounds (plosives) before they ruin a take.
You specifically want closed-back, over-ear headphones. Unlike the earbuds that came with your phone, these create a seal around your ears. Why does that matter? It prevents "audio bleed", where the sound from your headphones leaks out and gets picked up by your mic. This is especially critical when you have a remote guest, as their voice can create a nasty echo in your recording if you're not careful.
A simple pair of wired headphones is one of the most effective tools for quality control. Monitoring your audio live is the difference between fixing a problem in seconds and discovering a ruined recording hours later in editing.
3. The Audio Interface: Your Analog-To-Digital Translator
If you went with a USB mic, you can skip this part; the interface is built into the microphone. Smart, right?
But if you're stepping up to an XLR microphone for its superior quality, you'll need an audio interface. Think of it as the bridge between your pro-level mic and your computer. It takes the analog signal from the mic and converts it into a digital format that your software can record.
It also handles a couple of other key jobs, such as supplying "phantom power" for certain mics and providing physical knobs to control your recording levels (or "gain").
4. Recording Software: The Digital Hub
The final piece is the software that captures and edits everything. In B2B podcasting, you're almost always going to be interviewing high-profile guests from all over the world, so a dedicated remote recording platform is a must.
Don't be tempted to use Zoom or Google Meet. Those apps compress audio to save bandwidth, which seriously degrades the quality. You need a tool built for the job.
- Riverside: This is a favorite for remote interviews because it records each person's audio and video locally. That means if your guest's internet connection gets choppy, their recording remains crystal clear because it's saved directly to their computer before uploading.
- Descript: An amazing all-in-one tool that combines remote recording with a revolutionary transcript-based editor. You literally edit your audio by editing the text transcript. For beginners, it's an absolute game-changer.
These four items are the foundation of any great podcasting setup. By choosing wisely, you'll set your B2B podcast up for success with a polished, professional sound that builds credibility from the start.
Podcast Starter Kits For Every B2B Budget
Jumping into podcasting doesn't mean you need to empty the marketing budget on day one. Far from it. To make this easy, I've broken down the essential beginner gear into three practical tiers based on budget.
Think of this less as a shopping list and more as a strategic guide. It’s designed to get your B2B team recording with confidence, no matter where you're starting.
Each tier builds on the last, giving you a clear upgrade path. You can start lean, prove the concept, and then scale your setup as the show gains traction.
The Lean Starter Kit: Under $300
This is the perfect entry point. It’s for solo creators, small marketing teams, or anyone just testing the podcasting waters. The goal here is simple: get the best possible audio quality for the smallest investment. This kit proves you can sound professional and polished without a complicated or expensive setup.
- Microphone (A High-Quality USB Mic): The star of this kit is a reliable USB microphone. Look at something like the Audio-Technica AT2020 USB+ or the Samson Q2U. These mics are absolute workhorses, giving you excellent clarity and doing a decent job of rejecting background noise. Best of all, they're plug-and-play, so you can be recording minutes after opening the box.
- Headphones (Wired Over-Ear Models): Honestly, any decent pair of wired, closed-back headphones will do the trick. The key is preventing your guest's audio from "bleeding" into your microphone so you can hear exactly what's being recorded. The Sony MDR-7506 is an industry standard for a reason: they're tough as nails and deliver true sound.
- Accessories (The Essentials): You absolutely need a pop filter and a simple desktop stand (which often comes with the mic). The pop filter is a cheap but non-negotiable piece of gear. It softens those harsh "p" and "b" sounds (called plosives) that instantly make audio sound amateur.
This setup is simple, effective, and delivers a sound that gives your brand immediate credibility.
The Professional Mid-Tier: $300 to $700
When you're ready to level up your audio and get more hands-on control, this is your next move. This tier includes an XLR microphone and an audio interface, the standard for professional recording. It’s the sweet spot for teams who are committed to their podcast and want a more flexible, scalable system.
- Microphone (A Dynamic XLR Mic): Moving up to an XLR mic like the Rode Procaster is a significant upgrade. Dynamic mics are fantastic at isolating your voice and rejecting room noise, which makes them a lifesaver for recording in less-than-perfect spaces (like a home office).
- Audio Interface (A Simple, Reliable Hub): An interface like the Focusrite Scarlett Solo is the bridge between your XLR mic and your computer. It has much better preamps (which boost the mic's signal) and includes a physical knob for dialing in your recording volume precisely.
- Boom Arm (For Perfect Positioning): A boom arm, like the popular Rode PSA1, is a genuine game-changer. It clamps to your desk, frees up space, and lets you position the mic exactly where it needs to be for consistent sound. It also isolates the mic from any bumps or vibrations on your desk.
This mid-tier kit offers a very noticeable jump in quality and flexibility. It’s a rock-solid foundation for a serious B2B show.
The Scalable Pro Setup: $700+
This setup is for teams that are going all-in on podcasting as a core part of their marketing. It’s built around broadcast-standard equipment and basic room treatment to get that pristine, studio-quality sound. While it's a bigger investment, this is gear that's built to last and will serve your show for years to come.
While the podcasting market overall is expected to reach around USD 131.13 billion by 2030, high equipment costs remain a documented barrier to entry. Research notes that “high-quality microphones, headphones, and recording equipment can be expensive, discouraging potential podcasters from entering the market.” This tension has pushed manufacturers to create more affordable solutions. The minimum viable kit that would have cost over $1,000 a decade ago can now often be assembled for $250–$500 without sacrificing quality.
- Microphone (A Broadcast-Standard Dynamic Mic): The Shure SM7B is an icon in the broadcasting world for a reason. It delivers that warm, rich vocal tone you hear on top-tier podcasts and radio shows, and it has a built-in pop filter. It’s an investment that pays for itself in pure audio quality.
- Audio Interface (A More Robust Option): A high-end mic needs an interface that can provide enough clean "gain" (volume) to make it shine. A device like the Focusrite Scarlett 2i2, or a dedicated mic booster like a Cloudlifter, ensures you get a strong, clean signal from the SM7B without introducing unwanted hiss.
- Acoustic Treatment (Foundational Sound Control): At this level, the room itself becomes the final piece of the audio puzzle. Just a few well-placed acoustic panels behind your microphone and at key reflection points will absorb echo and give your recordings a tight, focused, professional sound.
This setup delivers uncompromising audio quality. It signals to your C-suite audience that your brand operates at the highest level. Of course, the gear is only part of the financial picture. You can get a detailed breakdown in our article exploring how much it truly costs to start a podcast.
By starting with a budget that fits your current needs, you create a sustainable path toward building an authoritative voice in your industry.
Beyond The Mic: Small Upgrades For A Big Impact
Once you've got your core audio gear sorted, a few small, strategic additions can make a massive difference in your production quality. We're not talking about expensive upgrades here; these are the inexpensive accessories that seasoned podcasters absolutely swear by.
Think of these items as the supporting cast for your microphone. They're the secret sauce that takes your audio from “good for a beginner” to just plain “good.” They handle the small but critical tasks that help your mic perform at its best, ensuring your recordings are clean, consistent, and free of distracting noise.
This decision tree shows how you might think about your budget, starting with a simple USB setup and scaling up from there.
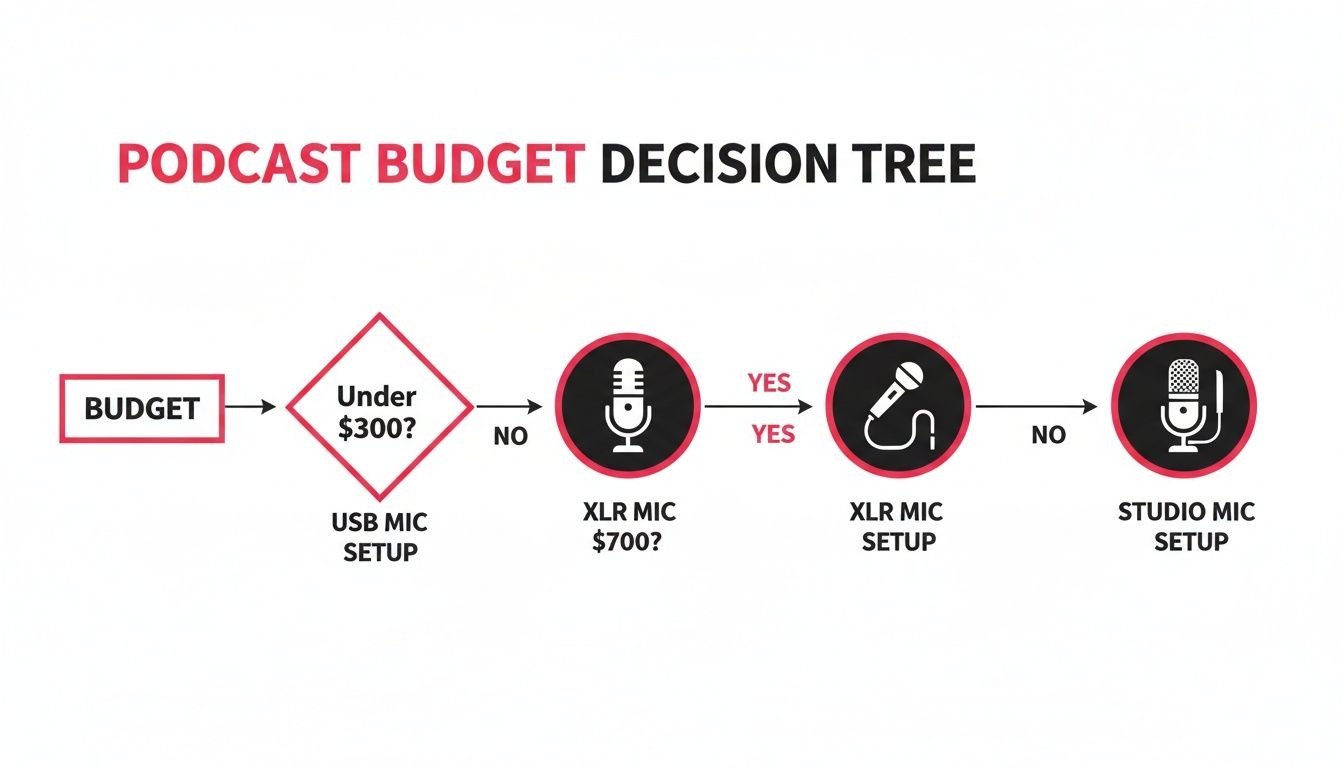
As you can see, even a small jump from under $300 to the $300-$700 range opens up a world of more professional XLR options.
Must-Have Accessories For Clean Audio
First up, a pop filter. This is a simple screen, either foam or mesh, that sits between you and your microphone. It’s your first line of defense against plosives, those harsh, explosive bursts of air from 'p' and 'b' sounds that cause a jarring "pop" in your recording. It's a tiny investment for a huge improvement in clarity.
Next on the list is a boom arm. This adjustable arm clamps directly to your desk and holds your microphone, freeing up valuable desk space. More importantly, it lets you position the mic perfectly and maintain a consistent distance from your mouth. That consistency is key for steady audio levels, which makes life so much easier in the editing phase.
Finally, a shock mount is essential if you're using a mic on any kind of stand or boom arm. This little cradle isolates your microphone from the stand itself, absorbing any vibrations from desk bumps, typing, or even just tapping your foot. Without it, those low-frequency rumbles can travel right up the stand and straight into your recording.
No-Budget Tips For A Better-Sounding Room
You don't always have to spend money to improve your sound. Your recording environment plays a massive role in audio quality, often more so than the microphone itself. A high-end mic in an echoey kitchen is going to sound terrible, period.
A common mistake beginners make is focusing entirely on gear while ignoring the room. Controlling your recording space is the single most effective, and often free, way to elevate your audio.
Here are a few practical, no-cost ways to make your room sound better:
- Record in a walk-in closet. The clothes hanging around you act as natural sound absorbers, killing echo and creating a tight, focused vocal sound. It's a classic podcaster trick for a reason; it works incredibly well.
- Use blankets and pillows. If a closet isn't an option, hang thick blankets on the walls around your recording area. Toss some pillows in the corners of the room. Soft surfaces absorb sound waves instead of letting them bounce around.
- Move away from hard surfaces. Get as far away as possible from bare walls, windows, and hardwood floors. A room with carpet, curtains, and a sofa is always a better choice.
These small details are what truly separate amateur-sounding podcasts from polished, professional productions. They show your audience that you care about their listening experience. A clean recording also makes your post-production workflow much smoother, especially as you explore the best podcast editing software options. By combining a few key accessories with a thoughtfully chosen recording space, you can get professional-grade audio on a beginner's budget.
Mastering The Remote Guest Recording
B2B podcasting pretty much runs on the insights of industry experts, which means you have to get good at remote recording. It's a non-negotiable skill. The ability to bring on high-quality guests easily is a huge advantage: they don't need to travel, it's easier to find a time that works, and you don't have to pay for studio time or reimburse expenses.
The real secret to a flawless remote interview isn't fancy gear, it's preparation. Your entire process needs to be built around making it dead simple for your high-profile guests to sound amazing. This is the single biggest thing that separates professional B2B podcasts from the ones that sound like they were recorded in a tin can.
Ditch The Video Call Software
First things first: stop using Zoom or Google Meet for your final recordings. I know it's tempting, but please, don't do it.
While they're great for meetings, these tools aggressively compress audio to save bandwidth. That process strips all the richness and clarity from a person's voice, leaving it sounding thin, digitized, and unprofessional. It's a podcast killer.
Instead, you need a dedicated remote recording platform. Tools like Riverside, Descript, or Adobe Podcast were built specifically for this. They work by recording separate, high-quality audio and video tracks locally on each person's computer.
This is a huge deal. It means if your guest's internet glitches or drops out mid-sentence, their recording stays pristine and completely unaffected. The full-quality file is saved directly to their machine before it gets uploaded, protecting your entire production from the whims of a bad Wi-Fi connection.
For a deeper dive, our guide to podcast remote recording breaks down the technical details you'll want to know.
Equip Your Guest For Success
The most common point of failure in any remote recording is the guest's setup. They aren't audio pros, and you can't expect them to have the perfect mic or a sound-treated room. Your job is to guide them.
A simple, friendly "pre-flight checklist" sent a few days before the recording works wonders. This isn't about making demands; it's about setting them up to shine and making both of you look good.
Here’s a simple checklist you can steal and send to your guests:
- Use Wired Headphones. This one is non-negotiable. It stops their computer's speakers from bleeding into their microphone, which creates a nasty echo on their audio track. Emphasize that any old pair of wired earbuds will do the trick, and that Bluetooth can sometimes cause issues.
- Find a Quiet, Soft Room. Ask them to pick a room with carpet, curtains, or a lot of furniture. A walk-in closet is a classic pro-audio trick for a reason. All those soft surfaces absorb sound and reduce echoes, making their voices sound much clearer.
- Face a Window for Light. Natural light is the best and cheapest way to get better video. Just having them sit with a window in front of them will make them look dramatically better without any special equipment.
- Close Other Applications. A quick reminder to close out any extra browser tabs and apps on their computer can make a big difference. This frees up processing power and ensures a smoother recording on their end.
"One thing people worry about is guests not having good equipment for remote recordings. We recommend wired headphones, sitting in front of a window to get natural light, and you can even send cheaper equipment to guests as a gift if you have the budget." - Tom Hunt, Founder of Fame.
The Ultimate Pro Move: Ship a Guest Mic Kit
If you have the budget and are interviewing a particularly high-value guest, consider sending them an affordable "guest kit." It’s a fantastic gesture that shows you genuinely value their time, and it guarantees you get the audio quality you need.
This doesn't have to break the bank. A simple kit could include:
- An affordable but great-sounding USB mic like a Samson Q2U or Blue Yeti.
- A pair of basic wired earbuds.
- A small, pre-printed card with dead-simple setup instructions.
This small investment removes all the guesswork and ensures your B2B podcast has a consistent, professional sound across every single episode. That kind of quality goes a long way in building your brand's reputation.
Your Pre-Flight Checklist For A Flawless First Recording
You've got the gear, the guest is booked, and you're ready to hit record. Hold on. Before you jump in, running through a quick pre-flight check can be the difference between a smooth session and hours of headaches in post-production.
This isn't about more theory. This is the final, actionable list that takes the guesswork out of your first recording.
Before You Record
Think of this as setting the stage. Getting these details right before the mics are hot lets you focus completely on the conversation when it matters most.
- Test Your Mic Levels: Start talking into your mic at a normal, conversational volume. Watch the audio meter in your recording software; you want it to bounce around the yellow, consistently around -12 dB to -10dB. If it ever hits the red, you're too loud, and the audio will distort.
- Confirm Your Inputs: This is a classic rookie mistake, so double-check it every time. Make sure your recording software is set to pull audio from your fancy new microphone (e.g., "Focusrite Scarlett") rather than your laptop's built-in mic.
- Give Your Computer a Break: Close all unnecessary applications and browser tabs. Podcasting can be demanding on your computer's processing power, and freeing up resources dramatically reduces the risk of a crash or audio glitches mid-sentence.
During The Session
Once you're rolling, your job is to keep things consistent and listen closely. This is how you spot problems before they have a chance to ruin a great take.
Always, always, always wear your headphones. Monitoring your own audio live is the only way to catch distracting background hum, annoying mouth clicks, or technical glitches as they happen, not hours later when it’s impossible to fix.
Also, try to stay a consistent distance from your microphone. A good rule of thumb is about 4-6 inches away. Making this a habit is a simple way to keep your volume levels steady and professional without a lot of editing later.
After You're Done
The conversation is over, but you're not quite finished. A couple of final steps are crucial for protecting all that hard work.
First things first: save your raw audio files immediately. Save them in a high-quality, uncompressed format, such as WAV. This gives you the most data to work with, which means maximum flexibility for editing and polishing.
With your episode ready to go, the next step is getting it in front of the right people. Services like Fame’s B2B social media and newsletter management can help turn that flawless recording into an audience that actually cares.
Frequently Asked Questions
Let's tackle a few common questions that come up for B2B teams getting their podcasts off the ground. Getting these sorted will help you clear those final hurdles and hit record with confidence.
Do I Need An Audio Interface With A USB Mic?
Nope, you're all good. Think of a USB microphone as a brilliant all-in-one solution. It has the audio interface built in, converting your voice into a digital signal your computer can use.
You only need to consider a separate external audio interface when you upgrade to an XLR microphone. Those mics need an external box to connect to your computer and get the power they need to run.
What's More Important: A Great Mic Or A Good Room?
The room, without a doubt. It’s not even a close contest.
You could have a $500 microphone, but if you're recording in a kitchen full of echo and hard, reflective surfaces, it’s going to sound awful. On the flip side, a solid $100 microphone in a quiet, carpeted bedroom with curtains and a sofa will sound ten times better.
For anyone just starting, the biggest and fastest quality win comes from controlling your recording environment. The old trick of recording in a walk-in closet packed with clothes really works, and it's free. It’ll do more for your sound than just throwing money at a more expensive mic.
How Do I Stop A Guest's Bad Audio From Ruining My Podcast?
This is all about being proactive because you can’t really polish a turd, so to speak. Once the audio is truly bad, there's very little you can do in post-production to save it.
First things first, always use a dedicated remote recording platform like Riverside.fm or SquadCast. These tools are essential because they record each person’s audio locally. That means if someone's internet connection glitches or drops out, it won't mess up their final audio file. It’s a lifesaver.
Next, you need to gently guide your guests. Send them a simple prep doc before you hit record.
A "pre-flight checklist" for guests is a total game-changer. Just politely ask them to use wired headphones (not AirPods!), find a quiet spot away from distractions, and maybe sit facing a window for some nice, natural light. This one simple step prevents 90% of the audio headaches you'll run into with remote guests.
If you’re interviewing a really high-value guest, consider shipping them an affordable USB mic. Something like a Samson Q2U is a smart, relatively small investment. It guarantees you get professional-sounding audio and shows your guest that you’re serious about quality and value their time.
Ready to launch a B2B podcast that drives real business results? At Fame, we handle everything from strategy and production to promotion, so you can focus on building authority in your industry. Let's create your company's podcast together.
Related content
- Read moreFame Team · July 16, 2026
10 Account Based Marketing Tactics For B2B Growth In 2026
Discover 10 actionable account based marketing tactics for B2B tech. Learn to use podcasts, data, and targeted content to close high-value accounts. - Read moreFame Team · July 16, 2026
The 8 Best Brighton Podcast Agency Picks For 2026
Find the best Brighton podcast agency for your B2B brand. Our 2026 guide reviews top 8 agencies for production, growth & ROI. Expert analysis here