
At a bare minimum, you need three things to start a podcast: a microphone, headphones, and recording software. That’s it. While you can always add more gear to your setup down the line, these three items are the non-negotiable foundation for capturing clean, professional audio.
And professional audio is what keeps listeners from hitting "stop."
Your No-Nonsense Podcast Equipment Checklist
Let's cut right to it. Launching a B2B podcast that sounds credible doesn't require a Hollywood-sized budget. It just requires a ruthless focus on what actually matters: pristine audio quality.
Poor sound is the fastest way to lose an audience. People can put up with lower quality video, but low quality audio is jarring, and they will tune out in seconds. Your equipment choices are absolutely crucial from day one.
The key is to pick a gear that matches your ambition and your budget. It's like buying a car. You can start with a reliable sedan (a basic setup), upgrade to something with more horsepower (a pro setup), or get the multi-passenger van for the whole team (a multi-host setup). Each one gets you where you're going.
For a much deeper dive into specific setups, check out our actionable guide to podcast setup equipment.
Choosing Your Starting Tier
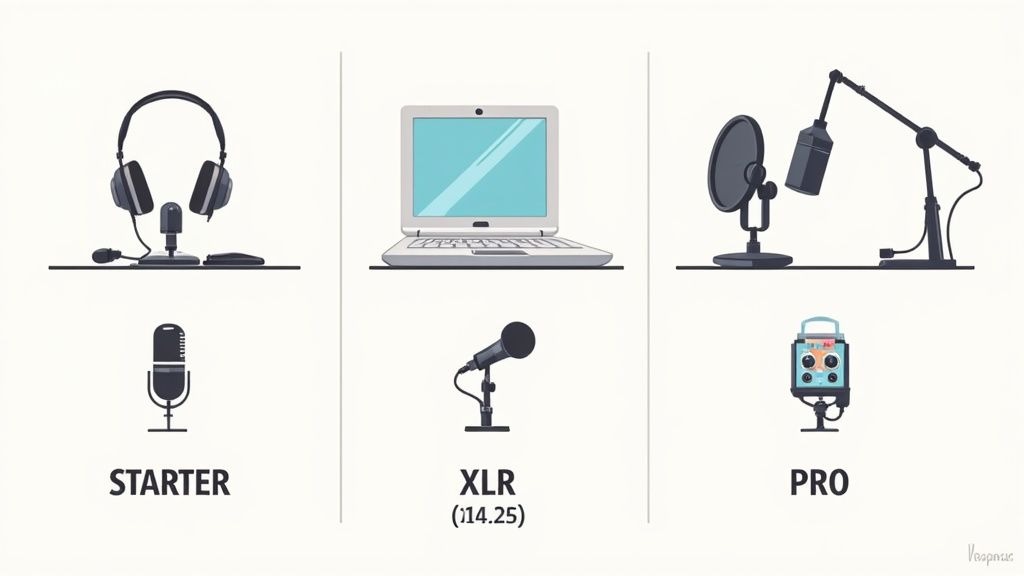
Your budget is the first and most important filter for your equipment search. This decision tree lays out the three most common paths for new podcasters, making the choice a lot simpler.

As you can see, even a modest budget can get you a high-quality USB microphone. As you invest more, you open the door to more advanced setups with XLR mics and audio interfaces.
To make this even more practical, let’s look at some real-world examples of what you can build at each level.
Podcast Starter Kits for Every Ambition
This table breaks down field-tested product recommendations and realistic costs for three common starting points. It's designed to help you make a smart investment based on your specific goals for the show.

Ultimately, your audio quality is your reputation. Whether you start with a simple $70 setup or invest in a more robust studio, the goal is the same: deliver clear, professional audio that positions your brand as an authority worth listening to.
Choosing a Microphone That Makes You Sound Great
Let's get one thing straight: your microphone is the heart of your podcast. It's the one piece of equipment that directly translates your voice into a signal your listeners hear, so getting it right is non-negotiable.
The podcast equipment market, which was valued at USD 3.7 billion in 2025 and is projected to hit USD 7.2 billion by 2033, shows just how seriously creators are taking their sound quality. Professional gear is quickly becoming the standard expectation, and the mic is where it all starts.
Ultimately, the goal is to find the perfect match for your voice, your room, and your budget.
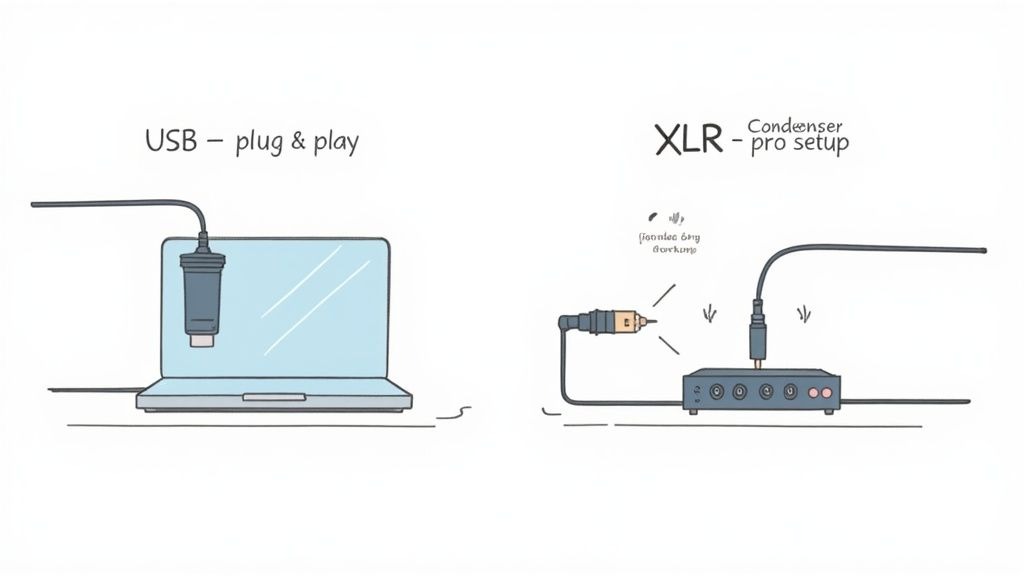
The First Big Choice: USB vs. XLR
Your first decision point is the connection type: USB or XLR. This choice sets the stage for the rest of your setup.
Think of it like this:
A USB microphone is like a high-quality webcam. It’s an all-in-one solution that you plug directly into your computer, and it just works. It’s perfect for simplicity, portability, and getting started quickly with surprisingly good results.
An XLR microphone, on the other hand, is like a professional DSLR camera. The mic itself offers superior quality and flexibility, but it needs a separate "lens" to function, in this case, an audio interface. This piece of hardware connects the mic to your computer. While it adds a bit of cost and complexity, it gives you far more control and a much higher ceiling for audio fidelity.
For most new B2B podcasters, a quality USB mic is the perfect starting point.
Dynamic vs. Condenser Mics Explained
Next up is the type of microphone: dynamic or condenser. This choice depends almost entirely on where you'll be recording.
- Dynamic Mics: These are the rugged workhorses of the audio world. They excel at rejecting background noise, making them ideal for imperfect spaces like a home office or a room with a bit of echo. They’ll capture your voice clearly without picking up your computer fan or the traffic outside. The legendary Shure SM7B is a dynamic mic for a reason.
- Condenser Mics: These mics are designed for detail. They're incredibly sensitive and capture every nuance of your voice, giving you that warm, rich, broadcast-quality tone. But that sensitivity is a double-edged sword; they'll also capture every other sound in the room. They truly shine in quiet, acoustically treated spaces.
If your recording room isn't a professional studio, a dynamic mic will be your best friend.
Top Microphone Recommendations for B2B Podcasters
We've been through the trenches testing gear, so we know what works. To save you the headache, we've even put together a detailed guide on choosing the best microphones for podcast recording that covers everything from budget picks to pro-level setups.
But to get you started, here are a few battle-tested models that deliver serious value.

Investing in the best microphone for podcasting you can afford is an investment in your brand's authority. When you sound professional, people listen.
When You Need an Audio Interface or Mixer
So, you've hit the ceiling with your USB microphone. You’re getting decent sound, but you know there’s another level you’re not quite reaching. Welcome to the next stage of your podcasting journey. This is where an audio interface or a mixer stops being a "nice-to-have" and becomes the central nervous system for your entire setup.
Think of an audio interface as a translator. It takes the rich, detailed analog signal from a professional XLR microphone and converts it into a digital format your computer can actually understand and record. This single step is the secret behind the depth and clarity you hear on top-tier shows.
This little box does more than just translate, though. It also supplies something called phantom power, a low-voltage current that most high-quality condenser mics need to even turn on. Without it, those sensitive, broadcast-quality mics are just expensive paperweights.
When to Get an Audio Interface
Leaping an audio interface is a key milestone. It’s the move you make when you're ready for more hands-on control and a significant jump in audio fidelity.
You absolutely need an audio interface if:
- You're upgrading to an XLR microphone: This is the big one. Pro-level mics like the RØDE PodMic or Shure SM7B use XLR connectors, which won't plug into your computer’s USB port.
- You need to record a co-host in the same room: Sure, there are some clunky software workarounds, but an interface with two inputs (like the ridiculously popular Focusrite Scarlett 2i2) is the only reliable way to record two clean, separate audio tracks. Your editor will thank you.
- You want to hear yourself without that annoying delay: Interfaces let you plug headphones directly into the unit for zero-latency monitoring. You hear exactly what the mic is capturing, in real-time, which is a game-changer for your delivery.
When to Get a Mixer
A mixer is like an audio interface on steroids. It’s not just a bridge between your mic and computer; it's a full-blown command center for more complex productions.
A mixer like the RØDECaster Pro becomes a necessity when:
- You're running a multi-person show: If you're hosting a roundtable with three or four people in the same room, a mixer is non-negotiable. Everyone gets their own mic and their own headphone feed.
- You want to mix in audio on the fly: Many mixers have built-in sound pads for triggering intros, outros, and sound effects live. This streamlines your workflow and makes you sound incredibly polished during the recording itself.
- You want to fix your audio before it records: Modern podcast mixers often include built-in processing like noise gates and compressors. This means you can clean up background noise and even out audio levels before the sound even hits your software.
Stepping up your gear is a serious move, and you're not alone. The global podcasting hardware market was valued at USD 3.6 billion in 2024 and is projected to explode to USD 28.07 billion by 2034. These numbers tell a clear story: serious podcasters are investing in the tools that give them a professional edge.
Finding the Right Recording and Editing Software
Your microphone and interface are all about capturing the raw sound, but your software is where the magic really happens. This is your digital studio, the place you’ll record, snip, polish, and piece together everything to create the final product your listeners hear.
Thankfully, you don't need a degree in audio engineering or a four-figure budget to get started. The days of needing a complex, expensive Digital Audio Workstation (DAW) are long gone. Plenty of top-tier podcasts are produced using software that’s intuitive, affordable, or even completely free.
The trick is to find a tool that fits how you work right now, but also has the legs to grow with you. Let’s walk through the main options without getting lost in the technical weeds.
Free and Beginner-Friendly Tools
If you're just dipping your toes in, free software is the perfect proving ground. You can learn the ropes of audio editing without spending a dime, and these tools are more than capable of producing a fantastic-sounding show.
- Audacity: The old faithful. Audacity is a free, open-source audio editor that’s been the starting point for countless podcasters. It works on Mac, Windows, and Linux and has everything you need: recording, editing, mixing, the works. The interface might look a bit dated, but don't let that fool you; it's a reliable workhorse.
- GarageBand: If you're a Mac user, you already have this. GarageBand is pre-installed and is incredibly easy to get the hang of. Its visual, drag-and-drop design makes it a breeze to see your audio tracks, cut out mistakes, and layer in your intro music. It’s a much smoother experience than Audacity for creators who are just learning.
Next-Level Editing with AI and Automation
Once you’ve got the basics down, you’ll probably start looking for ways to speed things up. This is where modern, AI-powered tools come in. They can shave hours off your post-production time by automating the tedious parts of editing.
Descript is the big name here, and for good reason. It completely changes the editing game by transcribing your audio into text first. Want to edit your audio? Just edit the text document. If you delete a sentence from the transcript, Descript automatically snips out the corresponding audio. It makes editing feel as simple as writing a blog post.
Another huge time-saver is Castmagic. This tool plugs into your workflow and automatically pulls valuable assets straight from your audio files.
Just feed it a recording, and Castmagic can spit out key topics, speaker bios, and even potential hooks for social media. This is a massive shortcut for writing show notes and repurposing your content for promotion.
Professional Digital Audio Workstations (DAWs)
For those who want ultimate control over every little detail, a professional DAW is the next logical step. Tools like Adobe Audition or Hindenburg Pro are the industry standard for a reason.
They offer a much deeper feature set, including complex multi-track mixing, advanced noise reduction tools, and granular controls for EQ and compression. They definitely have a steeper learning curve and come with a subscription fee, but they give you the power to achieve broadcast-level audio quality. If you want a deeper look at the editing process itself, our guide on how to edit a podcast breaks down the crucial steps, no matter which software you land on.
And let's not forget video. Many B2B podcasts also have a video component, and using AI video editing software can seriously accelerate your workflow. These tools are perfect for creating promotional clips and repurposing your episodes for platforms like YouTube and LinkedIn, helping every episode go further.
Optimizing Your Space for Clearer Audio
Even the most expensive microphone on the planet will sound absolutely terrible in a bad room. Think of it this way: your recording environment is a silent partner in your podcast, and it has a huge say in the final quality.
Before you get lost in the world of fancy gear and complex software, you can get a massive audio upgrade for free, just by focusing on the space where you record. This is probably the single most effective thing you can do to elevate your sound.
We're not talking about soundproofing, which is the expensive, complicated process of stopping sound from getting in or out of a room. Our goal is much simpler: acoustic treatment. This is all about taming the sound inside the room.
Your main enemies are hard, flat surfaces, bare walls, windows, hardwood floors, and even your desk. Sound waves from your voice hit these surfaces and bounce all over the place. That chaotic bouncing creates echo and reverb, which makes your recording sound muddy, distant, and unprofessional.
Your mission, should you choose to accept it, is to kill those reflections with soft, irregular surfaces. The good news? You've probably got everything you need lying around the house.
Must-Have Mic Accessories
Before we start rearranging furniture, let's nail down two small pieces of gear that make a monumental difference. Seriously, these are non-negotiable if you want clean audio.
- Pop Filter: This is the simple mesh or foam screen that sits between your mouth and the microphone. It’s built to diffuse the aggressive bursts of air that come from "p" and "b" sounds (plosives). Without one, you'll get jarring popping noises that are a nightmare to edit out. It’s a cheap, essential fix.
- Boom Arm: A boom arm is a game-changer. It clamps to your desk and lets you position the mic perfectly in front of your mouth, effortlessly. This keeps your audio levels consistent because you’re not leaning in and out, and it clears up precious desk space. Even better, it isolates the mic from any bumps or vibrations from your desk that a standard stand would pick up.
Low-Cost Room Treatment Strategies
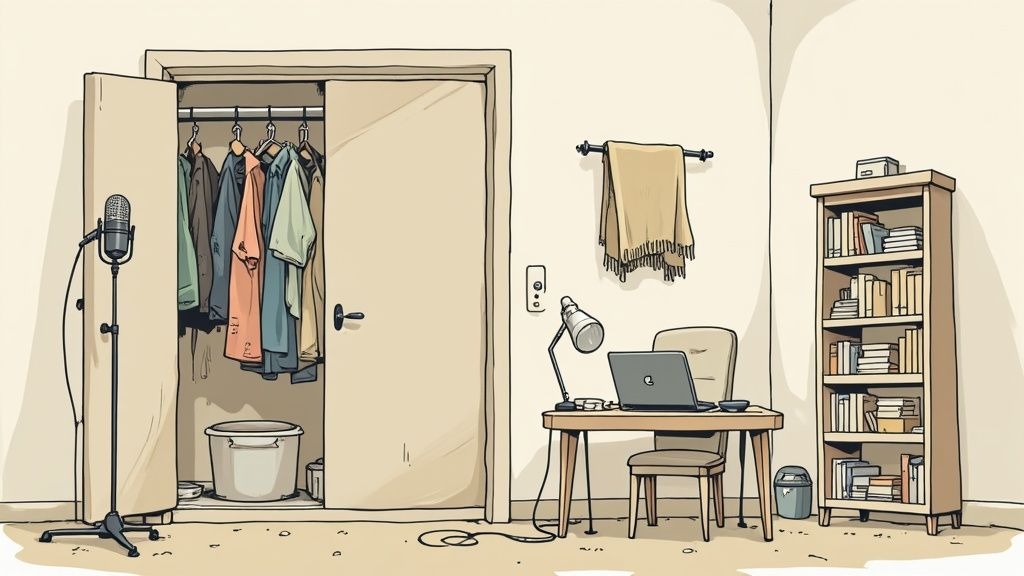
Forget about spending hundreds on fancy acoustic foam panels. You can get 90% of the way there with stuff you already own. The strategy is simple: cover up the hard stuff with soft stuff.
The best-kept secret in podcasting? A walk-in closet full of clothes is a near-perfect recording booth. The hanging clothes and small space absorb almost all sound reflections, giving you that tight, clean studio sound that’s perfect for voice.
If you can't record in a closet, no worries. You can easily replicate the effect in your office.
- Hang Heavy Blankets or Duvets: This is your number one weapon against echo. Drape them over bare walls, especially the wall your voice is hitting directly. It makes a world of difference.
- Use Bookshelves: A bookshelf packed with books of different shapes and sizes is an amazing sound diffuser. The uneven surface scatters the sound waves instead of letting them bounce right back at your mic.
- Add a Rug: If you have hardwood or tile floors, throw down a thick area rug. You'll be shocked at how much echo this single change can eliminate from the room.
- Draw the Curtains: Glass is a sound-reflecting nightmare. If you have windows, closing some heavy curtains will do a great job of absorbing those reflections.
By treating your room first, you guarantee the sound going into your microphone is as pure as possible. It saves you hours of headaches in the editing phase and is a foundational part of creating the best podcasting setup without needing a massive budget.
How to Nail High-Quality Remote Recordings
Let’s face it, your dream guest probably isn't your next-door neighbor. They could be anywhere on the planet.
Mastering remote recording isn't about compromise; it's a massive strategic advantage that opens up a global talent pool. When you ditch the travel friction, you make it incredibly easy to land high-caliber experts who would otherwise be out of reach.
Remote interviews slash costs. You’re not shelling out for studio time, and there are no travel or hotel bills to worry about. More importantly, it shows you respect your guest's time, which makes them far more likely to say "yes."
But what about quality control? That’s the big fear, isn't it? What happens if your guest has a terrible microphone or a choppy internet connection? Thankfully, the right tools and a little bit of prep work can make your conversations sound like you were sitting in the same room.
Use the Right Remote Recording Platform
The secret to crystal-clear remote audio is using a platform that records each person's audio track locally.
This just means the software records directly from their microphone onto their own computer, completely bypassing the internet during the recording itself. Once the call is over, the high-quality files get uploaded.
This single technical choice eliminates the risk of a bad connection ruining your interview. If someone’s Wi-Fi drops or stutters, it won't touch the final audio.
A fantastic tool that does this is Riverside.fm.
Platforms like Riverside are built for this. They provide separate, high-fidelity audio and video tracks for everyone involved, giving your production team maximum flexibility in the edit. To dive deeper into the nitty-gritty, check out our full guide on how to record a podcast remotely.
Prepare Your Guests for Success
Another common worry is that your guests won't have the right gear. You can solve this by sending them a simple prep sheet before you hit record. The goal is to make it as easy as possible for them to sound their best.
Here’s a simple checklist you can share:
- Use Wired Headphones: Always, always ask guests to use wired headphones or earbuds. Bluetooth can introduce lag and connection headaches, but a simple wired connection keeps the audio stable and in real-time.
- Find Good Lighting: For video shows, natural light is your best friend. Tell them to sit facing a window. It’s a zero-cost trick that dramatically improves video quality.
- Choose a Quiet Room: Ask them to find a small, quiet room with soft surfaces. Think carpets, curtains, or even a loaded bookshelf. These things are great at soaking up echo and making their audio much clearer.
As Tom Hunt, our founder at Fame, often says, “Great audio is more important than great video.” Listeners will put up with so-so video, but they will bounce immediately if the audio is harsh or hard to follow.
If you’ve got the budget, think about sending your guests an affordable USB mic like a Blue Yeti as a gift. It’s a small investment that guarantees great audio and leaves a lasting, positive impression. By managing the remote process proactively, you can make sure every single episode hits your quality standard.
Podcast Equipment Questions Answered
Getting started in podcasting opens up a can of worms when it comes to gear. What do you really need? To cut through the noise, we've rounded up the questions we hear most from new creators. Here are the straight-up, actionable answers that build on everything we've covered.
What Is the Single Most Important Piece of Equipment?
Your microphone. No question.
Your voice is the heart and soul of your podcast, and the mic is the tool that captures it. Listeners have an incredibly low tolerance for bad audio. If it’s tinny, distant, or full of static, they will tune out before you even get to your first point.
You can absolutely make do with basic software and skip the fancy extras, but a solid microphone is non-negotiable. Starting with a great USB mic like the Samson Q2U or Shure MV7 will give your show the biggest leg up in sounding professional right from episode one.
Do I Need to Soundproof My Room to Start a Podcast?
Nope. Professional soundproofing is overkill for 99% of podcasters. What you're actually aiming for is acoustic treatment, which is way easier and cheaper.
Soundproofing is about blocking sound from entering or leaving a room (think building a studio from scratch). Treatment, on the other hand, is all about taming the sound inside the room, killing echo and reverb so your voice sounds crisp and clear.
You can get amazing results for free. Record in a walk-in closet packed with clothes. The fabric will absorb sound reflections beautifully. Don't have one? Hang some heavy blankets on the walls, throw a thick rug on the floor, or fill the room with bookshelves. Anything soft will do the trick.
Should I Start With a USB or XLR Microphone?
For almost every beginner, a high-quality USB microphone is the way to go. They deliver fantastic, pro-level audio and couldn't be simpler to use. You just plug it into your computer, and you're ready to record.
XLR microphones are the industry standard and offer a higher ceiling for quality and control, but they come with a catch: they require an external audio interface. This adds another piece of gear to buy, learn, and troubleshoot.
Our advice? Start with a great USB mic. Get your reps in, focus on creating killer content, and find your voice. You can always upgrade to an XLR setup down the road when your show and your skills are ready for it.
The podcasting space is getting more crowded every day, making good audio a critical way to stand out. With projections showing more than 584 million people will be listening to podcasts in 2025, creators are rightly investing in gear that makes them sound legit among the 4.5 million shows out there. You can dig into more stats on this explosive growth and what it means for podcasters on facts.net.
Choosing the right equipment is step one. Turning those recordings into a polished show that actually drives business results is the real challenge. At Fame, we produce B2B podcasts that build authority and fill your pipeline. Learn how our end-to-end production service can help you launch and scale a podcast that grows your brand.