Key Takeaways
- Choosing the right gear is crucial for a professional B2B podcast setup.
- The choice between USB and XLR microphones is a key decision, with XLR being the professional standard.
- A simple setup can get you started, but a professional rig is necessary for a top-tier brand perception.
Let's get your podcast studio set up. Choosing the right gear from the start is a critical step for a B2B podcast. It's the first impression you make, and it directly signals how professional and authoritative your brand is. Follow these steps to nail your setup, and you'll save yourself countless headaches and costly upgrades down the road.
Choosing Your Foundational Podcast Gear
Before you hit record, you need the right tools. This isn't just about making a shopping list; it's a strategic move. For a B2B show that needs to command respect, your gear is the foundation your credibility is built on. If you need a comprehensive list of all the gear you might need, check out our guide on the equipment needed for a podcast.
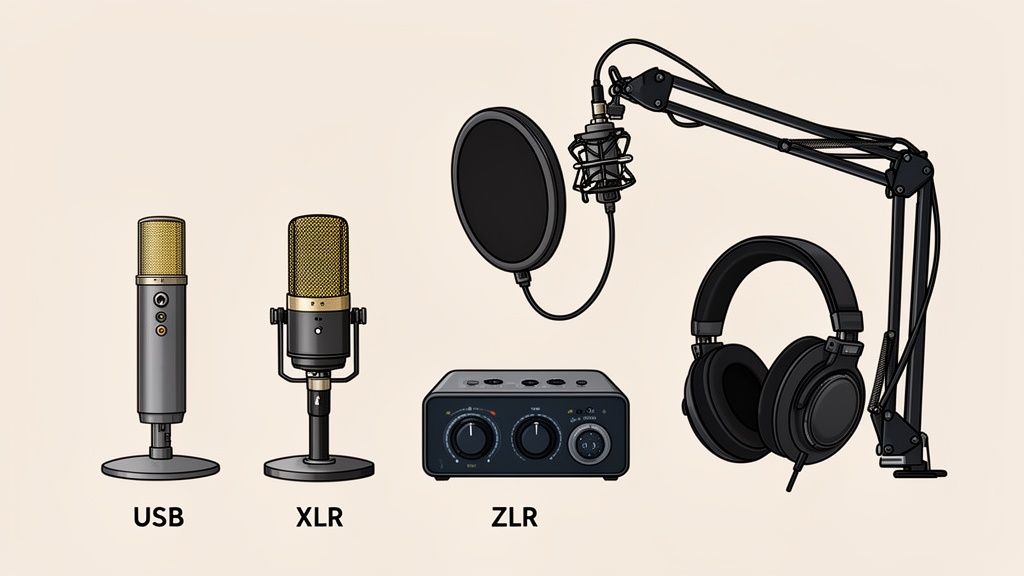
USB vs. XLR Microphones: The First Big Decision
The microphone is the heart of your setup, and your first major choice is between USB and XLR.
- USB Microphones: Think of these as your plug-and-play solution. They connect directly into your computer's USB port, making them incredibly simple to use. They're perfect for solo hosts or teams just getting their feet wet.
- XLR Microphones: This is the professional standard. You'll need an external audio interface to connect an XLR mic, but the payoff is superior sound quality, durability, and the flexibility to expand to a multi-host setup later on.
When B2B teams start out, USB microphones have a 36.1% popularity share, just edging out XLR mics at 32.5%. The Blue Yeti is a common starting point, with 16.6% of podcasters using it because it's so easy to set up. The Samson Q2U follows at 8.1%, largely because of its hybrid design that offers both USB and XLR outputs.
Interestingly, podcasters with over five years of experience almost always gravitate towards XLR for that extra layer of audio fidelity.
For a deeper look at specific models, our guide on the best microphones for podcast recording is a great place to start.
Podcast Starter Kit Comparison: Beginner vs. Pro
Deciding on your kit depends entirely on your goals. A simple, reliable setup can get you started, but a professional rig ensures your brand is perceived as a top-tier player. This table breaks down the key differences.
Ultimately, your budget will guide your initial choices. But for a B2B show, investing in the "Professional" column sooner rather than later pays dividends in perceived quality and brand credibility.
Interfaces and Mixers: Gaining Control
If you go the XLR route—and for B2B, I strongly recommend you do—you'll need an audio interface. This box takes the analog signal from your microphone and converts it into a digital signal your computer can record. A fantastic, no-fuss starting point is the Focusrite Scarlett 2i2.
A mixer takes it a step further, giving you hands-on control to adjust levels, add effects, and manage multiple microphones in real-time. It’s overkill for most, but essential if you plan on having multiple in-person hosts or complex audio routing.
For most B2B podcasts just starting, a simple two-channel audio interface is all you need. It delivers that huge quality jump from an XLR mic without the learning curve of a full mixing board.
Essential Audio Accessories
Don't overlook the small stuff. A few key accessories can make a massive difference in your final sound quality.
- Pop Filter: This is a non-negotiable. It's a simple screen that sits in front of your mic to soften the harsh "p" and "b" sounds—known as plosives—that cause that ugly popping noise in your recording.
- Boom Arm: Clamp one of these to your desk. It holds your microphone in the perfect spot, freeing up desk space and, more importantly, isolating it from any vibrations you make by typing or bumping the table.
- Closed-Back Headphones: You absolutely need these. They prevent the sound from your headphones from "bleeding" back into your microphone. This lets you monitor your own voice and your guest's audio live, so you can catch any issues before they become a post-production nightmare.
Designing Your Ideal Recording Environment
Top-tier equipment is only half the battle. Your recording space is the other, equally critical piece of the puzzle. The most expensive microphone in the world will still sound amateurish in a room full of echo and background noise.
The good news? You don't need to rent a professional studio to get professional results.
Your main goal is to create a "dead" space. That just means you need to minimize all the reflective surfaces where sound waves can bounce around. Hardwood floors, big windows, and bare walls are your enemies here. They create reverberation (reverb) and echo, which is an instant red flag for any savvy B2B listener.
Taming Your Space on a Budget
Controlling your room’s acoustics really comes down to one thing: absorption. Fill the space with soft, irregular surfaces that trap sound instead of reflecting it.
Start by looking around for everyday items you already have. There's a reason a walk-in closet packed with clothes is a classic home studio hack—all that fabric absorbs sound beautifully. If a closet isn't an option, try these simple but surprisingly effective tweaks:
- Cover the floor: Throw down a thick rug or even just a few blankets. This is one of the easiest and most impactful changes you can make.
- Treat the walls: Hang heavy blankets or duvets on the walls. Bookshelves crammed with books are also fantastic because their varied shapes and paper texture break up and absorb sound waves.
- Soften the windows: Heavy curtains are your best friend. They're great for blocking sound from outside and killing reflections from the glass.
For a much deeper dive into moving from these quick fixes to a more permanent, optimized setup, check out our guide on professional podcast studio design.
Eliminating Ambient Noise
Once you've dealt with the reflections, it's time to hunt down and eliminate unwanted background noise. This is all the low-level hum and buzz that can subtly poison your audio quality.
Before you hit record, do a quick "noise audit." Sit in your chair with your mic on and your headphones cranked up. Just listen. What do you hear?
Turn everything off. I'm serious—the air conditioner, your computer notifications, the ceiling fan, even the hum from your refrigerator down the hall. Listeners have an incredibly low tolerance for bad audio, and these seemingly minor noises can be jarring and distracting.
Close the door to the room you're in. If you can, try to record when street traffic is at a minimum. These small, deliberate actions are what separate the pros from the amateurs. They ensure your voice is the only thing your microphone captures, delivering that crystal-clear audio that reinforces your brand’s authority.
Connecting Your Gear for Flawless Audio
You've picked out your gear and tamed your room's acoustics—now it’s time to plug everything in and make it all work together. This is where you build a clean signal chain: the literal path your voice takes from the microphone, through your interface, and into your recording software.
Getting this path right is the key to minimizing noise and capturing that crisp, professional sound everyone's after.
Don't rush this part. The podcasting hardware market is exploding for a reason, especially as B2B companies realize audio is a powerful way to build authority. The quality of your microphone is a big piece of the puzzle, but how you connect it is just as important. In fact, poor audio quality can cause listener drop-off rates of up to 30% in the very first minute. People can put up with lower quality video, but low quality audio is jarring and they will tune out.
Remember, a great recording always starts with the room itself. Before you plug in a single cable, your focus should be on creating a controlled environment.
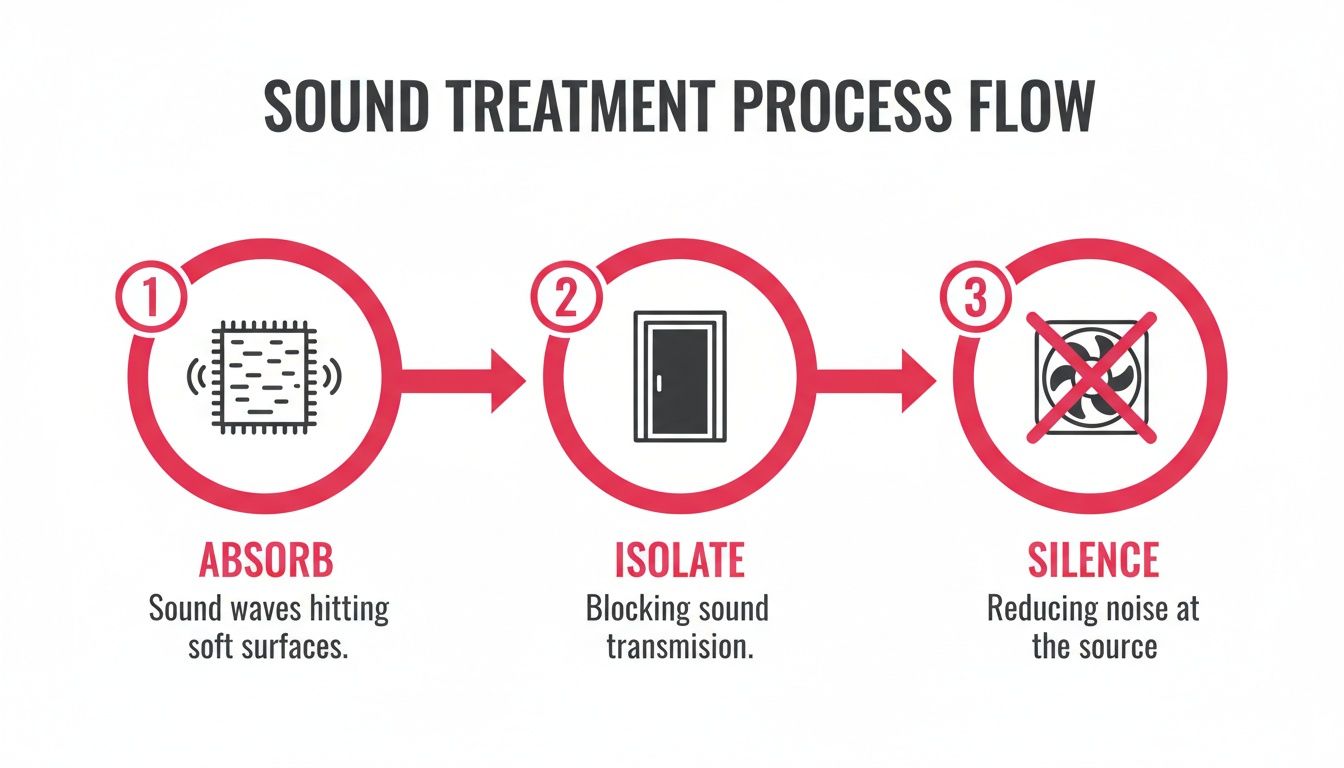
As you can see, it’s a three-pronged attack: absorbing reflections, isolating from outside noise, and silencing any ambient sounds. Nail this, and your gear can finally do its job properly.
Building Your Audio Signal Chain
Think of your signal chain as a one-way street for your voice. For a standard XLR microphone setup, the path is incredibly simple and effective.
Here’s the breakdown:
- Mic to Interface: Grab your XLR cable and plug the female end into the bottom of your microphone. Connect the other end to "Input 1" on your audio interface. You should hear a satisfying click when it's secure.
- Interface to Computer: Next, take the USB cable that came with your interface and connect it directly to a USB port on your computer. Your machine should automatically recognize it as a new audio device.
- Headphones to Interface: This is a big one. Plug your wired, closed-back headphones directly into the headphone jack on the audio interface—not your computer. This move lets you monitor your audio with zero latency, meaning you hear exactly what the mic is picking up, in real-time.
If you need a more detailed look at the specific components that make up a great setup, our step-by-step gear guide has you covered.
Mastering Gain Staging for Perfect Levels
With everything connected, the next critical step is gain staging. This just means setting the right input level for your microphone on the audio interface. The goal is simple: record your voice loud enough to be clear and present, but not so loud that it distorts or "clips."
Your target audio level should consistently peak between -12dB and -6dB on your recording software’s meter. This is the sweet spot. It gives you plenty of volume without risking distortion, leaving you with clean audio that’s a breeze to work with in post-production.
Here’s the step-by-step process to dial it in:
- Start talking into the microphone at your normal, comfortable podcasting volume.
- While you're talking, slowly turn up the "Gain" knob for Input 1 on your audio interface.
- Keep an eye on the audio meter inside your recording software (your DAW), like Audacity or Adobe Audition.
- Keep turning the gain up until your voice is consistently hitting that -12dB to -6dB range. If you see the meter flash red or hit 0dB, you're clipping. Back it off immediately.
Getting this right at the source is non-negotiable. Trying to fix audio that was recorded too quiet or too loud is a nightmare. A couple of minutes spent on proper gain staging will save you hours of headaches later and is one of the single most important things you can do for your sound quality.
Nail Your Remote Recordings with High-Profile Guests
In B2B podcasting, your guest list is everything. It’s what builds your credibility, and landing those big-name industry leaders can feel like a huge win. But here's the thing: they're busy. Any friction, any technical hiccup, any confusing step in the recording process can make them drop out.
Remote recordings make it easier for guests to show up, which means you can get higher-quality guests without having to reimburse travel or pay for studio time. This is where your remote recording setup becomes your secret weapon. The right tech stack isn't just about sounding good; it's about creating a completely seamless and professional experience for people who have very little time to spare.
Ditch Zoom and Use a Dedicated Recording Platform
Look, we all know how to use Zoom, but it’s just not built for high-fidelity audio. It aggressively compresses audio to keep the call stable, which often leaves you with a recording that sounds thin, glitchy, and unprofessional.
This is why we swear by platforms like Riverside.fm. They completely solve the internet connection problem. Instead of recording the compressed audio stream from the call, these platforms record each person’s audio and video locally on their own computer. When the interview is over, the full-quality files are automatically uploaded.
This method gives you two massive advantages:
- Studio-Quality Audio: You get separate, uncompressed WAV audio tracks for every single speaker. This is gold for your post-production team, giving them total flexibility in the edit.
- Bulletproof Recordings: If your guest's Wi-Fi stutters or drops out for a second, it won’t ruin the final recording. The live chat might get choppy, but the local file is saved perfectly intact.
As our founder, Tom Hunt, always says, removing every single point of friction is the key to getting great content from top-tier guests. Sending a simple, one-click link to a platform like Riverside is miles more professional than asking a CEO to dig through their Zoom audio settings.
Get Your Guests Set Up for Success
You can't control your guest’s recording environment, but you can gently guide them in the right direction. A few days before the interview, send over a simple prep guide with a few friendly tips. For an in-depth look, see our guide on how guests can prepare for an appearance.
Here’s what we recommend telling them:
- Use Wired Headphones: Even a basic pair of wired earbuds is more reliable than Bluetooth, which can introduce annoying latency and connection problems.
- Find a Quiet Space: A smaller room with soft furnishings is perfect. Think carpets, curtains, bookshelves—anything to absorb sound and kill that dreaded echo.
- Face a Window: For video recordings, have them sit facing a window. This is the easiest way to get great natural lighting and it makes a huge difference.
As the podcasting world keeps growing, getting this right is non-negotiable for B2B brands. With video now a huge part of the game, having a solid plan for both audio and video quality cements your show as a serious player. For more on that, check out how to master podcast remote recording.
Pro Tip: If your budget allows, consider sending high-profile guests a quality USB microphone like a Blue Yeti as a gift beforehand. It’s a small investment that not only guarantees you get pristine audio but also leaves a fantastic impression.
Your Post-Recording Quality Control Workflow
Hitting "stop" on the recording is a great feeling, but the job isn't quite done. What happens next is just as important as the recording itself. Now is the time to build a disciplined workflow to protect your audio files and set your editor up for a smooth, painless process. A clear podcast production workflow is key to scaling your content efficiently.
A solid post-recording system is the difference between a professional operation and a chaotic mess of lost files and confusing handoffs. Trust me, putting this in place now will save you countless headaches down the road.
File Management and Naming Conventions
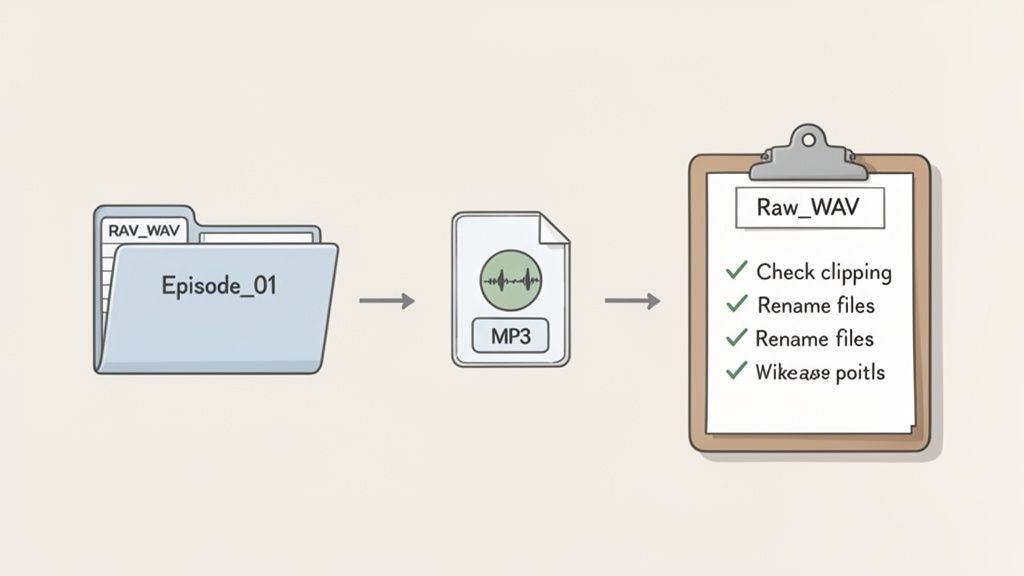
First things first, get organized. A messy folder of audio files is a nightmare waiting to happen, especially when you're working with a team.
The easiest way to start is by creating a master folder for every single episode. Inside that, you’ll create a few subfolders to keep all the different assets tidy and easy to find.
A simple, effective folder structure looks like this:
01_RAW_AUDIO(For all your original, untouched audio files)02_PROJECT_FILES(This is for your actual DAW project file)03_EDITED_AUDIO(Where the final edited WAV file will live)04_FINAL_MP3(For the compressed, ready-to-publish file)05_ASSETS(For things like show notes, transcripts, and artwork)
With the folders sorted, you need a clear naming convention for the files themselves. A consistent format like [Episode#]_[Speaker]_[Date].wav is perfect. For example: 015_Host_2024-10-26.wav. Anyone can look at that file and know exactly what it is without having to open it.
Once your audio is recorded and quality-checked, efficient digital asset management becomes critical for all your podcast files, from raw audio to final show notes. A practical guide on how to organize digital assets can help you build a system that scales with your show.
Quick Quality Checks and Exporting
Before you zip everything up and send it off to an editor, do a quick sanity check. You don’t need to listen to the whole thing from start to finish—just scrub through the recording and listen for any obvious deal-breakers.
Keep an ear out for major issues like:
- Clipping: That harsh, crackly distortion that happens when your recording levels were too hot.
- Audio Drift: This can happen with remote recordings where separate tracks slowly fall out of sync with each other.
- Missing Audio: Big chunks of silence where a speaker’s track dropped out.
Catching these problems right away can save your editor a world of pain and prevent delays.
Finally, make sure you're exporting your files in the right format. For the editing process, you should always export as an uncompressed WAV file. This preserves all the original audio data and gives your editor the most to work with. The final file you upload for listeners should be a much smaller MP3, which is perfect for streaming. Our guide on how to edit a podcast goes way deeper into prepping your audio for the post-production phase.
Got Questions About Your Podcast Setup?
Jumping into the world of B2B podcasting always kicks up a bunch of questions, especially around getting the gear right. I've been there. Let's walk through some of the most common things marketers ask when they're plugging everything in for the first time.
What’s the One Piece of Equipment I Absolutely Can’t Skimp On?
Hands down, it’s your microphone.
Think of it this way: every piece in your audio chain matters, but the microphone is where your sound actually begins its journey. It’s the tool that captures the authority and nuance in your voice.
No amount of editing wizardry can truly save audio that was captured poorly at the source. A great microphone grabs that warmth and clarity right from the start, which is non-negotiable for keeping listeners hooked. An audience might forgive so-so video, but bad audio? That's an instant "off" switch. Great audio is more important than great video.
If you’re looking for a solid starting point, our B2B podcast equipment guide has some great recommendations.
Do I Really Need an Audio Interface, or Can I Get by With a USB Mic?
If you're a solo host just dipping your toes in, a top-notch USB microphone is a fantastic way to start. It’s a true plug-and-play solution. All the tricky analog-to-digital conversion happens right inside the mic, which keeps your setup ridiculously simple.
But you'll hit a point where an audio interface becomes essential. That's usually when:
- You’re ready to step up to a professional XLR microphone for that classic, broadcast-quality sound.
- You need to record multiple guests in the same room, at the same time.
- You want finer, more hands-on control over your audio levels and headphone monitoring.
For any B2B podcast aiming to project a premium, authoritative brand, making the jump to an XLR mic and an interface is a natural and worthwhile next step.
The name of the game is reliability and simplicity. As our founder, Tom Hunt, always says, the key is to remove friction—not just for your guests, but for yourself. Start with what's manageable, and level up when your show demands it.
How Can I Make My Audio Better Without Buying Anything New?
This is my favorite question because the answer is completely free. Focus on two things: your recording environment and your microphone technique. These two tweaks will give you a bigger quality boost than almost any new piece of gear.
First, tame your recording space. Your mission is to kill echo and reverb. This means adding soft surfaces to the room. Throw some rugs on the floor, hang up heavy curtains, or even record in a walk-in closet packed with clothes. All that fabric will absorb sound waves instead of letting them bounce all over the place. And, of course, silence everything else—turn off your computer notifications, kill the AC, and close the door.
Second, nail your mic technique. You want to stay a consistent distance from the microphone—a good rule of thumb is about a fist's width away. Speaking directly into it will give you a clear, present sound. And always, always use a pop filter. It’s a simple screen that softens those harsh "p" and "b" sounds (we call them plosives) that can make a recording sound amateurish.
What Software Should I Be Using to Record?
To record and edit, you'll need what's called a Digital Audio Workstation, or DAW.
If you’re just starting out, Audacity is an amazing free tool that covers all the basics. When you're ready for more advanced features like complex multi-track editing and powerful noise reduction tools, Adobe Audition is the industry-standard pro tool.
For remote interviews—which are absolutely critical for landing high-profile B2B guests—we're huge believers in dedicated platforms like Riverside. Unlike a Zoom or Teams call, these tools record each person's audio locally, directly on their computer. This is a game-changer. It means that a glitchy internet connection or low bandwidth won't ruin the final audio quality, ensuring your guest sounds just as crisp and professional as you do.
Ready to create a B2B podcast that actually drives business results, without the headache of managing all the tech and production? At Fame, we handle everything from strategy and guest outreach to professional editing and promotion, guaranteeing at least 10% monthly download growth. Learn more about our B2B podcast production services and launch a show that builds real authority.