January 17, 202621 min read6 sections
A Guide To Professional Podcast Studio Design
By Fame Team
Key Takeaways
- Creating a professional podcast studio is not just about soundproofing and equipment, but also about building an environment that represents brand authority and delivers marketing results.
- A well-designed podcast studio should be a carefully balanced act of acoustics, equipment, video, and layout, with each element requiring attention to achieve a high-quality space.
- The demand for podcast studios is growing rapidly, with the global podcasting market expected to skyrocket from USD 32.48 billion in 2025 to USD 362.99 billion by 2035, making them an essential part of marketing infrastructure.
Great podcast studio design isn't just about soundproofing walls and buying fancy mics. It's about building an environment that screams brand authority and, more importantly, delivers real marketing results. This guide cuts through the fluff to give you a strategic, actionable blueprint for turning any room into a revenue-generating engine.
Your Blueprint for a B2B Podcast Studio
For any B2B company serious about claiming a thought leadership spot, a professional podcast studio is a non-negotiable investment. It’s not about ticking a box; it's about engineering a content creation hub that consistently churns out high-quality audio and video. This becomes a core asset, the foundation for generating a qualified pipeline and scaling your brand.
The demand for these spaces isn't just a hunch. The global podcasting market was valued at USD 32.48 billion in 2025 and is expected to skyrocket to USD 362.99 billion by 2035. This isn't just growth; it's an explosion. It tells you that dedicated studios are moving from "nice-to-have" to an essential part of marketing infrastructure.
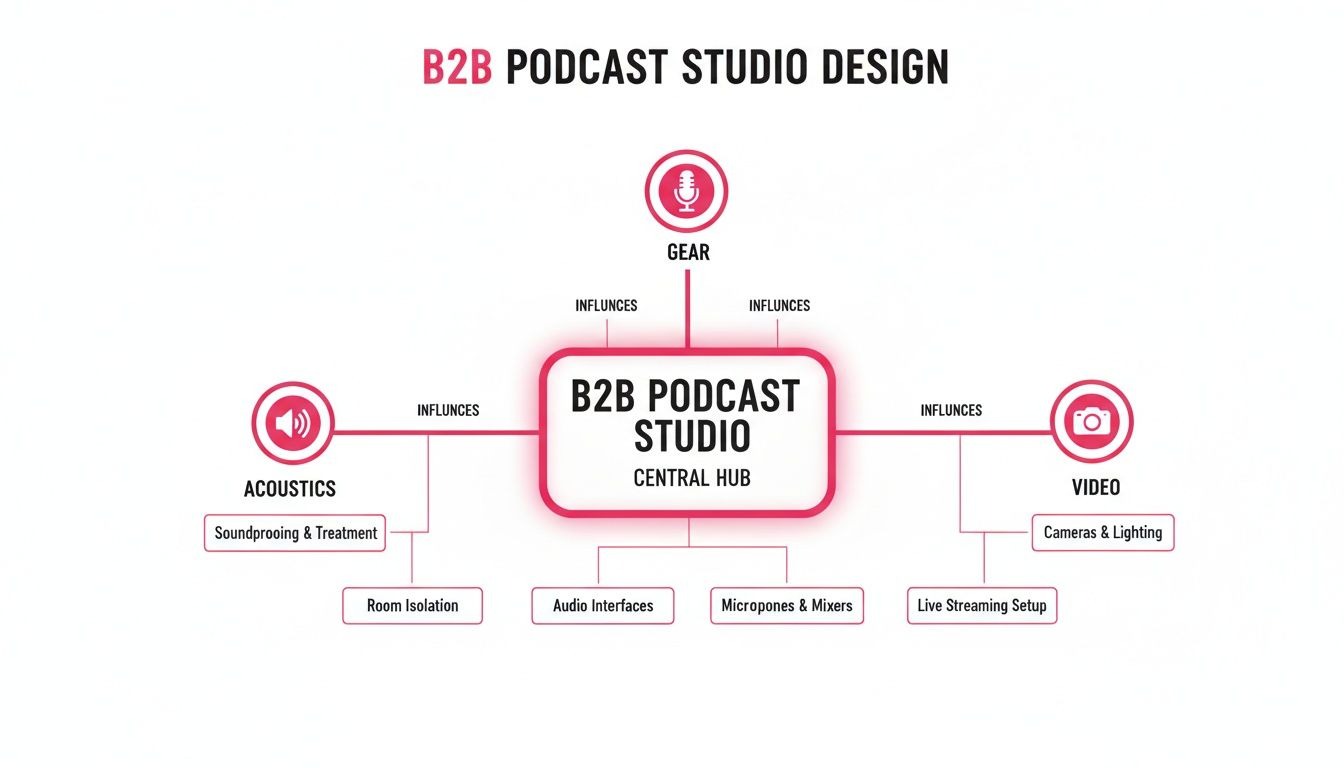
Core Pillars of Studio Design
A killer podcast studio is a careful balancing act of four key elements. Drop the ball on just one, and you'll sabotage the whole thing, no matter how much you spend on a microphone. To build a space that looks, sounds, and feels professional, you must nail all four.
Here’s your action plan:
- Master the Acoustics: This is non-negotiable. Before you buy any gear, your first job is to control the sound in your chosen room. This means taming echo and killing outside noise to get crisp, clean audio that barely needs touching in post-production.
- Select Strategic Equipment: Choose gear that is both reliable and scalable. Your goal is to understand the entire signal flow, from the moment sound hits the mic to the final recording, and invest in equipment that can grow with your content ambitions.
- Design for Video: In 2024, your studio has to look as good as it sounds. This means implementing smart lighting, planning camera angles, and creating a branded backdrop that reinforces your company’s identity on platforms like YouTube and LinkedIn.
- Optimize Your Layout: How you arrange furniture and gear directly impacts your efficiency and your guests' comfort. A smart layout creates a smooth, repeatable workflow for your team and a welcoming experience for everyone who steps inside.
From Concept to Creation
Before you even think about plugging in a single piece of gear, you need a plan for the physical space itself. Your first step is to choose the smallest room that comfortably fits your needs. A smaller room packed with soft furnishings is almost always better than a huge, empty one because it naturally absorbs sound and cuts down on echo. Before you start arranging desks, it's worth reading up on the fundamentals; something like a practical guide to acoustically treating a small room can be a huge help.
Think of your studio not as a line-item expense, but as a strategic investment. A purpose-built space elevates your content from just another podcast into a powerful asset that builds authority and drives measurable business growth.
Ultimately, the goal is to create an environment that mirrors the quality and expertise of your brand. For a much deeper dive into picking the right room and getting it ready, check out our guide to the perfect B2B podcast room setup. In the next sections, we'll walk through a detailed roadmap for each of these core pillars, helping you build a studio that truly delivers.
Mastering Acoustics for Professional Sound
Let’s get one thing straight: exceptional audio quality starts with the room, long before your voice ever hits a microphone. If there's one thing I've seen derail a promising studio build, it's overlooking the acoustics. Get this right, and you'll capture clean, crisp audio that saves you countless hours in post-production. Get it wrong, and you'll be fighting an uphill battle no matter how expensive your gear is.
To nail your room’s sound, we first need to clear up two terms that are constantly mixed up: soundproofing and acoustic treatment.
- Soundproofing (Isolation): This is all about blocking noise from getting in or out. Think of it as building a fortress. You’re stopping the sound of sirens, construction, or that sales rep with the booming voice next door from bleeding into your recording. It’s a structural job, usually involving adding mass to walls and sealing air gaps.
- Acoustic Treatment (Control): This is about managing how sound behaves inside the room. It’s about taming the echo and reverb that make you sound like you’re recording in a bathroom. This is what gives you that clear, direct, professional podcast sound.
While both are important, acoustic treatment is where you'll get the most bang for your buck and the most dramatic improvement in audio quality.
Action Plan: Taming Echo and Reverb
The mortal enemy of clear podcast audio is reverb. It’s the result of sound waves bouncing off hard, flat surfaces like drywall, windows, and hardwood floors. Parallel walls are especially notorious for this, creating a nasty, ringing effect called flutter echo.
Your first line of defense is to choose the right space. A smaller room is infinitely easier and cheaper to treat than a huge, cavernous one. Big rooms mean big echo. Look for a space that already has some natural sound absorption, things like carpet and fewer windows are a huge plus.
Your next step is to fill the room with soft furnishings. This is the most effective and affordable acoustic treatment you can do. Add a plush rug, hang heavy curtains over windows, place a fabric sofa against a wall, and put up bookshelves filled with books. These soft, irregular surfaces will break up and absorb sound waves naturally, doing much of the work before you even buy a single acoustic panel.
A room filled with a plush rug, heavy curtains, a fabric sofa, and packed bookshelves will perform better acoustically than an empty room with professional acoustic panels. The soft, irregular surfaces break up and absorb sound waves naturally.
This is the core idea: acoustics are the foundation upon which everything else is built. Your gear choices and video setup all depend on getting the room's sound right from the very start.
As you can see, acoustics aren’t just a nice-to-have; they’re a central pillar influencing the quality of your final product just as much as your microphone or camera.
Strategic Acoustic Treatment
Once you've leaned on soft furnishings to do some of the heavy lifting, you can bring in dedicated acoustic treatment. This doesn’t mean you need to cover every square inch of your walls with foam. It's all about strategic placement.
The goal is to hit the first reflection points. These are the specific spots on your walls, ceiling, and even the floor where sound bounces directly from the source (your mouth) into the microphone. Here's a simple way to find them called the "mirror trick": sit in your recording chair and have a friend slide a small mirror along the walls. Any spot where you can see the microphone in the reflection is a first reflection point. That's where you need to place an acoustic panel.
To help you decide what you need, here's a look at the most common types of acoustic treatment.
Acoustic Treatment Options
This table compares common acoustic treatment methods, their primary function, ideal placement, and relative cost to help you make informed decisions for your studio.
| Treatment Type | Primary Function | Best For | Estimated Cost |
|---|---|---|---|
| Acoustic Panels | Absorbing mid-to-high frequency sound waves (like voices) | Placing at first reflection points on walls and ceilings to reduce echo | $ (Low to Moderate) |
| Bass Traps | Absorbing low-frequency sound waves that build up in corners | Placing in room corners, ideally from floor to ceiling | $$ (Moderate) |
| Diffusers | Scattering sound waves to create a more natural, open sound | Used in larger rooms to improve sound without adding echo | $$$ (High) |
For most B2B podcast studios, a smart combination of acoustic panels and bass traps is all it takes to achieve a professional sound. You're essentially applying the same ideas used in massive concert halls, just on a much smaller scale. For those curious about the deeper science, exploring the core principles of acoustic design offers some fascinating insights.
Getting these acoustic principles right is the most critical first step. Once your room sounds great, you can confidently move on to the gear. If you want to jump ahead, you can see how it all comes together in our guide on how to record a podcast. By treating your room first, you ensure that every piece of equipment you plug in can perform at its absolute best.
Choosing the Right Gear for Your Studio
Diving into the world of podcast equipment can feel like learning a new language. For a B2B podcast, where every touchpoint reflects on your brand, skimping on gear isn't an option. But this isn't about buying the most expensive microphone on the shelf. It’s about building a reliable, scalable tech stack that delivers crisp, professional audio every single time.
To get there, you first need to understand the fundamental journey your sound takes. In the audio world, we call this the signal flow.
Think of it like a package delivery route. Your voice is the package. The microphone is the local post office that accepts it, the audio interface is the sorting center that processes it, and your laptop is the final destination. If any step in that chain is weak, the package gets lost or arrives damaged.
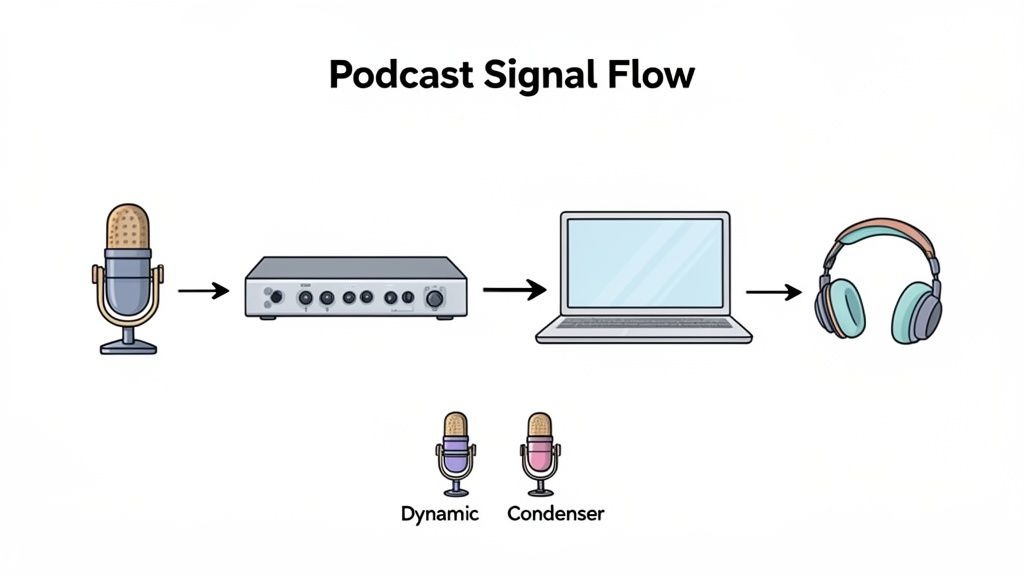
This simple path, mic, interface, and computer is the heart of your entire setup. Once you get this, every other equipment decision becomes much, much clearer.
The Microphone: The Voice of Your Brand
Your microphone is the very first point of contact for your audio, and it’s arguably the most critical. The choice you make here directly shapes the clarity, warmth, and overall quality of your show. You'll mainly run into two types: dynamic and condenser. They look similar, but they're built for completely different jobs.
- Dynamic Microphones: These are the rugged workhorses of the audio world. Think of them as specialists. They are less sensitive and absolutely brilliant at rejecting background noise. If your studio is in a typical office with imperfect acoustics, a dynamic mic is your best friend. It hones in on the sound source right in front of it (your voice) and does a great job of ignoring room echo or the low hum of an HVAC system.
- Condenser Microphones: These mics are the opposite; they're built to capture everything with incredible detail and sensitivity. They deliver that crisp, airy sound you hear on studio albums. But that sensitivity is a double-edged sword. A condenser will pick up the rustle of papers, the click of a keyboard, and every ounce of reverb in your room. They only truly shine in an acoustically perfect, sound-treated space.
For 95% of B2B podcast studios being built in an office, a dynamic microphone is the smarter, safer bet. It gives you that classic, clean broadcast sound and forgives a room that isn't a professional recording booth.
The bottom line is simple: choose the mic that fits your room. A great dynamic mic in a decent room will always sound better than a high-end condenser in a bad one.
The Audio Interface: Your Studio's Hub
Once the mic captures your voice, that analog sound wave needs to be translated into ones and zeros that your computer can actually understand. That's the job of an audio interface or a mixer. This little box is the central nervous system of your audio setup.
An audio interface connects your professional XLR mics to your computer, usually via USB. It contains high-quality preamps to boost the mic's quiet signal to a usable level and converters to digitize it. For most shows with one to four speakers, a simple two- or four-channel interface is all you need.
A mixer, on the other hand, gives you more hands-on control with physical faders, knobs, and buttons to adjust levels on the fly. While they're fantastic for complex live productions, they can add a layer of complexity that's just not necessary for a typical B2B podcast. Start with a quality interface; you can always add a mixer later if your production ambitions grow.
Choosing the right interface is really about anticipating your future needs. A two-channel model is perfect for a host and one guest, but if you envision hosting roundtable discussions down the line, a four-channel model gives you that crucial room to grow.
The Non-Negotiable Accessories
Your signal flow is only as strong as its weakest link, and that weak link is often an overlooked accessory. Don't make that mistake. Investing in quality cables and proper headphones isn't a luxury; it’s a requirement for getting professional, headache-free results.
- XLR Cables: These are the three-pin cables connecting your microphone to your interface. Cheap, poorly shielded cables are notorious for picking up electronic interference, which translates to an audible and incredibly annoying buzz or hum in your recordings. A solid set of cables is a small but critical investment.
- Studio Headphones: For recording, you absolutely need "closed-back" studio headphones. Unlike the earbuds you use for music, these are designed to physically isolate sound. This prevents the audio you're hearing in your ears from "bleeding" out and getting picked up by your microphone, which causes echo. This is non-negotiable.
By focusing on a rock-solid signal chain, a quality dynamic mic, a scalable interface, and reliable accessories, you build a resilient foundation for your entire podcasting operation. For a full breakdown of specific models we recommend, check out our guide to podcast studio equipment. This strategic approach is how you ensure every recording session runs smoothly and sounds phenomenal.
Designing a Studio for Video Podcasting
In the B2B world, audio-only just doesn't cut it anymore. Your audience wants to see the faces behind the voices, which makes a visually compelling studio an absolute necessity. A video-ready space elevates your entire brand, making your content shareable on platforms like YouTube and LinkedIn, exactly where your ideal customers are hanging out.
This isn't just a fleeting trend; it's a fundamental shift in how podcasts are made and consumed. Video is fast becoming the standard, with over half of all podcasts now publishing full video episodes to YouTube. That reality means you need to be deliberate about your lighting, visuals, and overall workflow to meet modern audience expectations.
The good news? You don't need a Hollywood-sized budget to create a professional look. But you do need a smart plan. And that plan starts with the single most important element in video: lighting.
Action Plan: Mastering Three-Point Lighting
Great lighting is the quickest way to make your video look polished and professional. It's what separates your subject from the background, adds depth, and ensures you look sharp and clear. The industry standard for this is called three-point lighting, and it's surprisingly straightforward to set up.
Here is your step-by-step guide to setting it up:
- Key Light: This is your main, brightest light. Position it at a 45-degree angle to the person on camera, just a bit above eye level. This will light up one side of their face.
- Fill Light: This is a softer, less intense light placed on the opposite side. Its job is to "fill in" the harsh shadows created by the key light, creating a more balanced and flattering look.
- Back Light (or Hair Light): Placed behind the subject, this light hits their head and shoulders. It creates a subtle outline that pops them off the background, killing that flat, two-dimensional vibe.
Getting the lighting right does 80% of the work in making your video look professional. A well-lit shot from a mid-range camera will always look better than a poorly lit shot from a high-end cinema camera.
Creating a Compelling Background
Your studio background isn't just a wall; it's part of your brand's story. It needs to look clean and intentional, reinforcing your aesthetic without distracting from the actual conversation.
Here are a few actionable options:
- Branded Backdrops: A simple, high-quality fabric backdrop or a custom-built wall with your logo is a clean, no-fuss solution. It keeps your brand consistent in every single shot.
- Tastefully Arranged Sets: A more dynamic option is to create a "set." Think of a stylish bookshelf with curated books, plants, and awards, or maybe a cozy seating area. It adds personality.
- Simple Color and Texture: Sometimes, less is more. A wall painted in one of your brand colors or covered in textured acoustic panels can look incredibly professional while also improving your room's sound.
Aligning Furniture and Aesthetics with Your Brand
Every single thing in the frame, from the chairs you sit in to the color on the walls, shapes how viewers perceive your brand. Even the style of your microphones contributes to the overall feel. It all needs to feel cohesive and intentional.
Take these steps to align your studio with your brand identity. A B2B tech brand should opt for a minimalist design with sleek furniture and cool tones. On the other hand, a brand in the creative space should lean into warmer colors and more organic textures. The goal is to create a visual atmosphere that feels authentic.
By thoughtfully planning your lighting, background, and overall aesthetic, you create a video podcast that doesn't just sound authoritative; it looks the part, too. For a detailed breakdown of the cameras and gear needed to make it happen, check out our actionable guide to equipment for video podcasting.
Optimizing Your Studio Layout and Workflow
A killer podcast studio is about so much more than fancy mics and soundproofing. It's about designing a space where conversations just flow. How you physically lay out the room has a massive, direct impact on the vibe of your recording sessions and, just as importantly, the comfort of your hosts and guests.
Get the layout right, and you create a smooth, professional, and repeatable process. Get it wrong, and you're just introducing friction. This all starts with the big four: the table, chairs, microphones, and cameras. Your goal is to arrange them in a way that feels natural and conversational, not like a forced interview.
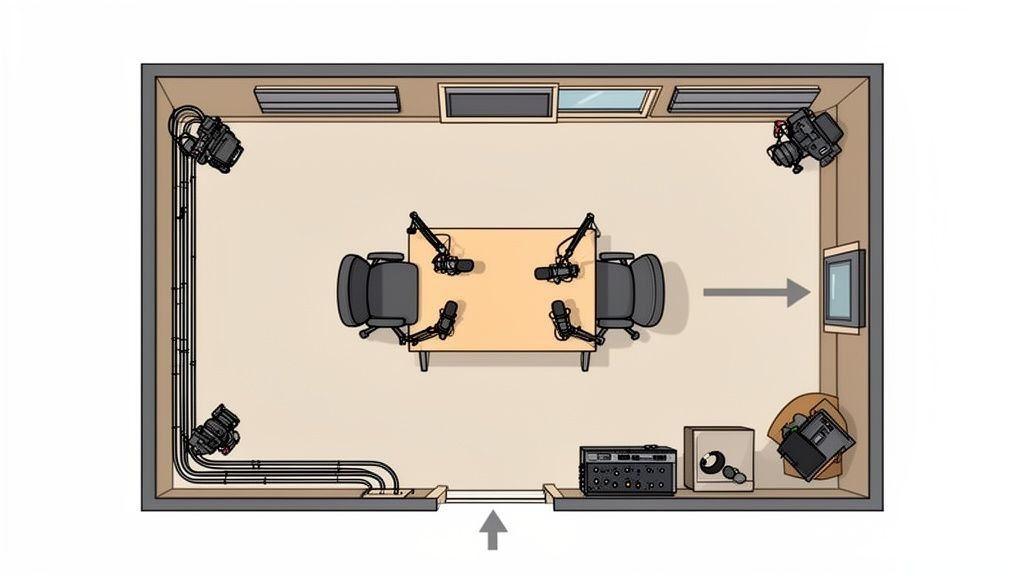
Planning Your Studio Floor Plan
Your furniture and gear placement needs to be all about clear sightlines and easy interaction. For B2B podcasts, where you're often hosting high-profile guests, creating a comfortable, collaborative atmosphere is everything. You want them to forget they're "on the record" and just talk.
Here are a few common layouts to consider:
- The Face-to-Face (Two-Person): The classic setup. For a simple host-and-guest show, placing them directly across from each other at a rectangular or oval table is perfect for encouraging direct conversation. It's also a breeze to light and shoot for video.
- The Roundtable (Three+ People): If you're running panel discussions, a round or square table is your best bet. It puts everyone on an equal footing and ensures they can all see each other, which really helps foster a more dynamic, inclusive conversation. Just be strategic with your camera placement to make sure you can get clean shots of every speaker.
- The L-Shape Layout: This arrangement puts the host at the head of a table with guests seated along one side. It can feel a bit less confrontational than a direct face-to-face and is great for creating a clear visual anchor for video, with the host guiding the discussion.
No matter which layout you pick, make sure there’s enough breathing room. People shouldn't feel cramped, and there must be clear pathways to get in and out without navigating an obstacle course of cables and equipment.
The Art of Cable Management
Nothing tanks a professional vibe faster than a rat's nest of wires. Messy cables aren't just ugly; they're a genuine safety hazard waiting to happen. A clean, organized approach to cable management is one of those small details that makes a huge difference.
Here are a few simple strategies to get it right:
- Use Cable Trays or Raceways: Mount these directly underneath your podcasting table. They're perfect for hiding power strips and audio cables, keeping everything completely off the floor and out of sight.
- Label Everything: Seriously, everything. Use a label maker or even just colored tape to mark both ends of every single cable. The first time you have to troubleshoot a technical glitch, you'll be incredibly grateful you know exactly what plugs into where.
- Invest in Velcro Ties: Ditch the flimsy plastic zip ties. Reusable Velcro ties make it ridiculously easy to bundle cables together neatly, and you can adjust them in seconds as your setup changes.
- Run Cables Along Walls: For any long cable runs, use adhesive cable clips or floor cord covers to secure wires along baseboards. This keeps them tidy and eliminates tripping hazards.
A clean workspace fosters a clear mind. By dedicating a few hours to thoughtful cable management, you create an environment that feels more organized, professional, and conducive to high-quality content creation.
Designing for Comfort and Ergonomics
Let's be real, in-depth B2B podcast recordings can easily turn into multi-hour sessions. An uncomfortable host or guest is a distracted one, and that lack of focus will come through in the final recording. Prioritizing ergonomics isn't a luxury; it's essential for keeping energy levels high.
Invest in high-quality, adjustable chairs with good lumbar support. Make sure your table height allows everyone to maintain a comfortable posture, so they aren't hunched over their microphones. The goal is to make the space so comfortable that the technology just melts into the background, letting the conversation truly shine.
This focus on process is a key part of any successful show. You can dive deeper into this in our guide to building an effective podcast production workflow. By dialing in your layout and workflow, you're not just building a studio; you're building a reliable content engine.
A Few Common Questions About Studio Design
As you get deeper into planning your podcast studio, some specific questions are bound to pop up. Let's tackle some of the most common ones we see from B2B marketing teams and creators head-on, so you can move forward with confidence.
How Much Does It Cost to Build a Professional Podcast Studio?
Studio costs can swing wildly depending on how ambitious you are with audio and video. The easiest way to think about it is in tiers.
For a high-quality, audio-only setup, you can get everything you need for $1,000 to $2,500. This budget easily covers a fantastic dynamic microphone, a solid audio interface, great headphones, and the acoustic treatment that actually makes a difference. It's the perfect launchpad for any B2B brand that wants to nail audio excellence from day one.
If you’re building a professional B2B video podcast studio, you’re looking at a budget between $5,000 and $15,000+. That jump in cost accounts for things like multiple cameras, a proper three-point lighting system, a branded set, and a more complex audio rig for co-hosts or guests.
The real secret is to spend strategically, not just expensively. Pour your initial investment into the two things that deliver the biggest returns on quality: your room's acoustics and your main microphone. You can always upgrade your cameras and lighting down the road once the show starts proving its ROI.
What Is the Ideal Room Size for a Podcast Studio?
You might think bigger is better, but for a podcast studio, that’s just not true. Huge rooms with towering ceilings are an acoustical nightmare; they create a mess of echo and reverb that’s a pain (and expensive) to fix.
The sweet spot is usually a smaller, more manageable space, like a spare office or even a converted storage closet around 10x12 feet. A room this size gives you enough space to fit your gear and a couple of people without feeling boxed in, but it’s small enough to control the sound without much hassle.
Here are a few other things to look for in a room:
- Weird Shapes: Rooms that aren't perfect squares are actually a good thing. Their non-parallel walls do a great job of breaking up standing sound waves naturally.
- A Quiet Spot: Pick a space as far away as you can get from noise culprits like HVAC units, elevators, street traffic, or the office kitchen.
- Soft Surfaces: If a room already has carpet, curtains, or other soft furniture, you've got a head start on sound absorption.
At the end of the day, the best room is one you can comfortably use while having total control over what your microphone picks up.
Should I Use a USB or XLR Microphone?
Look, modern USB mics have gotten surprisingly good, and they're a fine place to start. But for a professional B2B podcast, you should absolutely be aiming for an XLR microphone setup. The difference boils down to quality, control, and scalability, all things that matter when you’re building a brand.
USB mics are plug-and-play, but they hit a ceiling pretty fast. XLR microphones are the industry standard for a reason. They plug into a separate audio interface, which gives you much better sound quality from superior preamps, more durability, and way more flexibility.
With an XLR setup, you can easily add more mics for interviews and control each person's audio level independently. For a B2B brand, making the jump to XLR sends a clear signal that you’re serious about quality. It just sounds more polished and professional, which is exactly how you want your brand to be perceived.
How Can I Make My Studio Look Professional on a Budget?
Making your studio look like a million bucks on video doesn't have to cost a million bucks. It’s all about putting your money where it makes the biggest visual splash.
First, get a simple three-point lighting kit. Good lighting is the single most powerful way to make your video look incredible. It makes you look sharp, separates you from the background, and instantly elevates the entire production.
Second, create a clean, intentional background that says something about your brand. This doesn't need to be fancy. A portable fabric backdrop, a wall painted in your brand's color, or a simple bookshelf with a few well-placed items can work wonders. The goal is to look deliberate, not distracting.
Third, add some soft furnishings. A simple area rug doesn't just make the shot feel warmer and more textured; it also works as a great acoustic absorber, pulling double duty for your sound quality.
And finally, get serious about cable management. Using cable trays, sleeves, or simple velcro ties to hide your wires is a completely free way to make your space look instantly more organized and professional. It’s a small detail that makes a huge difference.
Ready to build a B2B podcast that drives real business results? At Fame, we specialize in producing authority-building podcasts for B2B brands. Our end-to-end service handles everything from strategy and production to guest outreach and promotion, so you can focus on sharing your expertise.
Learn how we can turn your podcast into a powerful growth engine.
Want us to run this for you?
Fame starts and grows B2B podcasts that generate pipeline. Tell us who you are trying to reach and we will send a costed proposal within 48 hours.
Related content
- Read moreFame Team · July 16, 2026
10 Account Based Marketing Tactics For B2B Growth In 2026
Discover 10 actionable account based marketing tactics for B2B tech. Learn to use podcasts, data, and targeted content to close high-value accounts. - Read moreFame Team · June 10, 2026
20 Best Podcast Production Agencies For 2026 (And Why Should You Hire One)
We painstakingly collated the 20 best podcast production agencies in the world. If you are considering starting a podcast, review this list! - Read moreApril 13, 2026
Leadership In Marketing: The B2B Podcast Playbook
Most companies still confuse leadership in marketing with job titles, org charts, and budget control. That's outdated. - Read moreApril 12, 2026
How to Build Brand Authority: A B2B Playbook
A strong B2B company can lose deals for a simple reason. Buyers trust the vendor they’ve heard from more often.