


Key Takeaways
- The room in which you record your podcast is more important than the quality of your microphone, as it can greatly affect the overall audio quality.
- A budget-friendly microphone in a space with controlled acoustics can produce a richer and more professional sound than an expensive microphone in an untreated room with echo.
- To achieve professional-sounding audio, it's essential to choose a room with natural sound absorption, such as a small, carpeted spare bedroom, and avoid rooms with hard, reflective surfaces like kitchens and bathrooms.
To create a professional-sounding podcast, start with a simple, often-overlooked foundation: the room itself. Before you even think about buying a microphone, your first and most critical action is to pick a space with decent natural acoustics. This single choice will have the biggest impact on your final audio quality, period.
Why Your Room Is More Important Than Your Gear
Here's a critical fact about microphones: they capture all sound. They can’t magically distinguish between your voice and the sound of your voice bouncing off the walls, floor, and ceiling. An expensive, top-of-the-line mic in an echoey, untreated room will always sound unprofessional. Always.
On the flip side, a budget-friendly microphone in a space with controlled acoustics can produce a rich, warm, broadcast-quality sound.
Get the room right from the start to save countless hours of trying to "fix it in post" and prevent yourself from throwing money at expensive gear upgrades that won't solve the core problem. Your goal is to find a space that naturally tames echo (reverb) and shields you from distracting outside noise.
With the podcasting market projected to rocket to $362.99 billion by 2035, listener expectations for clean, professional audio have never been higher. To stand out, you must get the fundamentals right, and that begins with a solid acoustic foundation.
Identify the Best and Worst Room Candidates
Not all rooms are created equal for sound. Let's walk through how to choose the right space.
First, look for a small, carpeted spare bedroom or even a walk-in closet packed with clothes. These are often fantastic starting points. Why? Because all those soft surfaces and irregular shapes do a great job of naturally absorbing sound waves, which is exactly what you want.
Next, immediately rule out places like kitchens, bathrooms, or any large, empty living room. These spots are acoustic nightmares. They’re full of hard, reflective surfaces, tile, glass, and bare drywall, which cause sound to bounce around like a pinball machine. An effective podcast setup avoids these environments at all costs. For a deeper look at these early decisions, our guide on planning a podcast is a great resource.
To make this easier, use the following table to compare common room types you might have available.
Comparing Common Room Types for Podcasting
This table breaks down the pros and cons of typical household spaces to help you pinpoint the best candidate for your podcast room.
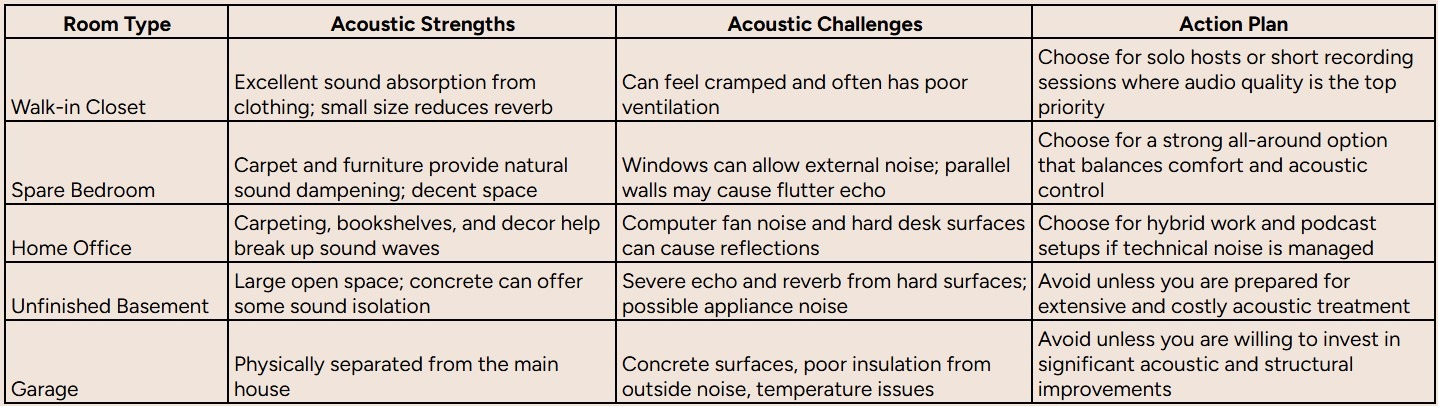
As you can see, a space with more soft surfaces and less "liveness" is almost always the better choice to start with.
Perform The Incredibly Simple Clap Test
You don’t need any fancy equipment to test a room's acoustic health. Just stand in the middle of your potential space and give a single, sharp clap.
- Good Result: You hear the crisp sound of the clap, and then... silence. The sound dies almost instantly. This means the room has plenty of things absorbing the sound. This room is a strong candidate.
- Bad Result: You hear a noticeable echo, maybe a metallic ringing, or a fluttering sound after the clap. That’s reverb, and it's a dead giveaway that your voice will sound distant and hollow in recordings. This room will require treatment.
A room that passes the clap test is already 80% of the way to being a great recording studio. This simple action tells you exactly how much (or how little) work you'll need to do with acoustic treatment later on.
Plan a Strategic Layout for a Noise-Free Zone
Once you’ve picked your room, the next step is planning your layout. Avoid the classic rookie mistake of setting up your computer right next to your microphone. Even the "quietest" computer fans can be easily picked up by a sensitive condenser mic, creating a low-level hum that’s a nightmare to remove later.
To prevent this, create a dedicated recording zone that's physically separate from your noisy tech. Position your desk so your microphone is as far away from your computer tower as possible.
An even better step is to stick the computer in an adjacent closet or use longer cables to move it to the other side of the room. This simple, free adjustment is one of the most effective actions you can take to clean up your audio and build a truly professional podcast room setup.
Mastering Acoustics to Sound Like a Pro
Here's a hard truth: you can't buy your way to great audio. I've seen people drop thousands on mics and mixers only to sound like they're recording in a bathroom. The secret isn't the gear; it's the room itself.
A killer podcast room setup is all about controlling the environment. Get this right, and you'll deliver that crisp, professional sound that makes people actually want to listen. This starts with understanding two key concepts.
First, let's clear the air. Soundproofing is about isolation; it's heavy, expensive construction designed to stop the neighbor's barking dog from getting into your recording. For most of us, it's total overkill.
Acoustic treatment, on the other hand, is about controlling the sound inside the room. This is where you must put 100% of your focus. It's about taming the echo and reverb that makes audio sound amateurish, and it delivers way more bang for your buck.
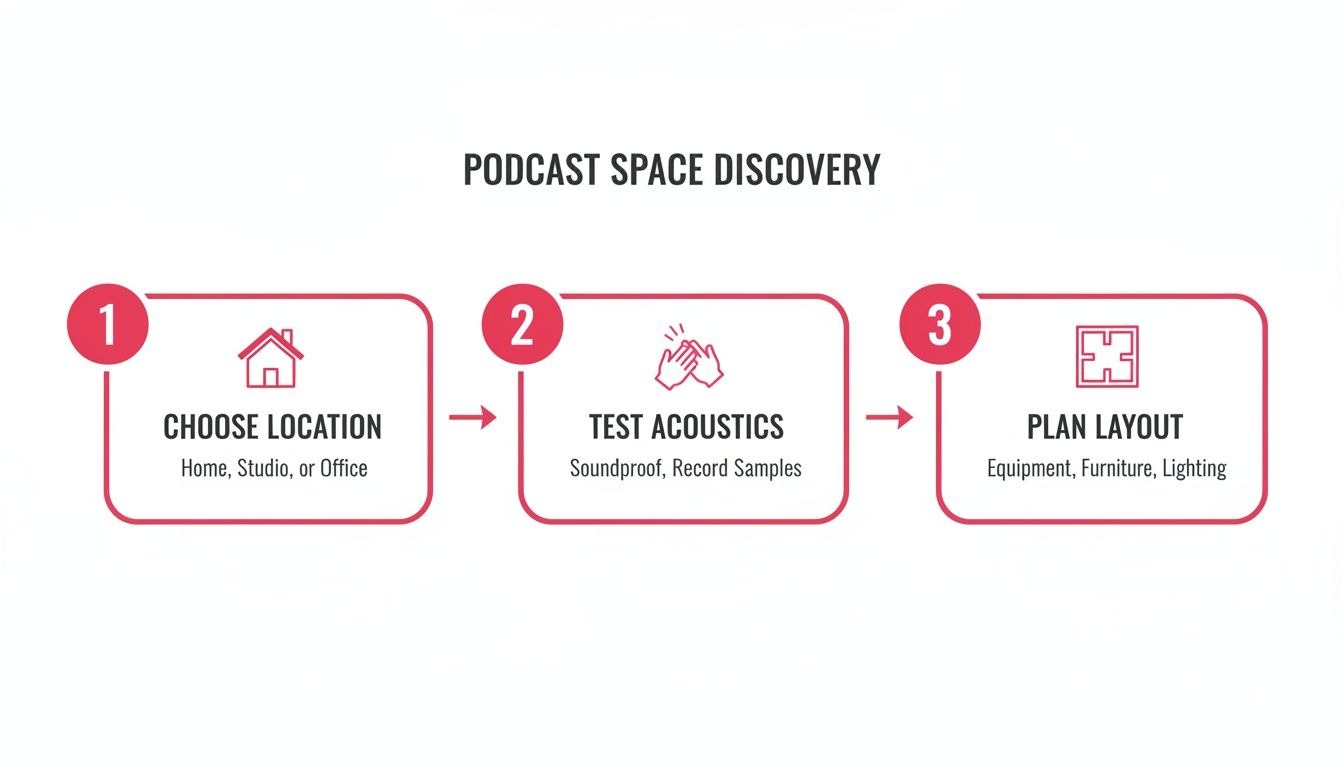
This isn't an afterthought; it’s step one. Follow this process: choose your space, test it, and then plan your layout.
Get the room right, and everything else falls into place.
Find Your Primary Sound Reflection Points
So, how do you know where to put treatment? You must hunt down the "first reflection points", the spots where sound waves bounce directly off the walls and into your mic, creating that hollow echo.
Follow this simple old-school trick to find them:
- Sit in your recording chair.
- Have a friend slide a small mirror flat along the walls around you.
- Anywhere you can see the microphone's reflection in that mirror is a first reflection point.
- Mark those spots with a pencil or painter's tape. These are your prime targets for treatment.
Prioritize Your Acoustic Treatment Tools
With your reflection points mapped out, you can get strategic. You don't need to cover every inch of the room like an asylum cell. Just focus on these key pieces for the biggest impact.
- Acoustic Panels: This is your workhorse. Place these foam or fabric panels directly on those reflection points you marked on the walls. They're designed to absorb the mid-to-high frequencies where the human voice lives, killing echo instantly.
- Bass Traps: Deep, low-frequency sounds (especially from male voices) love to build up in corners, creating a muddy, boomy mess. Place these thick, dense absorbers snugly in the corners of your room to soak up that low-end rumble.
- Diffusers: Killing all reflections can make a room sound dead and unnatural. Diffusers don't absorb sound; they scatter it. This breaks up soundwaves, preserving a sense of life and space in the room without creating nasty echoes. Place one on the wall behind you to see a significant improvement.
Look, don't feel like you need to buy all this at once. If your budget is tight, just start by placing acoustic panels on your first reflection points. That one move will give you about 80% of the improvement for 20% of the cost. It's the biggest win, period.
Use Budget-Friendly and DIY Treatment Solutions
You absolutely do not need to spend a fortune to get a great-sounding room. You can treat a room effectively with items you probably already own.
Hang heavy moving blankets on the walls as a substitute for acoustic panels. If you have a hardwood floor, lay down a thick area rug to kill floor reflections. Even a bookshelf crammed with books of different sizes and depths acts as a surprisingly effective diffuser, breaking up soundwaves naturally.
Once your room is dialed in, you've created a clean canvas. From here, you can start exploring more advanced techniques for improving overall audio quality. A well-treated room is the foundation that lets your voice and your content, truly shine. As you grow, you can then move on to upgrading your hardware, which we cover in our full guide to podcast studio equipment.
Selecting the Right Podcast Gear for Your Goals
Now that your room is acoustically treated and ready for clean audio, it's time to choose your gear. Walking into the world of audio equipment can feel overwhelming, but it really just breaks down into a few clear, scalable tiers. Your goal isn't just to buy a microphone; it's to build a reliable system that matches your ambition and your budget.
We're going to map out three distinct paths: Starter, Prosumer, and Professional. I'll explain not just what to get, but why each piece makes sense for that level. This way, you invest in a setup that serves you today and can easily grow with you tomorrow.
The Starter Setup: Get Great Sound on a Budget
This tier is all about simplicity, reliability, and fantastic value. It’s the perfect launchpad for new podcasters, internal company shows, or anyone who needs a high-quality, plug-and-play solution without a steep learning curve.
The hero of this setup is the USB microphone.
A quality USB mic like the Samson Q2U or Audio-Technica ATR2100x-USB is a game-changer. These are dynamic microphones, which are brilliant at rejecting background noise, a huge plus if you're recording in a home or office that isn't perfectly silent. They plug straight into your computer, completely bypassing the need for extra hardware.
Here’s your starter shopping list:
- Microphone: Samson Q2U (~$70). Crucially, it has both USB and XLR connections, giving you a built-in upgrade path for the future.
- Headphones: Sony MDR-7506 (~$100). These are the industry-standard, no-nonsense closed-back headphones. They'll stop your guest's audio from "bleeding" into your mic.
- Boom Arm: A basic desk-mounted boom arm (~$20). This gets the mic off your desk to kill vibrations and lets you position it perfectly.
- Pop Filter: A simple clip-on pop filter (~$10). This little screen is essential for diffusing the harsh "p" and "b" sounds that can ruin your audio.
The wild part? You can get this entire professional-sounding setup for under $200. It's proof that you don't need a massive budget to produce clean, engaging audio that respects your listeners' ears.
The Prosumer Setup: Unlock Flexibility and Control
Ready for more control? Need to record with a co-host or an in-person guest? The Prosumer tier is where you level up by introducing an XLR microphone and an audio interface, which together form the backbone of most serious podcast setups.
An audio interface, like the excellent Focusrite Scarlett 2i2 , is a small box that connects professional XLR mics to your computer. It converts the analog signal from the mic into a digital one that your computer can use. More importantly, it gives you physical knobs to control mic volume (gain) and headphone levels, offering far more hands-on control than you get with a USB mic.
This setup is built for growth. The Scarlett 2i2, for instance, has two inputs, so adding a second microphone for interviews is a breeze. This is the point where your podcast room setup evolves from a solo station into a small, versatile studio.
The Professional Setup: Build a Broadcast-Grade Studio
For B2B brands producing a flagship podcast, this is the tier that delivers broadcast-quality sound and serious workflow efficiency. Here, you will invest in specialized equipment designed for the spoken word, ensuring every single recording is flawless.
The microphone is almost always an industry staple, like the Shure SM7B or the Rode Procaster. These are legendary dynamic mics known for their warm, rich tone and exceptional rejection of any sound that isn't coming from directly in front of them. They do need a lot of power (gain), so they're often paired with a robust audio interface or a dedicated podcast production studio like the Rodecaster Pro II.
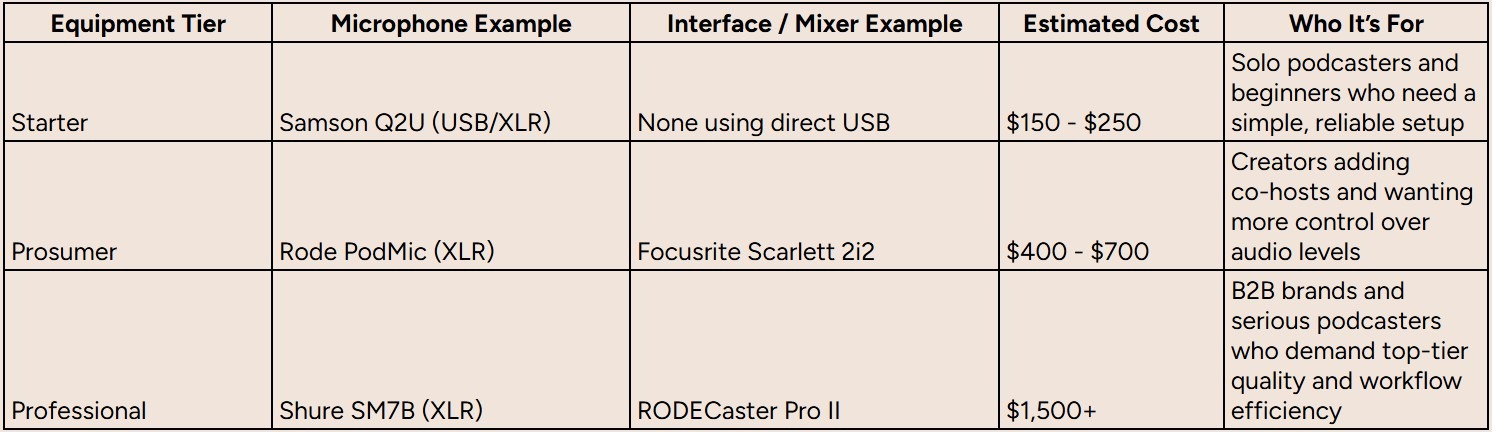
Here's a quick look at how these different tiers stack up against each other.
Podcast Equipment Tiers Compared
Choose your gear tier based on your immediate needs and long-term goals. Do you need a simple solo setup, or are you building a multi-host studio? This table breaks down the options.
It's all about making smart choices. While traditional studio time can run you $250–$1,000 per episode, investing in the right in-house gear turns a recurring cost center into a powerful, long-term marketing asset.
For a deeper dive into specific product recommendations and building out your kit, check out our comprehensive guide on the equipment needed for a podcast.
Configuring Your Setup for Flawless Recordings
Having professional-grade equipment is only half the battle. Knowing how to use it is what separates amateur audio from a polished, broadcast-ready production.
With your gear in hand and your room treated, it’s time to apply the hands-on techniques that make or break every single recording session. This is where you translate that investment into flawless audio.
This is about more than just hitting the record button. It’s about mastering mic placement, gain staging, and monitoring to capture the best possible audio at the source. Getting these elements right is non-negotiable for a professional podcast room setup.
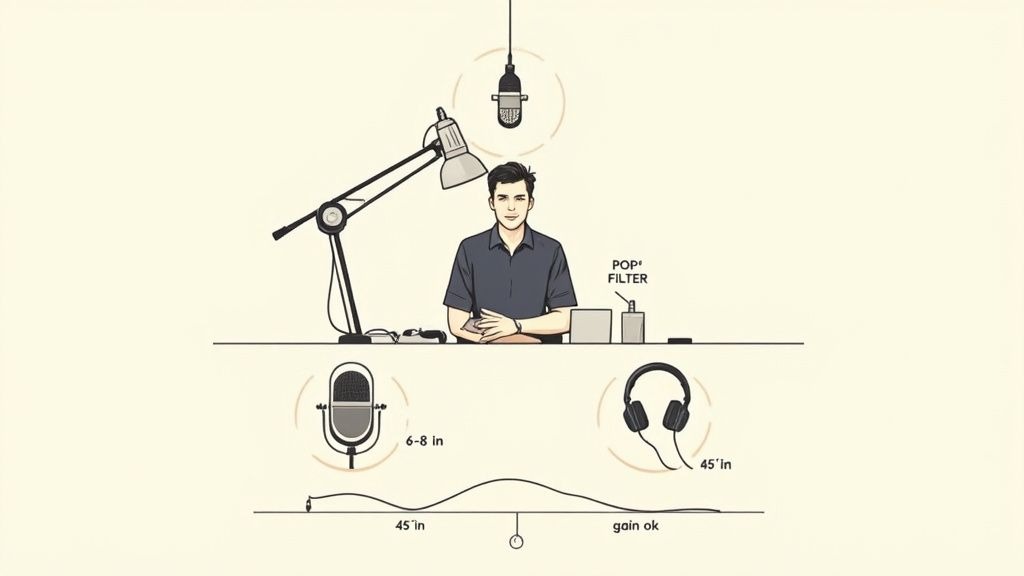
Master Microphone Placement and Technique
The distance and angle of your microphone have a massive impact on your sound quality. A classic rookie mistake is setting the mic too far away, which immediately introduces room echo and makes your voice sound distant and hollow.
For most vocal mics, position the mic four to six inches from your mouth. A good rule of thumb is to measure a hand's width. This proximity gives your voice a rich, full-bodied quality that sounds present and professional.
You also want to speak slightly off-axis. Instead of aiming directly into the diaphragm, position the mic at a slight 10- to 45-degree angle. This one simple adjustment dramatically reduces plosives, those harsh "p" and "b" sounds, without killing any of the clarity.
Set Your Gain Levels Perfectly
Gain is not volume. I'll say it again: gain is not volume. It’s the input level of your microphone's signal before it ever hits the recorder, and setting it correctly is arguably the most critical step of your entire setup.
The goal is to find that perfect balance, a signal strong enough to be clear and detailed, but with enough breathing room to avoid "clipping" or distorting.
Follow this process to dial it in every time:
- Start with the gain knob on your audio interface turned all the way down.
- Speak into the mic using your normal, energetic podcasting voice. Don't be shy; you need to set the level for how you'll actually sound on the show.
- Slowly turn up the gain knob. Keep an eye on the meter in your recording software or on the interface itself.
- Aim for your signal to consistently peak between 12dB and -dB. This gives you plenty of headroom and guarantees you won’t get any digital distortion, which is impossible to fix in post-production.
A common pitfall is setting gathe in too low and thinking you can just boost it later. All this does is amplify the noise floor along with your voice. Always start with a clean, strong signal from the source.
The Importance of Headphone Monitoring
You must wear headphones while you record. It lets you hear exactly what the microphone is picking up in real-time, so you can catch any plosives, background noise, or placement issues before they ruin a take.
More importantly, it prevents mic bleed. This is what happens when the sound from your speakers gets picked up by your microphone, creating a nasty echo that's a nightmare to edit out. For a full breakdown of the entire recording process, check out our in-depth guide on how to record a podcast.
Create a Mix-Minus for Remote Guests
When you bring a remote guest into the mix, proper monitoring gets even more critical. If you just send them the main audio output, they’ll hear an echo of their own voice with a slight delay. It's incredibly disorienting and makes natural conversation impossible.
The solution is to create a mix-minus. This is a dedicated audio mix you send to your guest that includes everything from the show minus their own voice.
Thankfully, most modern audio interfaces and dedicated mixers like the Rodecaster Pro have this feature built right in. It’s an absolute must-have for any hybrid recording setup.
Integrating Video and Remote Guests Seamlessly
Let's be honest, a modern B2B podcast is rarely just two people talking into mics in the same room. It’s become a dynamic, visual, and collaborative medium. Folding video and remote guests into your podcast room setup isn't a "nice-to-have" anymore; it’s a core piece of the puzzle for getting your show in front of more people.
The good news? The tech has caught up. You can pull off a professional, multi-person video podcast without the technical nightmares that used to make remote recording so painful.
Choose the Right Remote Recording Platform
We've all been there. You're deep into a great conversation with a guest, and then their Wi-Fi drops. You're left with glitches, robotic voices, and audio that’s drifted out of sync, making the whole thing unusable.
To prevent this, you must use a specialized remote recording platform. Tools like Riverside and SquadCast have a secret weapon: local recording. Instead of capturing the audio and video feed streamed over the internet, the software records a high-quality version directly on each person's computer. Once the call is over, those pristine local files get uploaded to the cloud.
This is a total game-changer. It means that even if a guest’s internet connection stutters or drops out completely, the final recording you get is flawless. It completely separates call quality from recording quality, which is a massive relief.
If you're looking to really dial this part of your workflow in, our guide on remote podcast recording dives deep into best practices and platform comparisons.
Scale Your Video Production Setup
Adding video to your podcast doesn't mean you need a Hollywood budget. You can scale your setup over time, starting with simple but effective gear and upgrading as your show grows. The key is to nail the lighting and camera placement first; these will have a much bigger impact on your final look than the camera itself.
Here’s a logical way to progress with your video gear:
- Starter Level: Use a high-quality webcam like the Logitech C920 or Logitech Brio 4K. When you pair these with good lighting, they produce an excellent image that's more than enough for most podcasts just starting.
- Prosumer Level: To get a big jump in quality, use a mirrorless camera (like a Sony a6400) connected to your computer via an HDMI-to-USB capture card (like the Elgato Cam Link 4K). This will give you that creamy, blurred background and much better performance in low light.
- Professional Level: For the most ambitious shows, build a multi-camera setup managed through a dedicated video switcher.
Multi-Camera Switching and Lighting Principles
For shows with multiple in-person hosts or anyone wanting to add more dynamic camera angles, a hardware switcher like the Blackmagic ATEM Mini Pro is an incredible tool.
This little box lets you plug in multiple HDMI cameras and switch between them live just by pressing a button. It gives your video that professional, broadcast-style feel without a massive production crew.
But no matter what camera you use, your lighting will make or break the shot. Implement the foundational three-point lighting setup. It's the industry standard for a reason: it's simple and effective.
- Key Light: Place your main, brightest light just off to one side of the camera.
- Fill Light: Place a softer, less intense light on the opposite side to fill in any harsh shadows on your face.
- Backlight: Place a light behind you to separate you from the background, creating a sense of depth.
As you start incorporating video, remember that recording is only half the battle. You also need to think about how people will watch it. Taking a little time for understanding optimal video formats and aspect ratios can make a huge difference, helping you tailor your final cuts for platforms like YouTube, LinkedIn, or Instagram so your visuals look great everywhere.
Your Podcast Room Setup Questions Answered
Even with the best-laid plans, a few tricky questions always seem to pop up when you're in the thick of a new studio build. Let's tackle some of the most common hurdles I see people stumble over when putting together a professional podcast room setup.
These are the quick-fire answers you need to sidestep common mistakes and get the details right.
How Much Does a Good Podcast Room Setup Cost?
This is the big one, and the cost can swing wildly depending on what you're trying to achieve. The good news? You don't need to remortgage your house to get audio that sounds like a million bucks.
- Starter Setup ($200 - $400): This is your entry point to fantastic, broadcast-ready audio. Get a high-quality USB microphone like an Audio-Technica AT2020+, a simple desk-mounted boom arm, and some clever DIY acoustic treatment with heavy blankets or a thick rug. Seriously, this is all you need to get going.
- Prosumer Setup ($800 - $1,500): This is for when you're ready for more control and flexibility. You'll typically find an XLR microphone (like a Rode Procaster), a solid audio interface (like a Focusrite Scarlett 2i2), and some professionally made acoustic panels for more precise sound control.
- Professional B2B Studio ($3,000+): When you need a flagship setup for your brand, the budget can climb. This tier involves multiple high-end microphones, a dedicated mixer like the Rodecaster Pro II, extensive acoustic treatment, and video integration.
Do I Really Need to Soundproof My Podcast Room?
This is probably the biggest point of confusion out there, and the answer is almost always a hard no. What most people think is soundproofing is actually acoustic treatment. They are not the same thing.
Soundproofing is a massive, expensive construction job meant to stop outside noise from getting in. It means adding mass to walls, decoupling structures, and sealing every single air gap. You only need this if you live next to an airport or have a crew doing construction outside your window 24/7.
Acoustic treatment is what 99% of podcasters actually need. It's all about controlling sound inside the room to kill echo and reverb. This is what gives you that clean, tight, professional sound, and you can achieve it affordably with acoustic panels, bass traps, and even just soft furniture. Always, always start here. It gives you the biggest bang for your buck.
What Is the Most Important Piece of Podcast Equipment?
Everyone obsesses over the microphone. I get it, they look cool. But your acoustic treatment is the undisputed champion of audio quality. No contest.
I guarantee you that a $1,000 microphone in an empty, echo-filled room will sound absolutely terrible. It will pick up every single nasty reflection and sound like you're recording in a bathroom.
Flip that around, and a solid $100 mic in a well-treated room can sound incredible.
Your recording environment is the foundation. It's everything. Before you even think about that flashy mic upgrade, pour your energy and budget into treating your space. Taming those sound reflections will improve your audio quality more than any piece of gear ever will.
Can I Just Use My Gaming Headset for My Podcast?
Look, for a professional B2B podcast, this is a non-starter. While gaming headsets are great for hopping on a quick Discord call, their built-in mics are not designed for broadcast-quality audio.
The sound is often thin, overly compressed, and just lacks the warmth and clarity your listeners expect from a serious production. Using a gaming headset instantly signals "amateur hour" to a discerning business audience.
Invest in even a basic, dedicated USB or XLR microphone to get a much richer, fuller sound. It keeps your listeners locked in and reinforces the idea that your brand is professional and values quality. Your audio is a direct reflection of your content; give it the tool it deserves.
Ready to skip the setup headaches and get a broadcast-quality B2B podcast that drives real business results? At Fame, we handle everything from strategy and production to promotion, guaranteeing at least 10% monthly download growth. Learn more about our B2B podcast production services and start building your authority today.