
Learning how to record a podcast remotely isn’t just a workaround anymore; it's a massive strategic advantage. I’ve found that pulling off professional-sounding remote audio comes down to three things: getting the right microphone, using dedicated software that records each person's audio on their own computer, and having a crystal-clear prep process for your guests.
Nail these elements, and you can achieve studio-quality sound from pretty much anywhere.
Why Remote Recording Is a Game Changer
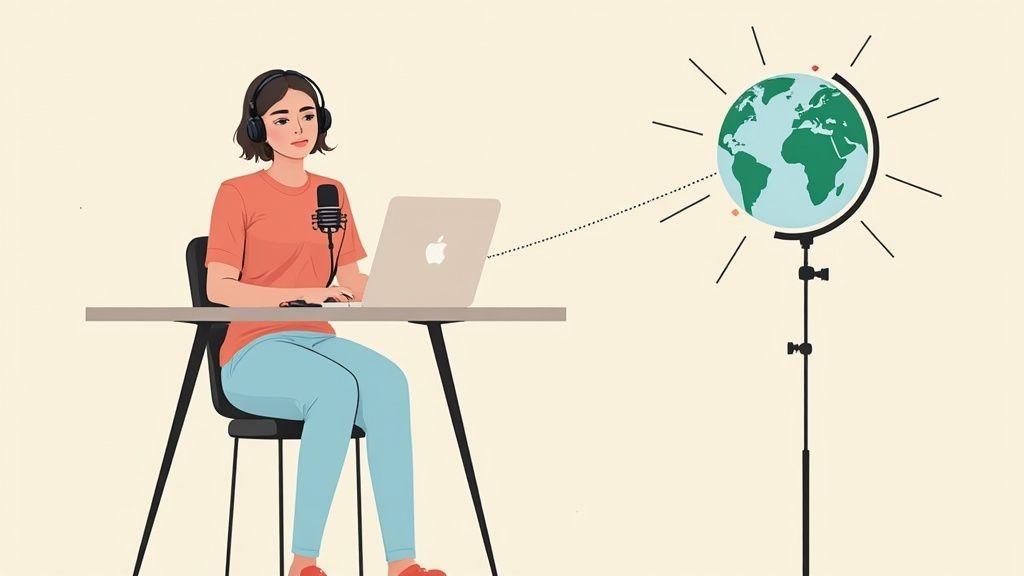
The ability to record a podcast from different locations has fundamentally changed the game for creators. It completely breaks down geographical barriers, letting you connect with dream guests no matter where they are in the world. This access to a global talent pool can add incredible value and diversity to your show.
Plus, remote recording offers flexibility that's hard to beat. You're no longer trying to coordinate travel schedules or book expensive studio time. Instead, you and your guests can find a slot that works across different time zones, which dramatically speeds up your entire production cycle. That kind of agility is huge for staying consistent.
Before we dive into the specific gear and software, here's a quick look at the core components we're talking about.
Core Components of a Remote Podcast Recording Setup
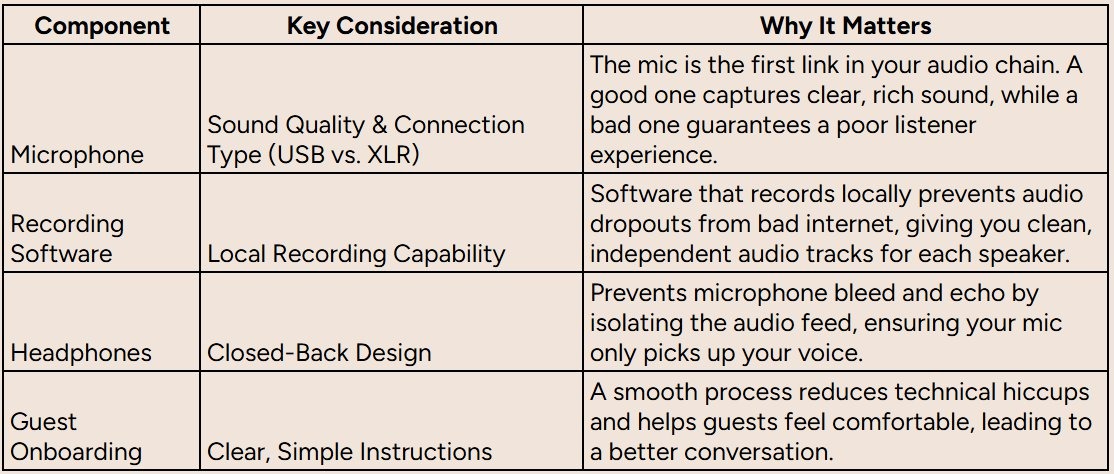
Getting these four pieces right is the foundation of a great remote recording workflow.
The Shift to High-Fidelity Remote Audio
The explosion of digital collaboration tools has really pushed remote podcasting into the mainstream. Modern platforms like Riverside, SquadCast, and Zencastr deliver studio-quality results because they record each participant's audio directly on their own device.
This method, known as local recording, completely bypasses internet instability, the number one cause of glitchy, low-quality audio on standard video calls. The result? You get crystal-clear, independent audio tracks that make it sound like everyone was sitting in the same room.
Fame's Founder, Tom Hunt, emphasizes that the real power of remote recording is that it democratizes access to high-quality production. You can create a polished, professional show without a five-figure studio budget, focusing your resources on what truly matters: creating exceptional content.
This shift has made podcasting a more accessible and potent tool for brand building than ever before. By consistently producing high-value conversations with industry experts, companies can leverage podcasting as a growth engine to build authority and connect with their audience on a much deeper level.
The quality barrier has been removed. Now, success really just comes down to your strategy and your content.
Choosing Your Remote Podcasting Equipment
You can't build a great podcast on bad audio. It's the bedrock of the whole operation, and it all comes back to the gear you're using. But here's the good news: you don’t need a six-figure studio budget to sound fantastic. The right equipment choices make all the difference, especially when you're recording remotely.
The single most important piece of your setup? Your microphone. It’s where your voice first enters the digital world, so its quality has a direct line to your final sound. For most people starting out, a solid USB microphone is the perfect play.
USB mics are plug-and-play. You connect them to your computer, and you’re basically ready to hit record. It’s that simple. Models like the Rode NT-USB+ are wildly popular for a reason: they deliver crisp, broadcast-quality audio with almost zero technical fuss.
Moving From USB to XLR
Once you get the hang of things, you might feel the itch to upgrade. That's when you'll start looking at XLR microphones. These are the mics you see in professional recording studios, and they require a little extra hardware, an audio interface, to work with your computer.
An audio interface is a small external box that takes the analog signal from the XLR mic and converts it into a digital signal that your computer can process. Why bother with the extra step? Control. This setup gives you far more flexibility and superior sound quality.
A great middle ground is a hybrid mic like the Shure MV7. It has both USB and XLR outputs, so you can start with the simple USB connection and have a clear upgrade path ready for when you want to get more serious.
Key Takeaway: Start with a high-quality USB mic. It’s simple, effective, and sounds great. When you're ready to level up, an XLR microphone and an audio interface will unlock professional-grade sound and control.
The Non-Negotiables: Headphones and Internet
No matter what microphone you or your guests use, headphones are a must. Not just any headphones, though, you need closed-back headphones. These create a seal around your ears, which is critical for preventing audio from leaking out and getting picked up by your mic. This is the simplest and most effective way to kill echo and feedback before they start.
Finally, don't forget the invisible piece of gear that holds every remote session together: your internet connection. An unstable connection can cause dropouts and digital artifacts, wrecking an otherwise perfect recording.
Whenever possible, plug directly into your router with an Ethernet cable instead of relying on Wi-Fi. It’s a faster and far more stable connection that minimizes the risk of something going wrong. If your guests can't do that, at least ask them to get as close to their Wi-Fi router as possible.
A simple setup with a USB mic, headphones, and a pop filter is more than enough to create a quality home studio. If you're looking for a deeper dive into different gear configurations, our guide on the best podcasting setup breaks down options for every budget and skill level.
Selecting The Best Remote Recording Software
Okay, your gear is all picked out. Now for the software, the digital studio where your remote podcast actually comes to life.
It's tempting to just fire up a tool you already know, like Zoom or Google Meet. I get it, they're familiar. But here’s the thing: they are built for meetings, not for creating high-quality audio. These platforms aggressively compress your audio and are completely at the mercy of your internet connection, which is a recipe for glitches, dropouts, and a tinny, unprofessional sound. Nobody wants that.
To really nail how to record a podcast remotely, you need a platform that was built for this exact purpose. The single most important feature you should look for is local recording, often called "double-ender" recording. This is the secret sauce that completely bypasses internet problems.
Instead of capturing the audio after it's been squeezed and sent over the web, the software records each person's microphone directly onto their own computer. This means you're getting the full, uncompressed audio file from everyone. After you're done recording, these pristine local tracks are automatically uploaded to the cloud for you to mix. This simple workflow ensures you get the best possible audio, every single time, no matter how shaky someone's Wi-Fi is.
Double-Ender Recording Is The Key To Quality
The concept is beautifully simple: record locally, then combine the files later. It's the foundation of any professional remote podcasting setup.
This infographic breaks down the basic workflow for getting that studio-grade sound from anywhere in the world.
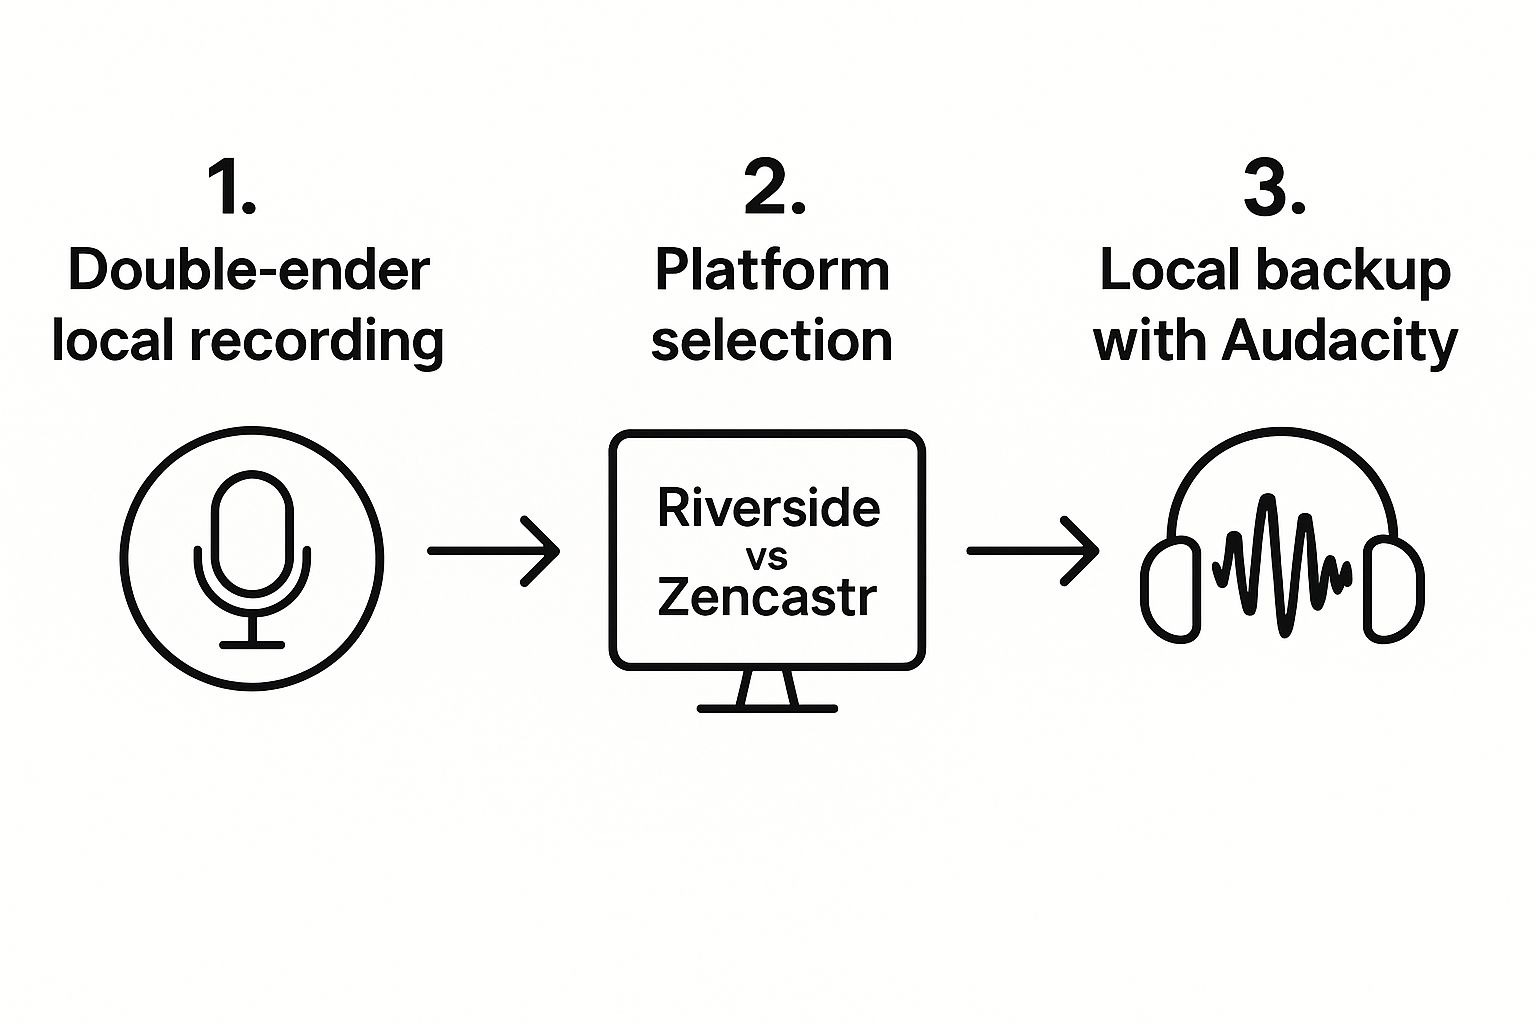
This three-part process, capturing high-quality local audio, using a reliable platform, and keeping a local backup, is the bedrock of a solid remote recording strategy. It removes the biggest variable (the internet) from the quality equation.
Remote recording has completely changed how podcasts get made. Platforms like Riverside have shown that by using multi-track local recordings, creators can produce episodes that are virtually indistinguishable from in-person sessions. This is how you beat common internet headaches like latency and packet loss that wreck audio quality on standard online calls.
Comparison of Top Remote Podcast Recording Platforms
So, which platform should you choose? A few major players dominate the space, each with its own strengths. Here's a quick look at some of the best options to help you decide.
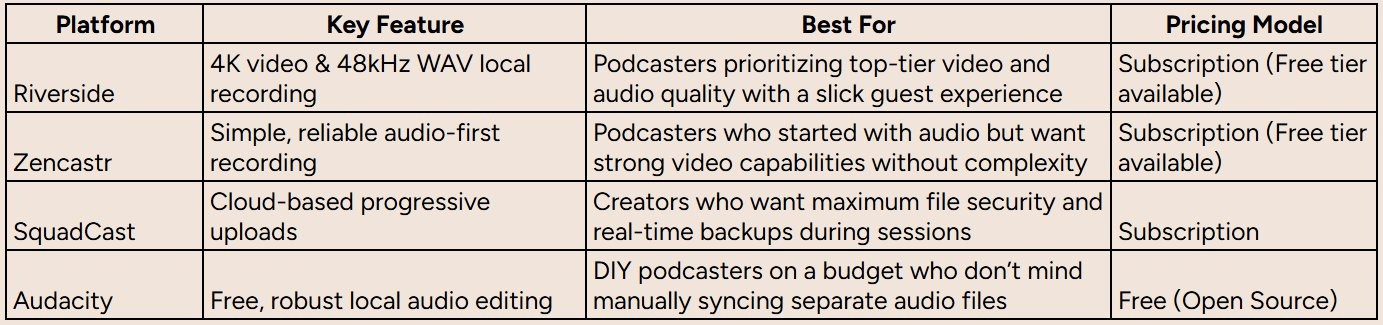
Ultimately, the best tool is the one that fits your show's needs, whether that's pristine video, a super-simple interface for guests, or just getting the job done on a tight budget.
Two of the most popular choices for a reason are Riverside and Zencastr.
- Riverside is an absolute powerhouse, especially if you're doing video. It can capture uncompressed 48kHz WAV audio and up to 4K video locally from each participant. The guest interface is also incredibly clean; they just click a link, and they're in. No downloads, no fuss.
- Zencastr has been a favorite for years, known for its rock-solid, audio-first approach. It also offers high-quality local recordings and has seriously upped its video game, making it a very strong competitor.
If you're working with a smaller budget, you can still get great results with a bit of a workaround. Use a standard video call tool for communication, but have each person record their own audio on their computer using free software like Audacity. This takes more coordination, and you'll have to sync the files manually in post-production, but it's a totally viable option that costs you nothing.
Pro Tip: No matter what platform you choose, have everyone record a backup on their own computer. A simple voice memo app on their phone or a separate recording in Audacity can be an absolute lifesaver if a file gets corrupted or an upload fails.
Making the right software choice is a big step. For an even deeper dive into all the different options out there, check out our comprehensive guide on essential podcast tools.
Your Workflow for a Flawless Remote Recording
Having the right gear and software is half the battle. A repeatable process is what separates stressful recording sessions from the smooth, professional ones you hear on top podcasts.
A solid workflow takes the guesswork out of the equation. It cuts down on technical mishaps and frees you up to focus on what actually matters: the conversation.
We can break this whole thing down into three phases: before, during, and after you hit record. Nailing these steps is the secret to capturing amazing audio, every single time.
Before You Hit Record
Preparation is everything. Just walking into a recording session hoping for the best is a recipe for technical glitches and awkward silences. A few simple moves beforehand can save you a world of hurt later.
First, whip up a simple guest prep sheet. This isn't a script; think of it as a one-page cheat sheet with everything your guest needs to feel comfortable and ready.
- The Recording Link: Make it big, bold, and impossible to miss.
- Simple Tech Instructions: Gently remind them to use headphones (this is non-negotiable), find a quiet space, and close any extra browser tabs or apps hogging their computer's resources.
- A Brief Outline: Share a few key topics or questions you plan on hitting. This isn't about scripting their answers; it's about helping them feel prepared, which always leads to a more natural, flowing conversation.
You should also always schedule a quick five-minute "pre-flight check" right before the official recording time. Use this window to test their mic, check their camera framing, and make sure the recording platform is actually picking up their equipment.
This one simple step catches 90% of potential tech problems before they have a chance to derail your interview.
During the Recording Session
Once you're live, your main job is to be an engaged host. But there are a few technical habits you need to build to make sure you're capturing the best possible material for your editor.
The single most important rule is to record each participant on a separate audio track. Thankfully, most modern remote recording platforms handle this automatically. This is a game-changer because it gives your editor total control to clean up crosstalk, nix background noise from one person's track without messing up the other, and balance audio levels to perfection.
Also, get comfortable with non-verbal cues to guide the conversation. A simple nod or a thumbs-up can signal agreement or encouragement without interrupting the speaker's flow. It keeps the energy up and makes the whole thing feel more like you're sitting in the same room.
If something goes wrong, stay calm. A dropped connection or a dog barking isn't the end of the world. Just pause, handle the issue, and pick back up. A good editor can slice out these little interruptions like they never happened.
After the Recording Ends
Don't slam your laptop shut the second you hit "stop." Your work isn't quite done.
Make sure all the local recordings have finished uploading to the cloud. Most platforms will show a progress bar for each person. It's critical to let this process finish completely to avoid getting stuck with corrupted or incomplete files.
The moment the files are ready, download them and back them up immediately. I mean it. Save one copy to your local hard drive and another to a cloud service like Google Drive or Dropbox. Hardware fails, so redundancy is your best friend here.
Of course, once your remote recording is in the can, you've got to manage the editing and production process. Our partner Freispace offers a guide to a post-production scheduler that is a great resource for streamlining your studio workflows. Building an efficient system here is just as important as the recording itself, and you can learn more about creating a complete podcast production workflow in our dedicated guide.
Turning Your Podcast Into a Marketing Engine
Hitting "stop record" on a great remote podcast feels like a huge win. And it is. But for any B2B company, that's just the starting line.
The real magic happens when you transform that pristine audio file into a marketing asset that actually drives growth. A finished episode isn't the end of your workflow; it's the raw material for your next promotional campaign.
The trick is to stop thinking of each episode as a single piece of content. Instead, see it as the foundation for a whole micro-campaign. This mindset is what separates podcasts that get traction from those that just sit there. Instead of publishing and praying, you build a system to get your message out there.
Create a Micro-Content Flywheel
The game plan is to slice and dice your core recording into a bunch of different formats you can splash across all your channels. This creates way more opportunities for your audience to find you.
Here are the non-negotiables for a promotional flywheel that actually spins:
- SEO-Rich Show Notes: Don't just slap a two-sentence summary on the page. Write detailed show notes that can stand alone as a blog post. Pack them with relevant keywords and always, always include the full transcript. This is how you get found on Google.
- Shareable Audiograms: Pull out the best 1-2 minute soundbites, the mic-drop moments, and turn them into audiograms. You know, those static images with the dancing waveform. They're absolute gold for catching attention on LinkedIn.
- Engaging Email Newsletters: A link is not enough. Your email list deserves more. Give them unique insights, behind-the-scenes tidbits, or the top three takeaways from the episode to actually make them want to click and download.
Leverage Guest Collaboration
Your guests are your secret weapon. They have a built-in audience that trusts them and a vested interest in making sure the episode does well. So, make it ridiculously easy for them to share it.
Put together a simple "promo kit" for them.
This little package should have everything they need to post with zero effort:
- Pre-written social media blurbs for different platforms.
- The audiogram clips and any other cool visuals you made.
- A direct link to the episode on Apple Podcasts, Spotify, and wherever else it lives.
When you remove all the friction, you dramatically increase the chances your guests will blast the episode out to their network. That's how you tap into a brand new, perfectly relevant audience instantly.
If you're looking to put this whole process on autopilot, specialized services can handle the heavy lifting. Fame’s B2B Social Media Agency and B2B Email Newsletter Agency are built specifically to manage this kind of content repurposing and distribution, turning your podcast into a reliable lead gen tool.
To really know if your podcast is pulling its weight, you have to track its impact. Our partner Cometly, an ad tracking platform, explains how to measure marketing ROI effectively, which is critical for justifying your investment.
Frequently Asked Questions About Remote Podcasting
Even when you've got the best tools and a solid workflow locked down, questions are going to pop up. It's just part of the process of recording a podcast remotely.
Here are some of the most common ones we hear from creators, along with our straight-up answers.
What Is the Best Way to Prepare a Guest for a Remote Podcast Recording?
Being proactive here is everything. Don't just send a calendar invite and hope for the best.
A day or two before you're set to record, send your guest a simple prep document. This isn't a script; think of it more as a quick guide to make sure you both have a smooth session.
Here's what to include:
- The direct link to whatever recording platform you're using.
- A friendly reminder to use headphones in a quiet room. Seriously, this one is non-negotiable.
- A quick request to close out of other apps. This frees up their computer's resources so everything runs smoothly.
- A brief, high-level outline of the topics you want to cover.
But the real secret weapon? Schedule a 5-minute tech check right before you plan to officially start. This simple step catches and solves almost every common technical hiccup and, just as importantly, helps your guest feel comfortable and relaxed before you hit the record button.
How Do I Fix Audio Sync Issues in Post-Production?
Ah, audio drift. It can be a massive headache, but it’s largely preventable.
Honestly, the best fix is to avoid the problem in the first place by using a dedicated platform like Riverside. It's built to record separate, high-quality audio tracks for each person and then automatically syncs them up, completely eliminating the issue.
If you do find yourself needing to fix sync issues manually, the classic "clap sync" is your best friend. It’s an old-school trick that still works perfectly. At the very beginning of the recording, just have everyone clap on camera at the same time. This creates a sharp, easily visible spike in each person's audio waveform. When you get to your editing software, you just line up those spikes, and voilà, your tracks are perfectly synchronized.
Key Takeaway: Using a platform with automatic syncing is the most reliable way to avoid audio drift. The manual clap sync is a great analog backup that has saved countless recordings over the years.
Can My Guest Use a Smartphone to Record Their Audio?
Yes, they absolutely can. It’s a surprisingly decent option, especially if your guest doesn't have an external microphone handy. The mics built into modern smartphones are actually quite good and can capture clean audio.
To get the best possible quality, give them a couple of quick tips. Tell them to record in a quiet room, preferably one with soft furnishings like carpets or curtains to cut down on echo. They should also hold the phone steadily near their mouth, but be careful not to speak directly into the mic to avoid plosives (those harsh "p" and "b" sounds).
Having them use their phone's native voice recorder app as a local backup is also a fantastic failsafe. For you, the host, however? An external USB mic is the single best investment you can make to level up your show's overall quality.
What are the benefits of investing in B2B podcast promotion?
Investing in B2B podcast promotion transforms your show from a content piece into a strategic growth asset. The core benefits are building industry authority, fostering key relationships with guests who are experts in your field, and generating qualified leads. Effective promotion strategies ensure your valuable content reaches your ideal customer profile, driving targeted traffic and establishing your brand as a go-to resource. This targeted visibility ultimately strengthens your sales pipeline and delivers a measurable return on investment, making it a critical component for any B2B startup or established company looking to grow.
What are effective B2B podcast promotion strategies?
Effective B2B podcast promotion strategies focus on a multi-channel approach to maximize reach and engagement. Key tactics include creating micro-content like audiograms and video clips for social platforms (especially LinkedIn), writing SEO-optimized show notes that double as blog posts, and featuring your podcast prominently in your email newsletter. Another powerful strategy is leveraging your guest's audience by providing them with a pre-made "promo kit" containing shareable assets. Podcast marketing services often expand on this by securing guest spots on other podcasts, running targeted paid ad campaigns, and building a community around the show to foster long-term audience growth.
How can podcast marketing services boost our company's visibility?
Podcast marketing services boost a company's visibility by systematically amplifying your content across multiple channels where your target audience is active. These services create and distribute a variety of assets from each episode, such as video clips, audiograms, quotes, and articles, ensuring maximum exposure. They help secure guest appearances on other relevant podcasts, tapping into existing audiences. By implementing comprehensive promotion plans, they build brand recognition, establish your company's leaders as thought leaders, and drive consistent traffic back to your website, significantly increasing your brand's footprint in your niche.
Ready to turn your remote podcast into a powerful growth tool for your B2B brand? At Fame, we specialize in producing podcasts that build authority and drive a measurable pipeline. Learn how our end-to-end B2B podcast production agency can help you grow.