
When you record a podcast remotely, you use specialized software to capture each person's audio and video on their own computer. This local recording is the secret sauce. It completely sidesteps choppy internet connections, giving your editor clean, isolated tracks to work with later.
Your Blueprint for a Flawless Remote Recording
Knowing how to record a podcast remotely isn't just a nice-to-have skill anymore; it's a core part of creating professional B2B content that can reach a global audience. When you get your workflow right, what seems like a logistical headache becomes a massive advantage. You can suddenly book top-tier guests no matter where they are in the world.
But without a structured approach, you're just asking for trouble, think poor audio quality, awkward technical glitches, and a final product that sounds completely disjointed.
The whole point is to make it sound like everyone was sitting in the same room, even when you're all on different continents. That means you need a rock-solid plan covering everything from pre-production and guest onboarding to the actual recording session and the final handoff to your post-production team.
This flowchart breaks down the entire journey, from the initial planning stages all the way to the final edit.
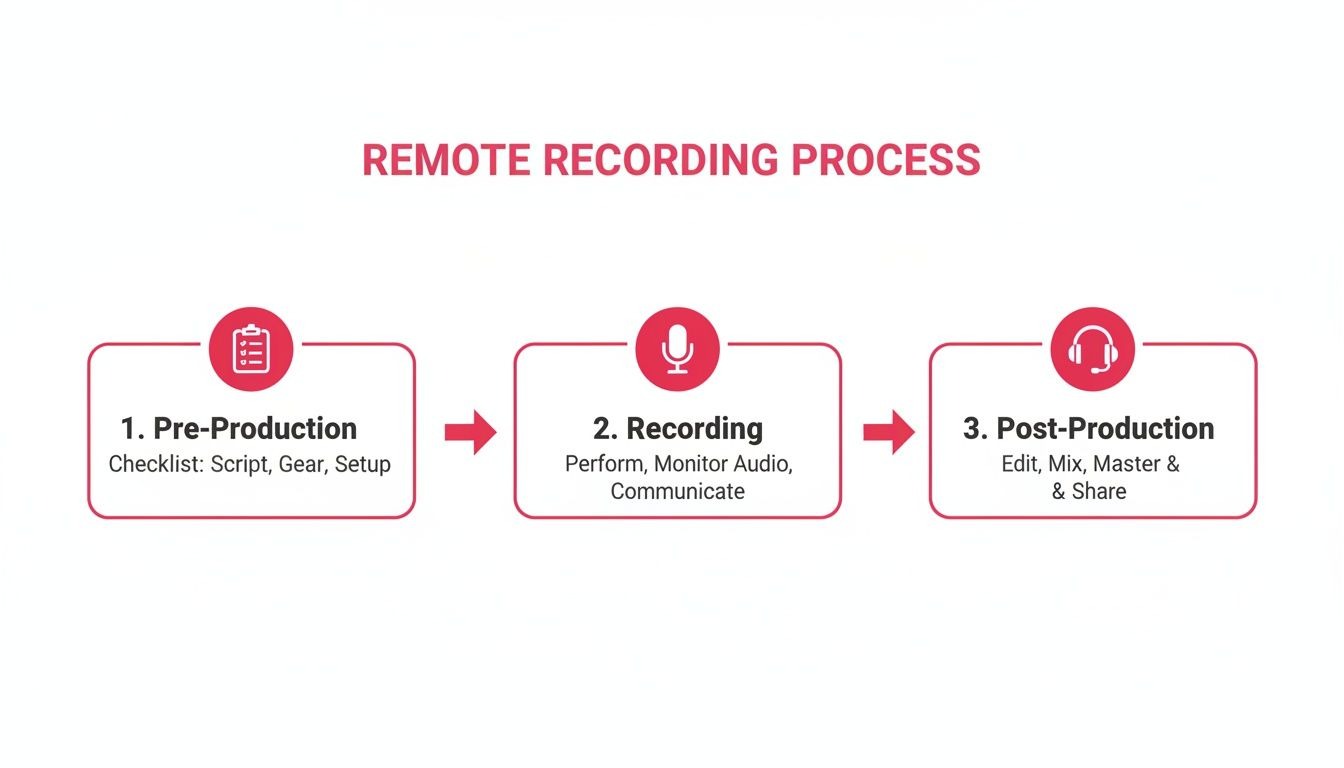
As you can see, every phase builds on the one before it. This is exactly why putting in the prep work upfront is non-negotiable for a smooth recording day and an even smoother editing process.
Before we dive into the specific steps, let's look at the core components that make up a successful remote workflow.
Core Components of a Remote Recording Workflow
This table gives you a quick snapshot of the essential stages and what you should be focused on during each one. Think of it as your high-level checklist.

Getting these three phases right turns a potentially chaotic process into a reliable system you can count on every single time.
The Tools Are Getting Better, and More Popular
This massive shift to remote recording isn't just a temporary trend; it's a market that's absolutely exploding.
The remote podcast recording market was valued at $1.51 billion in 2024 and is on track to hit $1.80 billion in 2025. That’s a staggering 18.7% annual growth rate, which just shows how much demand there is for tools that make this whole process easier.
This growth is all about making remote production feel seamless. As you're building out your own recording setup, it pays to understand what the dedicated platforms can do. For example, seeing how different tools connect, like with Mutedeck's integration with Riverside, shows you the kind of streamlined setup that's possible now.
A well-defined workflow is your best defense against the chaos of remote recording. It anticipates problems, sets clear expectations for guests, and ensures your final audio is crisp, clear, and professional.
Ultimately, a solid plan is what transforms a complex technical process into a repeatable system that just works. If you want to zoom out and see how this fits into the bigger picture, check out our complete guide on building a podcast production workflow.
Mastering Pre-Production and Guest Onboarding
The quality of your remote podcast is decided long before you ever hit record. Seriously. A polished, professional episode always starts with a rock-solid pre-production and guest onboarding process. When you’re dealing with busy B2B execs, making them feel prepared and comfortable is just as critical as your tech setup.
Think of this phase as setting the stage. A chaotic start almost always leads to a frantic, awkward recording session plagued by technical glitches. Systemize your approach now, and you’ll eliminate surprises later, letting both you and your guest focus on what matters: the conversation.
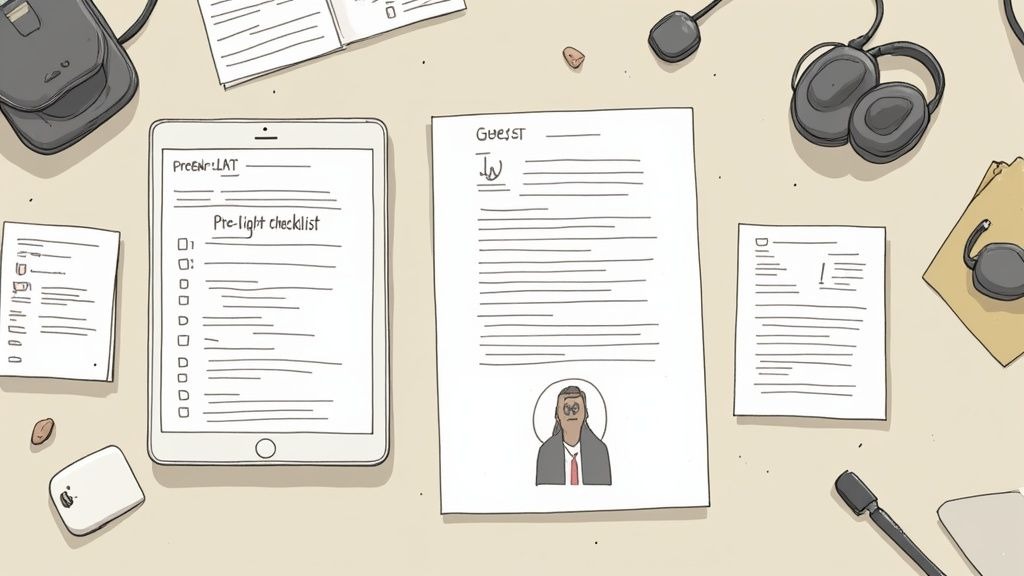
The goal is to create a seamless experience that builds confidence and rapport from the very first email. It all starts with a comprehensive guest onboarding package that leaves nothing to chance.
Building Your Guest Onboarding Package
Your guest package needs to be a single source of truth that answers every possible question before they even think to ask it. It should feel professional and reassuring, showing them you value their time and expertise. This is your first impression, so make it count.
Your package must include these three core documents:
- The Show One-Sheet: Create a concise, one-page PDF that covers the podcast's mission, target audience, typical episode format, and where it gets distributed. This helps the guest understand exactly who they're talking to.
- The Tech Guide: Design a simple, visual guide explaining the basic technical requirements. Include recommendations for mics (even if it's just "use your phone's earbuds, not your laptop mic"), stress the importance of a quiet room, and provide a direct link to the recording platform.
- The Release Form: Prepare a straightforward release form that clearly outlines how you'll use their content. Use a digital signature service like DocuSign or PandaDoc to make this painless and quick for everyone.
Send these in a single, well-organized email to establish your professionalism right away. This removes the guesswork and helps your guest feel completely prepared.
Pro Tip: Your guest's preparation is a direct reflection of your own. A detailed onboarding process doesn't just prevent tech issues; it helps your guest formulate their thoughts, leading to a much richer and more insightful conversation.
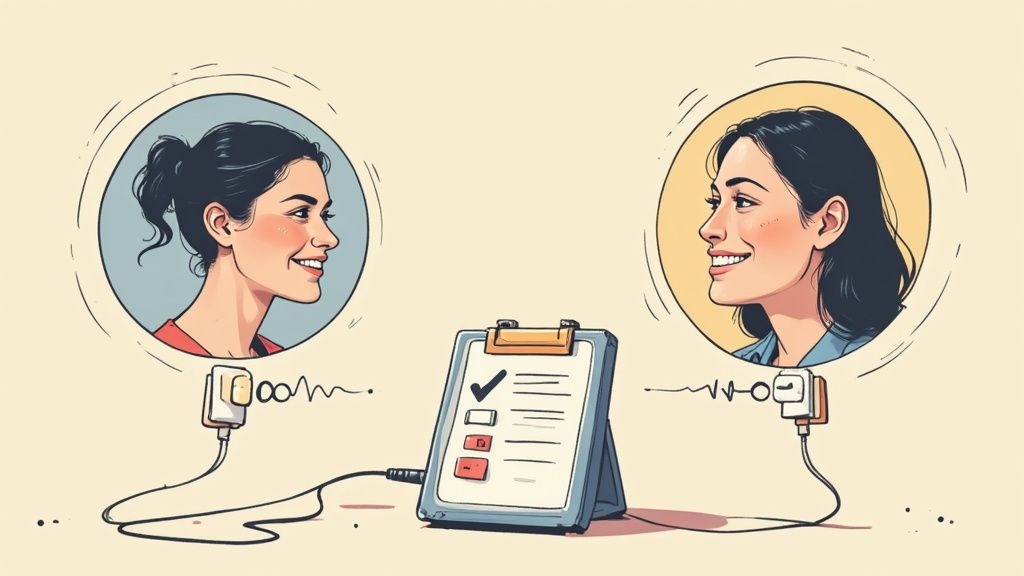
The Non-Negotiable Tech Rehearsal
This is the single most critical step in remote podcasting: the mandatory tech rehearsal, or "pre-flight check." Schedule a short, 15-minute call a day or two before the real recording. Do not make this optional. Do not skip it.
During this call, you will test everything. Check their microphone, help them with proper placement, confirm their internet connection is stable, and give them a quick tour of the recording software. This is also your chance to build a little rapport before the official interview, turning a stranger into a comfortable collaborator.
This rehearsal transforms recording day from a technical test into a relaxed chat. It gives your guest the confidence that everything will just work, allowing them to be more present and authentic when it counts. Our comprehensive guide on how to prepare for a podcast interview dives even deeper into this for both hosts and guests.
Your Pre-Recording Guest Checklist
To make sure nothing slips through the cracks, send a final "pre-flight" checklist to your guest on the morning of the recording. This just serves as a gentle reminder of the key points you covered in the tech rehearsal.
Here’s a simple checklist you can adapt and send:
- Find a Quiet Space: Pick a small room with soft furnishings like carpets or curtains to kill any echo.
- Use Wired Headphones: This is crucial to prevent audio feedback. Earbuds are totally fine.
- Position Your Mic: Place the mic about a fist's distance from your mouth and slightly to the side to avoid harsh "p" and "b" sounds (plosives).
- Close Unnecessary Apps: Shut down everything else, especially bandwidth hogs like Slack, email clients, and extra browser tabs.
- Silence Notifications: Turn off all notifications on your computer and phone. No interruptions.
This simple checklist reinforces best practices and empowers your guests to actively contribute to the audio quality. Once you nail your pre-production, you guarantee that when you finally hit record, the focus is 100% on creating an outstanding show.
Building Your Remote Recording Tech Stack
The tech you choose is the bedrock of your podcast's audio quality. Getting this right isn't about having the deepest pockets; it’s about piecing together a reliable system that pumps out clean, professional sound, episode after episode. This is the stuff that separates the hobbyists from the serious B2B thought leaders.
Your tech stack for recording a remote podcast really boils down to two things: the hardware you and your guests are using, and the software that’s capturing the conversation. Nailing both is non-negotiable if you want to produce a top-tier B2B show.

Essential Hardware for Remote Recording
Let's start with the physical gear. It’s easy to get lost in an ocean of options, but honestly, a few key pieces of equipment will make the biggest impact on how you sound. You don't need a professional broadcast studio, but you absolutely have to get the fundamentals right.
Your mission is simple: capture the best possible source audio from the jump. It's a million times easier to work with a clean recording than to try and rescue a bad one in post-production.
Here’s your essential hardware checklist:
- A Quality Microphone: Your mic is your single most important investment. A solid USB mic like the Rode NT-USB+ is a brilliant plug-and-play option that delivers fantastic clarity. If you're ready to level up, an XLR mic like the Shure SM7B paired with an audio interface like the Focusrite Scarlett 2i2 is the undisputed industry standard for a reason.
- Wired Headphones: This is a non-negotiable for everyone on the call, you and your guests. Use wired headphones to stop the sound from their speakers from bleeding into their mic, which is the number one cause of distracting echo and feedback. Even a basic pair of wired earbuds is infinitely better than nothing.
- A Pop Filter or Windscreen: This tiny, inexpensive accessory makes a world of difference. Place it in front of your mic to soften those harsh "p" and "b" sounds (known as plosives), giving you a much smoother, more pleasant vocal track for your listeners.
If you’re looking to dive deeper, our detailed guide on the best podcasting setup has a ton of recommendations for various budgets and technical needs.
Choosing Your Remote Recording Software
The software you pick is the central nervous system of your entire recording operation. It determines how your audio gets captured, saved, and handed off to your editor. The most critical distinction you need to wrap your head around is the difference between cloud-based recording and local recording.
This choice will have a bigger impact on your final audio quality than almost any other decision you make. It's that important.
The professional standard is to record separate, isolated audio tracks for each speaker. Modern tools do this by recording locally on each person's computer at high quality, often 48kHz/24-bit, before uploading the files. This approach completely sidesteps common issues like echo, internet dropouts, and robotic-sounding voices.
Local vs. Cloud Recording Platforms
Understanding the fundamental difference between these two approaches is critical. Let's break down how they stack up so you can make the right call for your B2B podcast.
Remote Recording Software Comparison: Local vs. Cloud
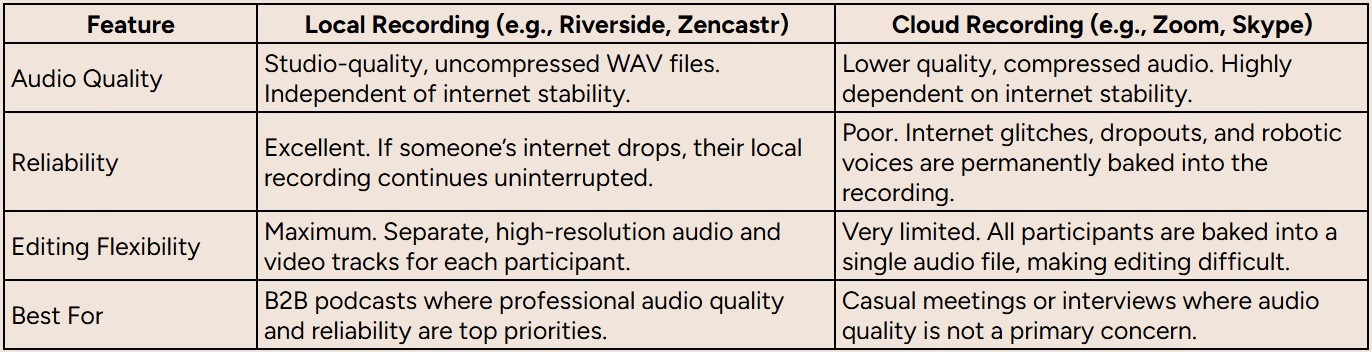
For any serious B2B podcast, local recording is the only way to go. Choose platforms like Riverside and Zencastr because they were built from the ground up for exactly this purpose. They capture pristine audio and video directly on each participant's machine before uploading those files to the cloud.
This completely decouples the recording quality from the live internet connection. So, if your guest's Wi-Fi stutters for a moment, the conversation might lag, but their high-quality local recording remains perfectly intact. On a cloud platform like Zoom, that same stutter becomes a permanent, unfixable flaw in your final audio.
Basing your tech stack on a local recording platform is the single most important move you can make to guarantee a professional sound, every single time.
Executing a Smooth Live Recording Session
Alright, this is the moment. All that prep work, the guest onboarding, the tech checks, it all comes down to this. Time to hit record and capture a great conversation.
Believe it or not, a smooth live recording has very little to do with winging it. It’s all about actively managing the tech in real-time. Your main job, besides steering the conversation, is to be a hawk. Keep one eye on the audio levels, make sure every track is actually recording, and be ready to jump on any glitch that pops up. This turns what could be a show-stopping disaster into a barely noticeable hiccup.
Dialing In Your Platform for Isolated Tracks
Before you even think about hitting that big red button, you need to confirm one critical setting: your software must be set to capture isolated tracks. You might also see this called "ISOs" or "multitrack recording."
This is non-negotiable for a professional B2B podcast. It’s the one setting that gives your post-production team total flexibility. It simply means that the platform saves a separate audio and video file for every single person in the recording.
When you have isolated tracks, your audio engineer can work magic:
- Kill the crosstalk: If you and your guest accidentally talk over each other, the editor can duck your volume without touching theirs. Clean and simple.
- Fix individual audio problems: Is one person’s mic humming or way too quiet? No problem. It can be treated independently without messing up the whole mix.
- Create dynamic video edits: For video podcasts, separate video files are a must. They allow your editor to make engaging cuts and switch between speakers to keep viewers hooked.
Most serious recording platforms like Riverside or Zencastr do this automatically, but it never hurts to pop into the settings and double-check. If you're still weighing your options, our guide on the 12 Best Podcast Recording Apps For B2B Success In 2025 breaks down the tools that nail this.
Building a Bulletproof Redundancy System
Here’s a hard truth: even with the best cloud-based software, things break. Computers crash. Files get corrupted. Connections drop at the worst possible moment. That’s why you absolutely need a backup plan. Redundancy isn't for amateurs; it's what the pros do.
The easiest and most effective way to do this is to run a secondary, local backup recording of your own audio. While your main platform is busy capturing everything in the cloud, you can simultaneously record your microphone's direct input using a separate program on your computer.
Pro Tip: I never, ever hit record without a local backup running. I just use a simple, free digital audio workstation (DAW) like Audacity or GarageBand. It takes literally 10 seconds to set up and has saved my bacon more than once when a primary recording went sideways.
Think of this local file as your insurance policy. If anything catastrophic happens to the cloud recording of your voice, you have a pristine, high-quality copy ready to send straight to your editor. It’s a tiny bit of effort for a massive amount of peace of mind.
Live Monitoring and Troubleshooting
During the session, you're juggling two roles: engaging host and eagle-eyed technician. Keep your recording platform's dashboard up on a second screen so you can see everyone's audio meters at a glance. You're looking for levels that are consistently bouncing in the green and occasionally tickling the yellow. If you see them hitting the red, that means the audio is "clipping" or distorting, and you need to ask that person to lower their mic gain.
Here are a few common issues that pop up and how to handle them without breaking a sweat:
- Internet Glitches: If a guest's video freezes, don't panic. The beauty of local recording platforms is that their audio and video are still being saved perfectly on their end. Just calmly pause the conversation, give their connection a moment to stabilize, and then pick up right where you left off. The editor will stitch it together seamlessly.
- Microphone Problems: Hearing pops, static, or a sudden volume drop? It’s almost always a loose cable. Politely interrupt and ask the person to quickly check that their USB or XLR cable is plugged in snugly.
- Sudden Background Noise: A dog starts barking, a siren wails past, and it happens. The key is to reduce background noise in your microphone before you even start, but for unexpected sounds, just hit pause. Ask the guest if they can quiet the dog or wait for the noise to pass. These small breaks are incredibly easy to edit out, and your listeners will thank you for the clean audio.
Streamlining Your Post-Production Handoff
You just wrapped up a fantastic conversation, and all the raw files are sitting on your hard drive. Hitting "stop record" might feel like the finish line, but for your post-production team, it’s really just the starting gun. A clean, organized handoff is the secret weapon for an efficient workflow, saving hours of guesswork and making sure the final episode is top-notch.
An editor’s worst nightmare is a chaotic file dump of unlabeled tracks. It forces them to waste precious time piecing together who said what, syncing up different audio streams, and hunting for that one key moment you mentioned offhand. This isn't just inefficient; it's a recipe for costly mistakes and a blown release schedule.
The goal here is simple: deliver a package so clear and well-organized that your editor can jump straight into the creative work. A few minutes of prep on your end translates directly into a faster turnaround and a much better final product. It all starts with a rock-solid system for your files and folders.
Creating an Editor-Friendly File Structure
Your editor will thank you for bringing order to the chaos. A logical folder structure and a consistent file naming convention are the twin pillars of a smooth handoff. This simple system removes all the ambiguity and ensures every single asset is exactly where it’s supposed to be.
First, create a main folder for each episode. Inside that, build out a clear sub-folder system. This keeps your raw audio, video, and any supporting documents separate and dead simple to find.
Here's a folder structure that works wonders for us:
- /01_Audio_Raw/ (This is for all the .wav files)
- /02_Video_Raw/ (And this is for all the .mp4 files)
- /03_Assets/ (Stick your intro/outro music, logos, etc. in here)
- /04_Editor_Notes/ (Your notes doc lives here)
Next, and this is crucial, rename every single raw file before you send anything over. This one small action immediately tells the editor which track belongs to whom.
Use a clear naming convention like this: [EpNumber][GuestName][TrackType]_[Participant].wav
- Example: 042_JaneSmith_Audio_Host.wav
- Example: 042_JaneSmith_Audio_Guest.wav
This step might seem small, but it’s a massive time-saver. It eliminates any confusion and lets your editor immediately drop the right files into their timeline and get to work.
Providing Clear and Actionable Editing Notes
Your brain is the one asset your editor doesn't have access to. During the recording, you were mentally flagging key moments, awkward pauses, and insightful quotes. A simple document with these notes is the bridge that connects your live experience to the final polished edit.
Create a shared document (a Google Doc works perfectly) and fill it with time-stamped notes. This doesn’t need to be a full transcript, just a bulleted list of helpful pointers.
Your editing notes should be a treasure map for your post-production team. Clearly mark where the gold is buried, the killer quotes, the awkward pauses to cut, and the key takeaways, so they can craft the perfect narrative without wasting time searching.
A solid set of notes must include:
- Timestamped Edits: Note specific times to cut out a cough, a long pause, or a section that just didn't land. (e.g., 14:32 - Cut my long "ummm" before the question)
- Key Moments: Highlight the absolute best parts of the conversation. (e.g., 28:15 - Jane's story about her first sale is fantastic. Great clip for social.)
- Audio Issues: Point out any technical glitches you noticed in real-time. (e.g., 41:10 - Guest's mic has some static for about 20 seconds here.)
This document is also a great jumping-off point for learning more about what comes next. For a deeper look into what happens after the handoff, check out our complete guide on how to edit a podcast.
Connecting Post-Production to Marketing Goals
For a B2B podcast, the episode itself is just the beginning. The real value is unlocked when you repurpose that content to fuel your broader marketing engine. Your handoff document is the perfect place to align your production team with your marketing objectives from the get-go.
As you're recording, keep an ear out for soundbites that can be transformed into marketing assets. Make a note of these in your document so your editor or marketing team can pull them easily.
Look for these content goldmines:
- Quote Graphics: Pinpoint short, impactful quotes that would make perfect graphics for LinkedIn or X.
- Video Clips: Identify 30-60 second segments where your guest delivers a powerful insight; these are perfect for short-form video.
- Newsletter Takeaways: Note the main themes or actionable tips that can be quickly summarized in your next email newsletter.
By flagging these moments upfront, you ensure your podcast becomes a central pillar of your content strategy, not just an isolated audio file. This simple habit turns a single remote recording session into a dozen unique marketing assets.
Your Remote Podcasting Questions, Answered
Even with the slickest workflow, you're going to have questions. Everyone does. When you're trying to nail down how to record a podcast remotely, little gremlins always pop up, from weird tech hiccups to figuring out how to get the best possible sound.
I've rounded up the most common questions we get from B2B podcasters. The goal here is to give you some quick, practical advice you can use right away to make your next recording session a whole lot smoother.
What's the Best Software for Recording a Remote Podcast?
For any serious B2B show where quality and reliability are non-negotiable, you must use a dedicated local recording platform. I'm talking about tools like Riverside or Zencastr.
These platforms are built for one job and one job only: capturing clean, isolated audio and video tracks for every single person, recorded directly onto their computer.
That "local recording" part is the secret sauce. It completely takes internet glitches out of the equation. A guest's spotty Wi-Fi simply won't nuke your final audio file. Compare that to something like Zoom, which records from the cloud; any lag or drop-out gets baked right into the recording, and you can't fix it later.
Can't I Just Use Zoom to Record a Podcast?
You can, but you're making a massive trade-off on quality. Zoom is built for meetings, not for creating professional content. Its audio is squashed and compressed to save bandwidth, which leaves you with a thin, tinny sound that just screams "amateur."
The real killer, though, is that Zoom usually mashes everyone into a single audio track. This leaves your editor with zero room to maneuver. They can't fix crosstalk, and they can't balance out someone's mic level if it's too quiet or too loud. You can dig into Zoom's settings to enable separate audio files, but the quality still doesn't hold a candle to a proper recording platform.
My two cents: Using Zoom for a serious podcast is like using your phone's camera to shoot a Hollywood movie. Sure, it's technically possible, but the result will lack the professional sheen your B2B audience expects. Stick to local recording platforms. It's worth it.
How Do I Get My Guest's Audio to Sound Better?
This is probably the single most important thing you can focus on. The easiest win? Insist they use wired headphones or earbuds. I can't stress this enough. This one move prevents audio feedback and echo, which are an absolute nightmare to try and remove in post-production.
After that, here are a few other actions to take:
- Pick the right room: Ask them to find a small room with soft things in it, carpets, curtains, a big comfy couch, or a bookshelf full of books. All of that stuff will soak up sound and kill echo.
- Mic placement is key: If they have an external microphone, tell them to place it about a fist's distance from their mouth, and slightly off to one side. This avoids harsh "p-pop" sounds.
- Send them a "guest kit": For your A-list guests, mail them an inexpensive USB mic like the Audio-Technica AT2020. The small investment pays off massively in the final sound quality.
What Kind of Internet Speed Do I Need for This?
While local recording platforms are pretty forgiving, you still need a stable internet connection for the live conversation to feel natural. For a good, clean session, tell your clients that everyone involved should have at least 50Mbps+ upload speeds.
Latency, the delay in the signal, should also be under 150ms to keep the conversation from feeling awkward and laggy. You can find more industry benchmarks by checking out these professional podcasting standards on riverside.
A wired Ethernet connection is always, always, always better than Wi-Fi. If you or your guest has to use Wi-Fi, get as close to the router as possible and kick everyone else off the network. No Netflix streaming or online gaming during the recording!
Do I Actually Need a Backup Recording?
Yes. One hundred percent, absolutely. Relying on a single recording is like walking a tightrope without a net. It's a gamble you just don't want to take. Files get corrupted, cloud uploads fail, and each just decides to have a bad day. Your backup is your professional insurance policy.
The easiest way to do this is to run a local backup of your own audio. While your main platform is recording everyone, just open up a free program like Audacity or GarageBand and hit record. It will capture your microphone's input directly to your hard drive.
That way, if something catastrophic happens to the main recording of your voice, you have a pristine, high-quality copy ready to go. It takes 30 seconds to set up and has saved countless episodes from being lost forever.
Ready to stop sweating the technical details and just focus on creating a killer B2B podcast? At Fame, we handle the entire production workflow, from finding and booking guests to recording, editing, and promotion. We help you build real authority and drive business results. See how our B2B podcast production agency can make it happen for you.